Do-it-yourself washing of car nozzles
Do-it-yourself flushing of injectors can be done without removing them from the engine or after dismantling. The quality of washing nozzles with your own hands in one way or another is approximately the same. The only difference is that after flushing without dismantling, it is advisable to change the oil. In addition, by flushing the dismantled injectors, you can evaluate the result of your work.
Signs of Injector Contamination
- Difficulty starting the engine.
- Unstable operation of the engine at idle.
- High fuel consumption.
- Detonation.
- Reduced engine power.
Of course, the appearance of these symptoms does not only occur when the nozzles are dirty, so do not rush to change them. First check how they spray fuel or try washing them yourself.
According to statistics, the nozzle works for at least 120 thousand kilometers of the car. And for its smooth operation, it is recommended to wash it at least four times during this time.
The intensity of injector fouling can be divided into three stages:
- Reducing throughput by 5-7%. Increase in fuel consumption by no more than 3 liters per 100 kilometers.
- Reduction of throughput by 10-15%. Uneven engine idling, mumbling exhaust sound. Noticeable drop in power. Detonation, acrid smell of exhaust gases. Increased fuel consumption by more than 3 liters per 100 kilometers.
- Reducing throughput by 20-50%. The engine runs intermittently, a couple of cylinders may not idle. Shots in the air filter due to lean mixture. Signs of the first two stages are greatly enhanced.
Flushing without dismantling
Of course, you can flush the injector yourself by simply adding a detergent additive to the fuel tank, but the method described below is more effective.
To flush the nozzles with your own hands without removing them from the engine, you need to make a device for supplying pressurized flushing fluid to them. For this you will need:
- Fuel filter.
- Two collars.
- 1.5 m hose. It should be the fuel supply hose for the car. Then it will fit along the inner diameter and will not be destroyed by the flushing liquid.
- Two liter plastic bottle.
- Drill with a diameter of 13 mm.
- Automobile compressor for pumping wheels.
- Two valves for tubeless wheels.
Making the device:
Drill Ø 13 mm holes in the bottom and cork of the bottle. Insert nipples for tubeless wheels into them. Unscrew the nipple from the valve in the cap. Then put a hose on it and secure it with a clamp. Connect the fuel filter inlet to the other end of the hose and also fix it with a clamp. A do-it-yourself device for washing nozzles is ready. 
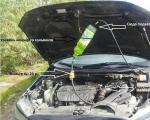
To flush the injectors without removing them from the engine, first start the engine and warm it up to operating temperature. After that, you need to reduce the pressure in the fuel line. To do this, disconnect power or ground from the fuel pump and start the engine. When the pressure in the gas line equals atmospheric pressure, the engine will stop working. Now remove the fuel line hose from the metal tube attached to the car body. Insert the fuel filter outlet of the injector cleaner into it and tighten the clamp on the end of the hose. Remove the cap from the bottle and pour the nozzle cleaner into it. Screw the plug back on and shade it. Attach the compressor boost hose to the valve at the bottom of the bottle. Hang the bottle upside down on the open hood. Turn on the compressor and create a pressure of about 3 kg / cm 2 inside the bottle. Now, when flushing enters the nozzles instead of gasoline, you need to start the engine. It will run on it like gasoline. To flush the nozzles, you need to burn about a liter of flushing fluid. After 15 minutes of running the engine at idle, turn off the engine and wait 15 minutes to get the blockages as wet as possible. Then start the engine and burn the liquid. 
While flushing is in progress, you need to monitor the pressure in the bottle, and when it decreases, turn on the compressor. Above 3 atm. You don't need to pressurize the bottle. When the flushing in the bottle is over and the engine stops, it is necessary to dismantle the flushing system and restore the regular engine power circuit. After that, you should change the oil with an oil filter. This must be done due to the fact that part of the flushing fluid will not burn in the cylinders, therefore it will be removed from the cylinder walls by oil scraper rings and drain into the sump, diluting the oil. Sometimes after cleaning the injector with your own hands in this way, the spark plugs fail, and they have to be changed. 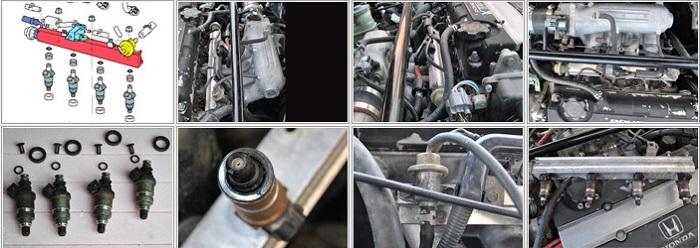
Flushing after dismantling
To do this, you will need: two cans of carburetor cleaner, an electric bell button, insulated wires, a 12 V 21 W light bulb (for example, from a turn signal light), an injection syringe and a roll of PVC electrical tape, two terminals suitable for the nozzle contacts . The syringe must be chosen in such a size that the inlet part of your nozzle with an o-ring is tightly inserted into it. Often a syringe with a volume of 2-3 cm 3 is suitable.
Dock the tube from the spray can with the nozzle of the syringe, and wrap the joint with electrical tape.

Attach the tube to the can, press its valve and the electric button. Cleaning fluid will come out of the atomizer. Continue flushing until the spray is fine and the fan is wide. If do-it-yourself soaking and washing does not bring the desired result, then the deposits on the sprayers are too dense and cannot be chemically cleaned with your own hands. Then you need to use an ultrasonic bath for cleaning.