Removal and installation of the front bumper vaz 2114
Relatively often, people are interested in how to remove the front and rear bumpers on the VAZ 2114 and 2115. This work may be required in several cases. Most often, dismantling is carried out if it is necessary to eliminate the damage that the bumper receives in a fair amount. Affect our not always ideal roads and driving features. At the same time, people are often afraid of this simple occupation. Although, the process usually does not cause any particular difficulties.
In principle, the work is about the same as when dismantling many other decorative elements. Replacement can be performed in any garage with a minimum of tools.

What do you need?
How to remove the front and rear bumper on the VAZ 2114 and 2115? The question is quite common. For work you will need the following things:
- Keys with socket 10;
- Keys (13);
- Crosshead screwdriver.

Withdrawal front bumper
The hardest part is removing the front body kit. Usually foglights are installed on it, which somewhat complicates the process of repair work. Dismantling is carried out in the following order:
- We remove the fender liner from the front arches, this will greatly facilitate the work;
- Removing the trim from the headlights and radiator;
- 2 nuts securing the left edge of the bumper are unscrewed;
- After that, the edge of the bumper bends a little, which allows you to remove the studs of its fastening from the bracket;
- The next step is to unscrew the right edge of the bumper. All actions are similar to those described above;
- The fog lamp cover is removed from the latches;
- The screws holding the headlights are unscrewed. There are 6 in total;
- Foglights are removed together with the casing. Do not forget to disconnect them from the wires;
- Through the holes left after removing the fog lights, unscrew the nuts securing the bumper to the bracket. For this, it is most convenient to use a 13 head with an extension cord;
- The bumper is removed.

Withdrawal rear bumper
In many ways, the dismantling of the rear bumper resembles the process described above, but there are some features:
- The fenders are removed;
- With a “10” wrench, all nuts are unscrewed from the attachment points on the sides;
- Using keys with connector 13, unscrew the brackets. It is most convenient to do this with a ring wrench or head;
- Dismantle the bumper together with the amplifier;
- All screws connecting the amplifier and bumper are unscrewed, after which they are separated.

body kit repair
As a rule, this body element is removed in case of damage or for the purpose of painting. Therefore, below we will consider the main ways to repair the bumper. When removing, its condition should be assessed, sometimes the damage is so serious that there is simply no point in bothering with restoration. In other cases, it makes sense to tinker.
Let's start the review of methods with painting. This is an easy way to restore appearance bumper. It is usually used for minor abrasions, or simply to restore a faded color. To work, you will need the following:
- Putty;
- Primer;
- Dye.
If there are cracks, you will need a soldering iron. All damage should be soldered with reverse side. It is worth being as careful and accurate as possible. Do not burn through the bumper, otherwise you will get another problem. After soldering, do not forget to prime and paint the part. Sometimes putty has to be applied to the place of the crack.
Sometimes it happens that whole pieces of the bumper are lost. In this case, recovery will take a little longer than usual. You will need fiberglass and PVA glue. It is with their help that the missing piece of plastic is formed. After drying, you need to carefully putty the area and paint it. There should not be any particular problems with such a repair.
Conclusion. Unfortunately, the peculiarities of car operation in our country often lead to bumper damage. Therefore, very often you can hear questions about how to remove the front and rear bumpers on the VAZ 2114 and 2115. Experienced drivers and beginners ask about this. Actually, this is very simple work that does not require any special skills. The main difficulty can be the nuts of the fasteners, which have rusted during operation.
Some motorists were faced with the fact that they had to change the front bumper on the VAZ-2114. This could be due to the fact that its structure was destroyed or the structure itself was redesigned. Of course, I had to go to a car service, where they took not small cash for such a simple process. This article tells how to change the front bumper with your own hands
Video on how to remove the front bumper on the VAZ-2114
The video material will tell you about the process of replacing the front bumper of the VAZ-2114, and will also tell you about some of the nuances and subtleties of the process.
bumper replacement process
Scheme of the device of the front bumper
The front bumper of the car performs a protective function, which first absorbs a possible impact. IN Lately, the trend of automakers is such that it should have a decorative function and an aerodynamic one. In that case, what should take the hit?
For this, a special metal amplifier was developed, which just fulfills this role.
Before starting the replacement process, you need to decide on the tools. Which one is needed: a screwdriver with sets of nozzles or a set of screwdrivers, open-end and box wrenches for 8 and 10, a ratchet with a head for 13, a new bumper.
So, when the motorist has collected everything, you can proceed directly to the process.
Step by step process
Consider the step-by-step process of replacing the VAZ-2114 front bumper:
- We install the car so that you can freely get up from below to perform operations. Ideal for a pit or lift.
- We unscrew the bolts of the radiator grille.
Radiator grille bolt pattern
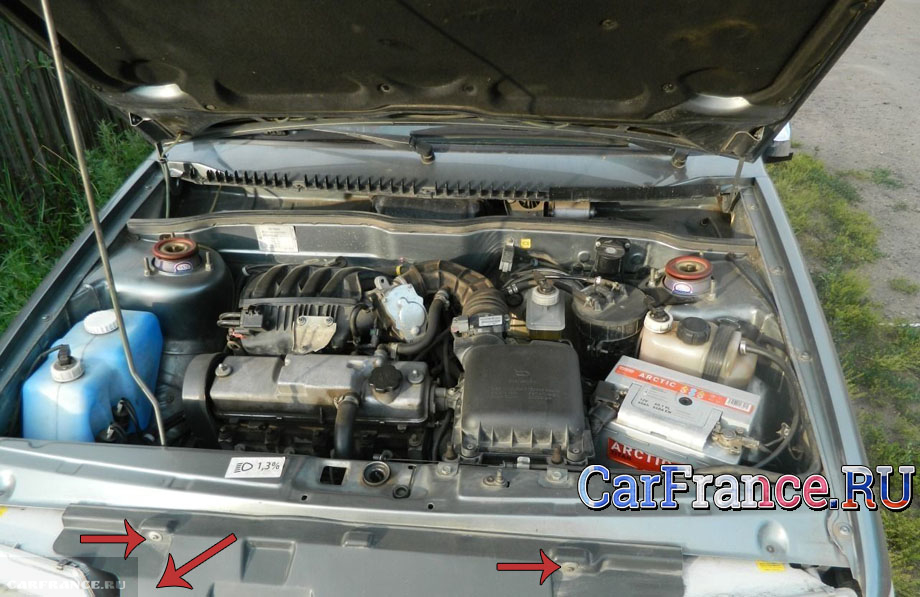
- We remove the number, under it there are two bolts. Under the license plate there will be two bolts that secure the bumper to the booster. They also need to be dismantled.
- We unscrew the screws securing the fender liner (protective arches of the front wheels).
- Using a 10 wrench, unscrew the two nuts on the side bumper mounts.

Removing the side mounts of the front bumper
- Pull the bumper forward and dismantle it.
- Installation is carried out in the reverse order.
Selecting a part on the VAZ-2114 (article)

General view of the original front bumper
2113-2803015 - the original catalog number of the front bumper manufactured by AvtoVAZ. There are no analogues of this part, so there are no options other than a factory purchase. average cost products is 6000-7000 rubles.
Reasons for removing the front bumper
There are several reasons why the front bumper will need to be removed. So, let's look at the main ones:
- Deformation, destruction or damage due to an accident.
- Dismantling to remove or repair elements that are under the protective element. This may be an amplifier, a headlight, a radiator frame or an extractor of the spars, as well as other reasons.
- Dismantling of the part for painting or restoration work.
- Other reasons.
tuning
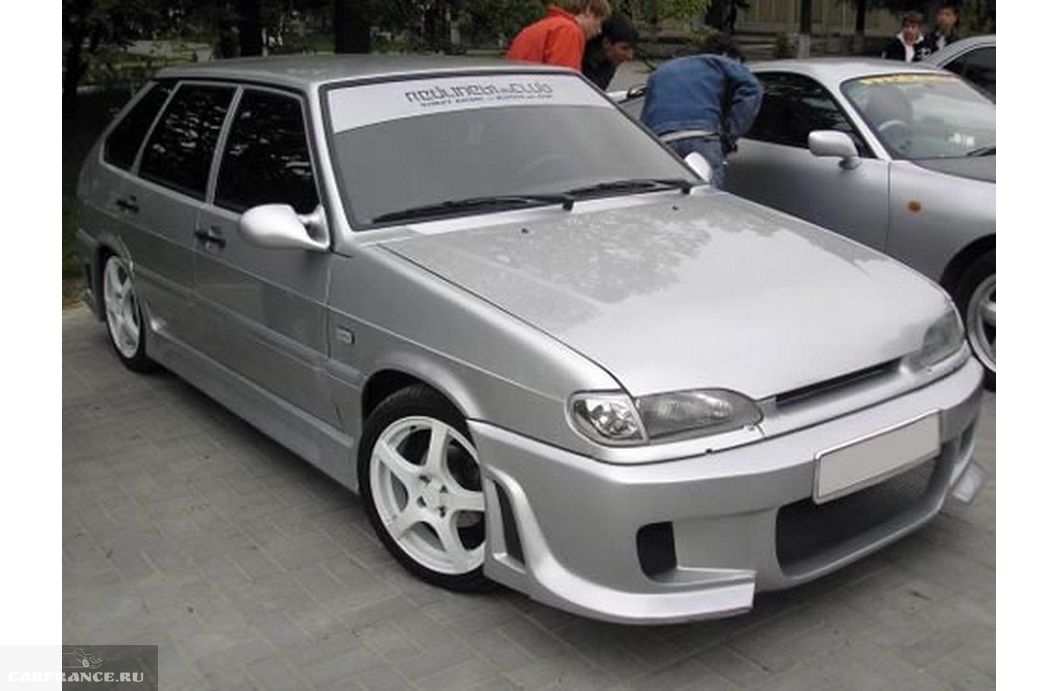
One of the options for tuning the front bumper
The dismantling of the front bumper is repeatedly required to improve performance, in other words, tuning. This is a fairly common practice, especially in the CIS countries.
Thus, the protective element can be completely modernized, and sometimes completely changed. There are a lot of tuning options, and each motorist independently chooses the design and rework option.

Minor refinement of the bumper — lip installation. Looks stylish and fits on a standard bumper
But, the only thing that remains unchanged in this case is the fasteners. Therefore, no matter how you change the appearance, the installation of the element is carried out in the same way as it was removed, only in the reverse order.
conclusions
Removing and installing the front bumper on the VAZ-2114 is quite easy and even a novice motorist can handle this process, the main thing is that there is a desire and hands grow from the right place. Well, and if the process described in the article seemed quite complicated, then you need to contact a car service, where everything will be done for an immodest fee.
header
Why does a car need a front bumper? This detail is an integral part of the body and performs not only decorative functions, as it may seem at first. Yes, its appearance should be written off in the general appearance of the car, but the main thing is completely different. Its purpose is precisely to protect the car from major damage in minor traffic accidents.
This device is essentially an energy absorbing device. In general, in its form it resembles a bar. Thanks to modern design findings, the front and rear views of this spare part can be made from the most various materials, including synthetic ones. The bent edges act as spoilers that increase downforce and prevent the birth of a whirlwind astern.
Your first protector
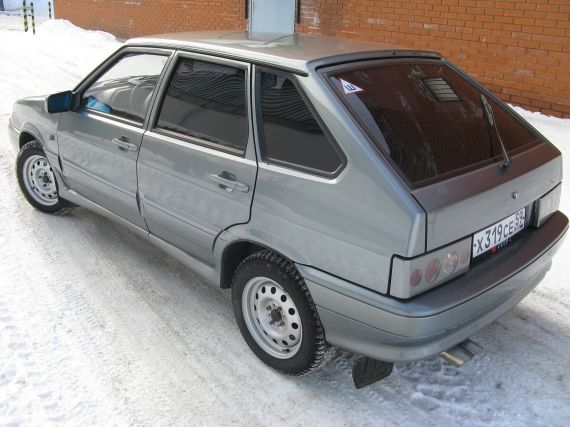
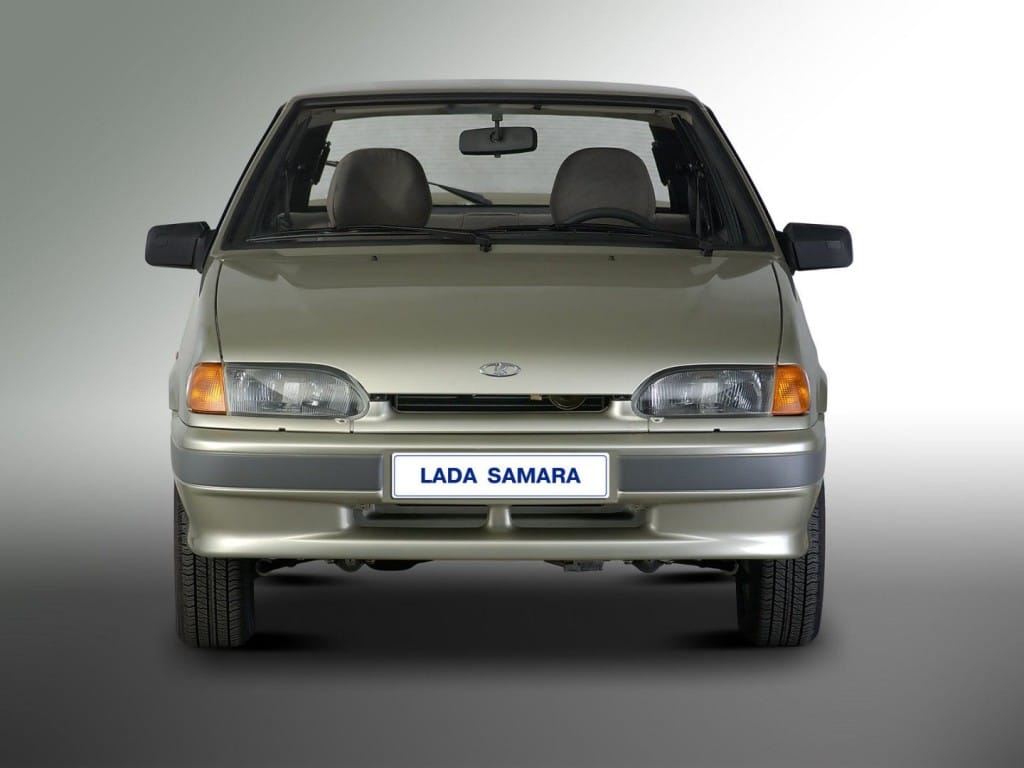
The five-door hatchback VAZ-2114 Samara-2 is a restyled version of the VAZ-2109 and differs from its predecessors in the original design of the front end with new headlights, hood, radiator lining, and moldings. In more detail, it is necessary to dwell on the bumpers.
Vaz 2114 has two of these - front and rear. Both of them are recently made of plastic. With what it can be connected?
To answer this question, one must turn to the physical nature of the impact in a collision. It will be assumed by the front (or rear) element. If it turns out to be metal, then in this case all the energy will go to the body (and, therefore, as a consequence, to the driver). Plastic, on the contrary, will play the role of a buffer and, upon direct contact, will not resist, but will fold. Thus, it will absorb some of the impact energy.
Of course, in this case, the plastic front bumper will definitely suffer and in most cases will become unusable. But precisely because of its nature, it will help save the life of a driver or a pedestrian. For the same purpose, the VAZ concern also increased the shape of the spare part itself. If you pay attention, on the model 2114 it looks more puffy. All this is aimed at increasing the safety zone of the VAZ 2114 model. This brand of car has a wider width so that, accordingly, there is a larger area of \u200b\u200bcontact with the subject of a collision. And the front bumper element will cover other body parts in 2114, sacrificing itself (although the rear one suffers no less when hit).
Most popular consumable
Such heroism is fully provided for by manufacturers, because this spare part has long become a consumable. It is for this reason that the part is produced in the color of the car body. There are certain advantages here as well. Chief among them is cost. Another positive bonus is that you do not need to spend time painting it. And the replacement itself will take no more than forty minutes.
They are painted as follows: at the very beginning they are painted over with a special primer for plastic. This must be done because at various temperatures the plastic can expand (and the paint will simply peel off).
What is ahead, what is behind this spare part with light dents is quite possible to repair on your own: you can do this by heating it with a hairdryer to a temperature of 50-60 degrees. So you can experiment even without contacting a car service, in your own garage, watching how the plastic takes on its original state.
Ease, convenience and great potential in use - these are the indicators that became the basis for the production of plastic parts to become a general global trend. VAZ, like other manufacturers, is not going to stop there - work is constantly underway to improve this body part (and not only 2114 models).
Additional accessories

Along with all the above improvements, it is quite possible to pick up some more decorative accessories for it. The most popular of them are:
- Pad on the front;
- Pad on the back;
- Net.
Let's dwell on each option in more detail.
Why are overlays needed?
Such details are usually used as an elegant and beautiful addition to general view car. Such a tuning detail for 2114 will be considered not superfluous, as it will have a large number of advantages.
The first one is, of course, appearance. The car will be transformed and will attract the attention of passers-by. And also get a more dynamic look. Each motorist is quite capable of acquiring exactly the lining that, in his opinion, will correspond to the general style of the car. And besides the decorative function, the front element is also an additional protection against minor scratches and damage and improves the aerodynamic characteristics of the car.
The main material for the production of overlays is the popular ABS plastic, which is also a very high quality material. A more budget option are chrome inserts. They are rectangular cutouts that run parallel to the wheels and look very nice. In addition, their task is to create an additional air flow that will cool the rear brake discs. Usually such products are attached in special places and give a sporty and elegant look to the car. There are options for the rear bumper element.
What are the overlays?
There are a large number of overlays on the VAZ 2114 model, which will add originality and elegance to the part. The following types can be distinguished:
- Molding;
- "Skirt".
Which one is better?
For example, chrome moldings will give a more dynamic look. They are usually installed along the decorative ribs in the front.
Being made in the form of a reflective tape, such “improvements” will look especially stylish at night, so they will give the car a cosmic and even fantastic look, and during the day they are quite capable of performing the function of parking lights.
The overlay skirt is made of plastic and helps to make the spare part more durable. It is located at the bottom and improves the aerodynamic pressing of the car to the road. A similar detail seems to push the air wall in front of the car.
By the way, there are such proposals for the rear element. They will be made of plastic and help make it more durable.
Replacement pads are also carried out on their own.
Net
Another addition is a mesh that can protect the radiator from stones and dirt flying from the road. Apart from this protective function, aluminum mesh for VAZ 2114 is a decorative element and can decorate the very appearance of transport. As a rule, it is not placed behind.
How to make a replacement ahead
How to do this for the front bumper for VAZ 2114?
One of the bonuses of the VAZ 2114 car is that in order to change the front bumper, it is not at all necessary to contact a car service. You can do it in your own garage. It’s also good that at VAZ you can buy a part of the color you already need, and the price of a new part will be several times less than the cost of repairing an old one. So the replacement is even more profitable economically.
Such a replacement will take about an hour of your personal time. For this event, you will need the following tools:
- Crosshead screwdriver;
- Ring wrench for 10 and 8;
- Socket with a knob for 13
The sequence of work will be as follows:
- Unscrew the three screws protecting the front wheel from the bumper with a screwdriver.
- Unscrew the two screws in the wheel arch with an 8 wrench.
- Unscrew the two nuts located at the bottom by 10 with a similar wrench.
- Do the same for the other side of the car.
- It remains to unscrew the four screws in front with a screwdriver (two are under the license plate, and two are in the lower windows).
- Remove the front bumper.
Such actions also apply to the amplifier - if it is also damaged, then it is quite possible to deal with it on your own.
How to replace bumper booster?
- After removing the main element, you only need to unscrew two more fastening nuts on each side with a 13 head.
- You do not need to touch the adjusting bolts on the amplifier mounting studs - we leave them in place.
- We twist from the old bumper to the new side brackets.
- We fix them with screws.
The reverse installation of the amplifier has its own characteristics. It is produced in a mirror order, but here you should pay attention to the fact that usually the amplifier can be adjusted in height, because it has slot-shaped holes. This makes it possible to mount them lower or higher (it all depends on the gap between it and the headlights).
There are similar slots on the side mounting brackets, which helps to adjust the gap between it and the wing.
Removing and replacing the bumper element at the rear of the car
How to replace this spare part on the back?
If the rear bumper of the car is damaged, it is quite possible to change it yourself. In this work, it is best to follow the sequence:
- At the very beginning, we disconnect the wires that are needed in order to disconnect the wires intended for the lamp that illuminates the license plate.
- Unscrew the fasteners to the bumper body with a wrench (the screws are located on the sides).
- Loosen the remaining bolts.
- Carefully pull the beam towards you and remove it together with the brackets and the beam.
- Loosen the license plate screws.
- Remove rear element.
- Carry out installation in reverse order.
- Connect the lamp wires above the license plate.
- The bumper has been replaced.
At the end of the assembly, be sure to check the reliability of fastening: for this, it will be enough to grab the rear bumper with your hand and pull it slightly - at the same time, it should hold well.
Instructions for the repair and replacement of body parts, the steps for disassembling and removing the doors of the Lada 2115, the procedure for assembling and installing the tailgate of the VAZ 2113, VAZ 2115, VAZ 2114. Removal and installation of bumpers Adjusting doors and hood, bumpers VAZ 2114, VAZ 2115, VAZ 2113 do-it-yourself body repair doors, hood, bumper, replacement
Installation and removal of bumpers VAZ 2114, VAZ 2115, VAZ 2113, Lada Samara 2
To remove the front bumper, disconnect the electrical wires from the fog lights (installed on certain modifications of Lada Samara 2 cars).
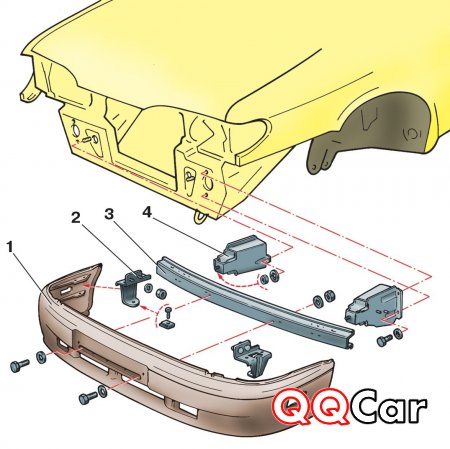
Details of a front bumper: 1 – facing of a bumper; 2 - side bracket; 3 - beam; 4 - front bracket
The front bumper 1 is removed from the front of the body assembly with the beam 3 and brackets for this, unscrew the nuts securing the side 2 and front 4 bumper brackets. Remove the six screws and remove the side brackets from the bumper. Remove the license plate by removing the two screws. Unscrew the two bolts and disconnect the beam with the front brackets from the bumper VAZ 2114, VAZ 2115, VAZ 2113. Inspect the bumper, brackets, beam and replace them if necessary.
Assemble and install the front bumper of the VAZ 2114 in the reverse order.
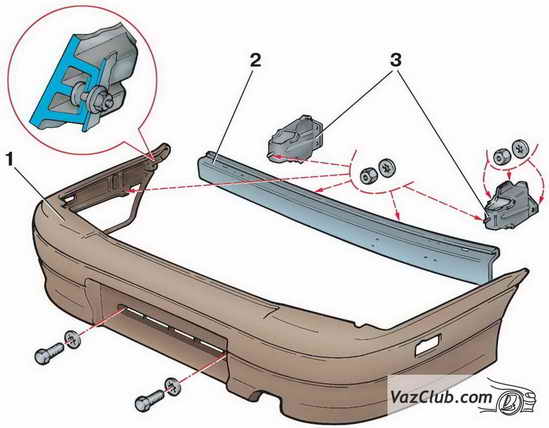
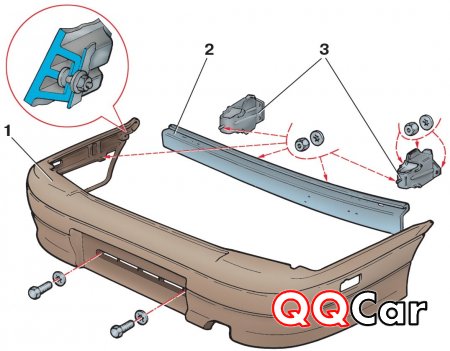
Details of a back bumper: 1 – facing of a bumper; 2 - beam; 3 - rear bracket
Before removing the rear bumper of the VAZ 2114, disconnect the electrical wires from the license plate light. The rear bumper of the VAZ 2115 is removed from the back of the body assembly with beam 2 and brackets 3. Unscrew the nuts for the side fastening of the bumper to the body and the nuts for fastening the brackets and remove the bumper. Remove the license plate from the bumper and unscrew the beam mounting bolts. Disconnect the beam with brackets from the bumper VAZ 2113. Inspect the elements of the bumper and fasteners, if a malfunction is found, replace them.
Assemble and install the rear bumper in the reverse order.
Doors, Hood, Bumper VAZ 2114, VAZ 2115, VAZ 2113
Front doorRemoval and installation of the front door VAZ 2114, VAZ 2115, VAZ 2113 |
Disassembly and assembly of the front doorAssembly and disassembly of the front door VAZ 2114, VAZ 2115, VAZ 2113 |
Door lock adjustmentAdjusting the front door lock VAZ 2114, VAZ 2115, VAZ 2113 |
Car bumpers are the first obstacle and support in a collision with any object. And now we are talking not only about the plastic lining, because the bumper is a combination of various elements. Among these elements, the main ones can be distinguished, but they differ in the front and rear bumpers.
Front bumper elements
Facing.
Beam.
Front and side bracket.
Rear bumper elements
Facing.
Beam.
Rear bracket.
How to remove the front bumper
Since the designs are slightly different, the replacement and repair of these parts will be carried out a little differently. First, let's analyze the replacement of the VAZ 2115 front bumper.
1. Disconnect wiring from foglights.
2. Turn off nuts of fastening of a forward arm.
3. Turn off nuts of fastening of a lateral arm.
4. Remove the screws.
5. Remove the side brackets from the bumper.
6. Remove the license plate screws.
7. Remove the license plate.
8. Disconnect the beam and front brackets from the bumper by unscrewing the two bolts.
9. When everything is removed, you can install the new front bumper in reverse order.
How to remove the rear bumper
It is not necessary to replace all elements, inspect and identify faulty or damaged ones. Now let's talk about the rear bumper.
1. Disconnect the bundle of wires that goes to the license plate light.
2. Turn off nuts of lateral fastening of a bumper.
3. Turn off nuts of arms.
4. Remove the license plate from the bumper.
5. Remove the bumper.
6. Loosen the beam bolts.
7. Separate the beam with brackets from the bumper.
8. Replace.
Again, change only the necessary parts. Bumpers have been replaced and now even in situations where you have to change a bumper right on the road, you will not be at a loss and quickly make the necessary manipulations. Recall that in the previous article we talked about