Toyota Corolla Auris Removal and installation of rear bumper Toyota Corolla Auris. Removing the rear bumper.
Often there are situations when it is necessary to remove the front or rear bumper from a Toyota Corolla car. There can be many reasons: from a banal cosmetic repair to the installation of additional protection on the radiator. The body kit removal process is no different and is largely similar on the 2006, 2008 and 2012 models.
To dismantle, you must:
- Open the car hood.
- The next step is to remove the radiator grille, for this you need to unscrew the bolts with a rubber casing, as well as another fastener that holds the radiator grille.
- The grill must be pulled towards you and the latches holding it should be unlocked.
- Toyota Corolla bumper rests on a special clip located in the center. She holds the body kit of the car.
In order to unlock it, you need to slightly unscrew the plastic fastener with a screwdriver (you should not completely unscrew it), and then you can simply pull it up.
- The next step will be the dismantling of two more fasteners, they are located under plastic protection, above the front wheels. For the convenience of the process, it is better to use a key with a head.
- There are self-tapping screws at the bottom of each side, they should also be unscrewed.
- Under the front body kit is a metal beam.

The part is attached to it with the help of plastic fasteners. In order to remove them, you will need a flat screwdriver, with which you can pick up the fastener, pull it out slightly and pull it down.
- The final step in dismantling the Toyota Corolla bumper is to remove the part from the car. For the body kit you need to pull down and gradually remove, starting from the right headlight.
It should be added that the installation front bumper carried out in reverse order.
Removing the rear trim
There are also situations when it is necessary to replace rear bumper. On the global Internet, you can find many videos on how to remove the bumper. In order to dismantle the rear body kit, on Toyota Corolla E120, AE101, E150 and Fielder cars, you need to carry out the following series of actions:
- Open trunk.
- Fold forward the carpet located at the bottom of the luggage compartment.
- Dismantle the mudguard assembly with the fender liner.

- Slightly shift the trim and dismantle the body kit mount from the fender liner
- On each side from the bottom, you need to unlock the fasteners with a screwdriver.
- After these steps, you can begin to dismantle the fasteners located in the center.
- After that, it is worth unscrewing the screws that connect the trunk and body kit (there are two of them, and they are located on the outside).
- Now the body kit can be slightly pulled away from the car body. It is pulled near the wings of the car, on each side.
- Also, behind the fender liner, it is worth pulling the edges of the bumper, and it will sag. It remains only to carefully unlock the brackets and remove the part.
Conclusion
Dismantling and installation of a car bumper is a simple matter and subject to absolutely every motorist. The driver requires accuracy, precision and perseverance. When installing it in place, gaps and backlashes may occur that were not there initially. A body kit installed in the wrong way will not hold tightly, and there will also be a possibility of losing this body element. Therefore, before asking the question “How to remove the front bumper?”, You need to read the instructions on how to install the front and rear bumpers on the Corolla 150, 120 and 101. All operations must be carried out accurately and accurately, because the use of excessive brute force may result in the need to purchase a new body kit.
We will need: minus screwdriver, Phillips and ratchet wrench with 10 socket.
It is advisable to remove and replace in a pit or overpass. Take care of this in advance and spread something soft and clean on the ground so that after removing it, put the bumper there.
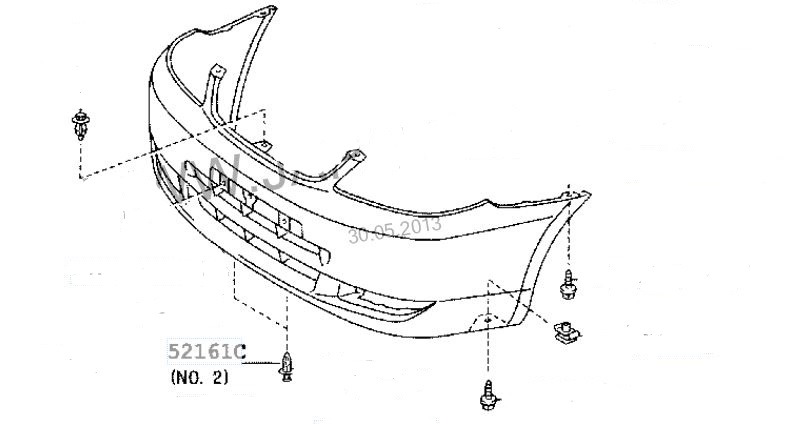
If the location of the bolts is not clear in the process, we check with this diagram. The diagram refers to our bumper.
We open the hood. The first step is to remove the central chrome grille. We unscrew the two bolts with a rubber casing around the edges as in the photo.

And another bolt in the center.

After that, by moving towards ourselves, we remove the grate, which is fixed on the grooves from below. Under the grill we will see the upper bumper mount. In the center it is connected with a plastic bolt. It is necessary to unscrew it by prying up.
It is not necessary to completely remove the bolt. Let's leave it hanging on the bumper, the main thing is that the connection is released.

We lower to the arches of the car under the front wheels. In the arches, we bend the plastic protection under which there will be a bolt holding the bumper on top. We unscrew on each side with a 10 ratchet wrench.


In the same places but at the bottom of the bumper Unscrew one more screw on each side. We spray with a bucket if it will be bad to go out.


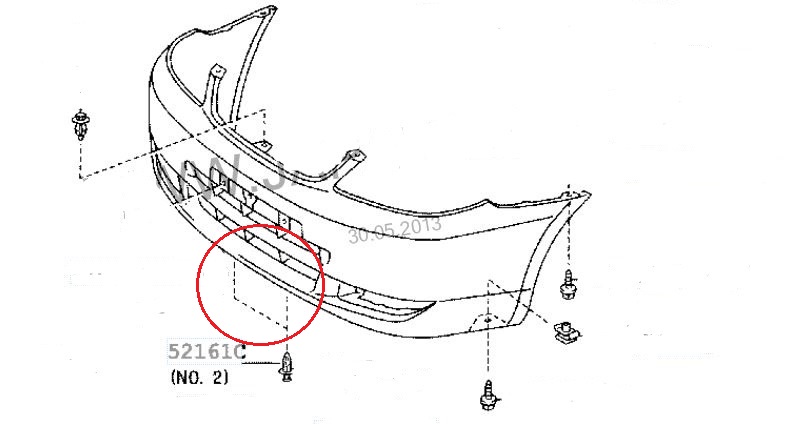
Now on the front side of the bumper, below the bumper there will be a mount holding the bumper with an iron body beam. The bumper is attached to it with two plastic bolts.
We pull them out with a screwdriver to the minus.

Now let's remove the bumper. First, we separate it from the wings, then, standing in front, we remove it from the grooves under the headlight.

The bumper of the car is removed for various reasons, sometimes a person just needs to carry out cosmetic repairs, sometimes to install protection on the radiator, and sometimes it’s just necessary. Below are sequential instructions for removing bumpers (rear and front) using the example of a Toyota Corolla car that is common today.

Removing the front bumper of a Toyota Corolla
Now we will step by step describe the steps to remove the front body kit of the Toyota Corolla:

Removing the rear bumper of a Toyota Corolla
Removing the rear bumper is not very difficult, but there are some nuances. So, in order to remove the rear body kit, you need to do the following manipulations:

Thus, the front and rear bumpers of the Toyota Corolla are removed. Now you can do all the necessary work yourself. It should be understood that the installation of body kits on the Corrola is not done in the reverse order. Installing Toyota bumpers is a little more difficult than removing them, since in addition to the intricate installation, it is necessary to set the gaps. It is also necessary to be aware that a similar body kit on another car brand may not be removed in the same way.


