Making a postcard for dad for February 23rd. The best postcard ideas for Defender of the Fatherland Day
Useful tips
Handmade cards are always a pleasure to give and receive. By February 23rd you can prepare several different cards and crafts made with your own hands. You can make them yourself or with your children and give them to your dad, grandfather, uncle, friend, colleague.
Today, the holiday of February 23 has ceased to simply be a holiday for military personnel. On Defender of the Fatherland Day congratulations to all beloved men.
To make a card or gift, you need to prepare a few details, but first you need to think about the design, about what exactly you would like to do.
In this master class you will learn how to make several types of cards and do-it-yourself gifts.
DIY crafts for February 23rd. Origami shirt

Video Lesson (underneath is a diagram in pictures)
To make a paper shirt you will need rectangular sheet of paper any color.
You can also choose shirt size. When choosing a size, you need to consider several details: the ratio of the length and width of the rectangle is 2:1; The sides of the shirt after assembling it will be 2 times smaller than the sides of the rectangle.

* You can first try folding an origami shirt using a regular sheet. Thus, you will learn where and how you can avoid mistakes when making a direct gift.
1. First you need to fold the rectangle in half, but along and not across. Next, you need to unfold and fold the edges of the paper towards the middle (see picture).


3. Prepare your sheet face down again. Fold the corners again to the fold lines you just made. No need to bend those little corners this time.


4. Now bend the upper part of the sheet with the folded corners in the part of the paper where the edge of the sheet intersects with the fold lines of the corners.


5. The next thing to do is to fold two ribs to the middle of your paper shirt and make sleeves (see picture), while holding the ribs with the finger of one hand.


6. You've done the sleeves and now it's time to move on to the collar. You may have already guessed that you need to start making the collar from the other end of the folded rectangle. To do this, fold the bottom edge of the sheet so that the collar is approximately 2 times shorter than the sleeve.

7. Turn the folded sheet over and make the corners of the collar.


8. Finally, fold the resulting sheet so that the edge aligns with the sleeves and collar. Straighten the corners of the collar and use glue to secure them.

You have made the base of the shirt. Move on to decoration. Add buttons. You can also add a corner of a handkerchief, a bow tie or a tie.
Scheme on how to make a paper tie for your shirt:
Using an origami shirt as a base, you can easily decorate your card. You can make a large shirt and use it separately as a gift.
You can also make several small shirts in different colors and attach them to one card.
On any holiday, the most important gift is a reminder that the man you love is important to you. For this purpose, a gift made with your own hands is what you need.
DIY frame-card for February 23
And if you are not inclined to knitting, then you can prepare such a colorful postcard frame, which not only looks original, but is also very simple to make. In principle, anyone can make such a frame.

You will need:
Wooden photo frame size 10x15
* It is better to choose white color. And if you have a dark frame, you can repaint it light using white acrylic paint and a sponge.
Colour pencils
Hot glue gun
* It can be replaced with transparent strong-hold adhesive.
Colored paper (in the shape of a square), for making a boat or airplane.
1. Prepare a light frame and select colored pencils of the desired size.
*To paint a frame with white acrylic paint, dip a sponge in the paint and carefully apply evenly to the frame. Next, leave the frame to dry.
* Pencils need to be selected so that they look beautiful on the frame.
2. Glue the pencils to the frame using a hot glue gun.
3. Draw a postcard and make a boat that needs to be glued onto the postcard, which in turn should be glued to the frame.
Cool congratulations on February 23
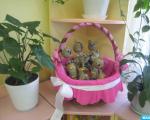
Men also like sweets, and therefore chocolates can be prepared and beautifully decorated.

You will need:
Wooden skewers
Colored paper
Double sided tape
Multi-colored thick cotton threads
PVA glue
Two chocolates in a wrapper
Scissors
Side cutters for cutting skewers
1. To make a sail, you need to cut out an isosceles triangle from paper with sides equal to 10 cm and a base of 12 cm.
2. Fold the triangle in half and insert a piece of skewer into its fold. Make sure that the end of the skewer protrudes just 1cm above the sail.
3. Now you need to glue the structure using PVA glue.
4. Apply double-sided tape along the entire length of the chocolate bar.
5. On the other side of the tape, remove the protective film and glue the mast with the sail as shown in the picture.
* The mast must be pressed between two chocolates.
* You can decorate the mast using colored paper flags!
Congratulations to the boys on February 23. Photo frame "Order"
With this gift you can reward your hero for all his achievements. This handmade order is suitable not only for an adult man, but also for a little boy. And most importantly, he will be pleased.

You will need:
Cork stand for hot dishes
Thin plexiglass
Satin ribbon (color blue, width 4cm)
Cardboard (thick paper)
Metal ring (2pcs)
Acrylic paint (gold color)
Colored paper
Eyelet 0.4cm, 1 piece (you can do without it)
PVA glue
Glue gun
Punch
1. Using PVA glue, prime the cork hotplate and paint over it using gold acrylic paint.
2. From cardboard or thick paper, cut out an eight-pointed star of such a size that the cork stand will fit as shown in the picture.
3. The star now needs to be covered with two layers of acrylic paint.
4. Use a glue gun to join the stand and star together. In this case, the recess in the stand should be on the outside.


5. Prepare plexiglass and cut out a circle from it, the diameter of which should be 0.1 cm larger than the diameter of the stand. This way you will ensure good fixation of the plexiglass in the photo frame.
6. Using a universal punch, make a hole in one of the arms of the star.
7. Insert the eyelet, which also needs to be secured, using the same punch, but with a special attachment for installing eyelets. Insert a metal ring into the hole.
8. Prepare a satin ribbon, thread it through the ring and make a bow.
9. Now you need to glue the second metal ring on the back side. It will be needed for fastening.


10. It's time to decorate the rays with triangular elements made from colored paper.
DIY gift for February 23rd. Keychain - shoulder strap.
In this master class you can learn how to make a military attribute with your own hands and give it to a man. Namely, you will learn how to make a felt keychain with embroidery as decoration.

You will need:
Burgundy felt (thickness 0.1cm)
Green felt (thickness 0.5cm)
Floss threads (different colors)
Copy paper
Eyelets 0.4cm (quantity 2 pcs)
Ring with chain (as part of a keychain)
Universal punch
1. Find a drawing of a soldier. Use transfer paper to transfer the design onto the felt.
2. Slowly pull the felt onto the hoop. Use the “simple double-sided satin stitch” technique and try to embroider a picture on felt. Next, you need to remove the hoop and cut out the image, leaving an allowance of 1.5 cm.

3. Prepare green felt and cut out 2 pieces from it in the shape of a small shoulder strap (both should be the same size). Now you need to make holes on both parts. To do this, you need to install the nozzle on the punch and punch.
Use a special attachment to secure the eyelets. You can also try to process this hole manually - just wrap the edges with threads of a suitable tone.
4. Using a hidden seam, it is tedious to sew felt with embroidery to one of the blanks made of green felt.

5. As for the other workpiece, here you need to make a slot in the form of a window.
6. For now, fold all the pieces and sew by hand using an over-the-edge stitch.

7. The top part needs to be decorated. To do this, sew it with red threads.
8. Insert a chain with a ring into the hole.

Postcard for February 23rd using quilling technique

You will need:
Paper
Simple pencil
Scissors
Quilling tool (can be replaced with a toothpick or awl)
Quilling paper
If you don't know about quilling, then watch two short video lessons on quilling for beginners.
Quilling for beginners (video)
1. Bend a piece of paper so that one half is longer than the other.
2. Using a simple pencil, mark the numbers 23 (see picture). You can simply draw numbers and cut them out, or you can cut strips from which you can then carefully fold the number 23.
3. Prepare quilling paper. Make blanks - twist the spiral using a toothpick.
4. Glue the quilling elements to your card.
5. Glue the number 23 on top.
6. You can decorate the card a little more, for example, by adding a red star, made using the quilling technique, or simply cutting it out of paper.
DIY postcard for February 23

You will need:
Colored paper (color: brown, red, golden)
Scissors
Glue (can be replaced with double-sided tape)
Printer
1. Make a blank by folding thick paper in half, drawing and cutting out a place for the star. You can print out an image of a star, cut it out, trace it on the blank, and then cut out the star on the blank itself.
2. Using scissors, you need to cut out the outline of the card, as well as the star on the front side. Next, fold the card in half.


3. Prepare a sheet of red paper and cut out a star from it. We need to make the star three-dimensional. To do this, bend the “ears” for gluing inward. In this case, the star itself must be bent so that its outer ribs go outward, and the inner ones, on the contrary, inward.


* You can use scissors to secure the ribs and prevent them from straightening out.
4. Use glue to attach the star inside the hole you made on the front of the card.
5. Now we need to decorate the card a little. To do this, prepare a golden sheet of paper and cut out a small star, as well as vertical and horizontal stripes.
Glue these elements of the card to the front side, namely in the places marked with a dotted line.
Postcard ideas for February 23 (video)
Poems from February 23
1.- Congratulations to you today
- From February 23
- This holiday is very significant
- And it was not invented in vain.
- May your spirit be healthy,
- You are the defenders of the country!
- Be a strong support for her
- And they are always faithful in everything!
- You are a man, which means you are a protector!
- Your family hearth and peace,
- Like a strong granite wall,
- You protect yourself from adversity.
- Be wise - a mind to match a man.
- Wisdom is more precious than a crown.
- Not the sage who is of higher rank,
- The one with the higher rank is the one who is wise.
- I want to congratulate my beloved
- I'm happy February 23rd,
- I can't leave you -
- You are my best.
- Congratulations, beloved husband,
- Happy February 23rd!
- Always be undaunted
- And also - love me.
- Bogatyrsky health,
- Many fun days
- And have a fun feast,
- And decent friends!
Not only grown boys, men and grandfathers are preparing for February 23rd. Even very young sons also want to be fully armed. Together with the poems learned responsibly, the child can ask his mother to make a voluminous postcard with his own hands for his father or grandfather.
Now we will make an original Boat gift for dad. You can draw or find any other template online, such as a tank.
Do-it-yourself voluminous postcard for February 23: master class
To work you will need:
- printed template
- colored cardboard
- white cardboard
- stationery knife
- simple pencil
- fine marker for signature

Let's start making a postcard
- Using the template, we draw the details on colored cardboard. If your printer prints on thick paper, you can print the design directly onto construction paper and then cut it out.
- We press a groove in the middle of the white cardboard sheet - this is the fold point. To do this, you can use a knitting needle, a ballpoint pen that no longer writes, or another object. Be careful not to cut through the cardboard!
- Glue the colored part of the card to the white sheet, leaving the boat free.
- We wait until the product dries, write a congratulation with a marker, and then fold the card in the marked place. You can make a line along the outline of the entire card with a marker. You can glue colored buttons to the sails, and bright paper twine to the hull of the ship.


Using multi-colored blanks and foam tape, you can make other items. They can be glued to cardboard or placed on a footrest as a stand-alone card.


Simple DIY postcard for February 23rd: photo
To work you need:
- thick paper or cardboard of any color
- corrugated cardboard (colored or self-painted)
- metal fittings – brads
- leg-split
- miniature wooden clothespin
- star stamp (if you couldn’t get one, you can cut out several stars from colored cardboard)
The process of making a postcard is quite simple.
Handmade cards are always a pleasure to give and receive. By February 23rd you can prepare several different cards and crafts made with your own hands. You can make them yourself or with your children and give them to your dad, grandfather, uncle, friend, colleague.
Today, the holiday of February 23 has ceased to simply be a holiday for military personnel. On Defender of the Fatherland Day congratulations to all beloved men.
To make a card or gift, you need to prepare a few details, but first you need to think about the design, about what exactly you would like to do.
In this master class you will learn how to make several types of cards and do-it-yourself gifts.
DIY crafts for February 23rd. Origami shirt
To make a paper shirt you will need rectangular sheet of paper any color.
You can also choose shirt size. When choosing a size, you need to consider several details: the ratio of the length and width of the rectangle is 2:1; The sides of the shirt after assembling it will be 2 times smaller than the sides of the rectangle.
* You can first try folding an origami shirt using a regular sheet. Thus, you will learn where and how you can avoid mistakes when making a direct gift.
1. First you need to fold the rectangle in half, but along and not across. Next, you need to unfold and fold the edges of the paper towards the middle (see picture).


3. Prepare your sheet face down again. Fold the corners again to the fold lines you just made. No need to bend those little corners this time.

4. Now bend the upper part of the sheet with the folded corners in the part of the paper where the edge of the sheet intersects with the fold lines of the corners.

5. The next thing to do is to fold two ribs to the middle of your paper shirt and make sleeves (see picture), while holding the ribs with the finger of one hand.


6. You've done the sleeves and now it's time to move on to the collar. You may have already guessed that you need to start making the collar from the other end of the folded rectangle. To do this, fold the bottom edge of the sheet so that the collar is approximately 2 times shorter than the sleeve.
7. Turn the folded sheet over and make the corners of the collar.


8. Finally, fold the resulting sheet so that the edge aligns with the sleeves and collar. Straighten the corners of the collar and use glue to secure them.

You have made the base of the shirt. Move on to decoration. Add buttons. You can also add a corner of a handkerchief, a bow tie or a tie.

Scheme on how to make a paper tie for your shirt:

Using an origami shirt as a base, you can easily decorate your card. You can make a large shirt and use it separately as a gift.
You can also make several small shirts in different colors and attach them to one card.
DIY frame-card for February 23
On any holiday, the most important gift is a reminder that the man you love is important to you. For this purpose, a gift made with your own hands is what you need.
If you know how to knit, then here is one idea for you - a knitted butterfly.

And if you are not inclined to knitting, then you can prepare such a colorful postcard frame, which not only looks original, but is also very simple to make. In principle, anyone can make such a frame.

You will need:
Wooden photo frame size 10x15
* It is better to choose white color. And if you have a dark frame, you can repaint it light using white acrylic paint and a sponge.
Colour pencils
Hot glue gun
* It can be replaced with transparent strong-hold adhesive.
Colored paper (in the shape of a square), for making a boat or airplane.
1. Prepare a light frame and select colored pencils of the desired size.
*To paint a frame with white acrylic paint, dip a sponge in the paint and carefully apply evenly to the frame. Next, leave the frame to dry.
* Pencils need to be selected so that they look beautiful on the frame.
2. Glue the pencils to the frame using a hot glue gun.
3. Draw a postcard and make a boat that needs to be glued onto the postcard, which in turn should be glued to the frame.
Cool congratulations on February 23
Men also like sweets, and therefore chocolates can be prepared and beautifully decorated.

You will need:
Wooden skewers
Colored paper
Double sided tape
Multi-colored thick cotton threads
PVA glue
Two chocolates in a wrapper
Scissors
Side cutters for cutting skewers
1. To make a sail, you need to cut out an isosceles triangle from paper with sides equal to 10 cm and a base of 12 cm.
2. Fold the triangle in half and insert a piece of skewer into its fold. Make sure that the end of the skewer protrudes just 1cm above the sail.
3. Now you need to glue the structure using PVA glue.
4. Apply double-sided tape along the entire length of the chocolate bar.
5. On the other side of the tape, remove the protective film and glue the mast with the sail as shown in the picture.
* The mast must be pressed between two chocolates.
* You can decorate the mast using colored paper flags!
Congratulations to the boys on February 23. Photo frame "Order"
With this gift you can reward your hero for all his achievements. This handmade order is suitable not only for an adult man, but also for a little boy. And most importantly, he will be pleased.

You will need:
Cork stand for hot dishes
Thin plexiglass
Satin ribbon (color blue, width 4cm)
Cardboard (thick paper)
Metal ring (2pcs)
Acrylic paint (gold color)
Colored paper
Eyelet 0.4cm, 1 piece (you can do without it)
PVA glue
Glue gun
Punch
1. Using PVA glue, prime the cork hotplate and paint over it using gold acrylic paint.
2. From cardboard or thick paper, cut out an eight-pointed star of such a size that the cork stand will fit as shown in the picture.
3. The star now needs to be covered with two layers of acrylic paint.
4. Use a glue gun to join the stand and star together. In this case, the recess in the stand should be on the outside.


5. Prepare plexiglass and cut out a circle from it, the diameter of which should be 0.1 cm larger than the diameter of the stand. This way you will ensure good fixation of the plexiglass in the photo frame.
6. Using a universal punch, make a hole in one of the arms of the star.
7. Insert the eyelet, which also needs to be secured, using the same punch, but with a special attachment for installing eyelets. Insert a metal ring into the hole.
8. Prepare a satin ribbon, thread it through the ring and make a bow.
9. Now you need to glue the second metal ring on the back side. It will be needed for fastening.

10. It's time to decorate the rays with triangular elements made from colored paper.
DIY gift for February 23rd. Keychain - shoulder strap.
In this master class you can learn how to make a military attribute with your own hands and give it to a man. Namely, you will learn how to make a felt keychain with embroidery as decoration.

You will need:
Burgundy felt (thickness 0.1cm)
Green felt (thickness 0.5cm)
Floss threads (different colors)
Copy paper
Eyelets 0.4cm (quantity 2 pcs)
Ring with chain (as part of a keychain)
Universal punch
1. Find a drawing of a soldier. Use transfer paper to transfer the design onto the felt.
2. Slowly pull the felt onto the hoop. Use the “simple double-sided satin stitch” technique and try to embroider a picture on felt. Next, you need to remove the hoop and cut out the image, leaving an allowance of 1.5 cm.
3. Prepare green felt and cut out 2 pieces from it in the shape of a small shoulder strap (both should be the same size). Now you need to make holes on both parts. To do this, you need to install the nozzle on the punch and punch.
Use a special attachment to secure the eyelets. You can also try to process this hole manually - just wrap the edges with threads of a suitable tone.
4. Using a hidden seam, it is tedious to sew felt with embroidery to one of the blanks made of green felt.

5. As for the other workpiece, here you need to make a slot in the form of a window.
6. For now, fold all the pieces and sew by hand using an over-the-edge stitch.
7. The top part needs to be decorated. To do this, sew it with red threads.
8. Insert a chain with a ring into the hole.

Poems from February 23
- Congratulations to you today
- From February 23
- This holiday is very significant
- And it was not invented in vain.
- May your spirit be healthy,
- You are the defenders of the country!
- Be a strong support for her
- And they are always faithful in everything!
- You are a man, which means you are a protector!
- Your family hearth and peace,
- Like a strong granite wall,
- You protect yourself from adversity.
- Be wise - a mind to match a man.
- Wisdom is more precious than a crown.
- Not the sage who is of higher rank,
- The one with the higher rank is the one who is wise.
- I want to congratulate my beloved
- I'm happy February 23rd,
- I can't leave you -
- You are my best.
- Congratulations, beloved husband,
- Happy February 23rd!
- Always be undaunted
- And also - love me.
- Bogatyrsky health,
- Many fun days
- And have a fun feast,
- And decent friends!
Print the template onto thin colored paper and cut out a rectangle. Trace it on a thick colored sheet and cut it out too.
YouTube channel Hand Made
Return to tissue paper. Cut the template along all the solid lines to create a design.
 YouTube channel Hand Made
 Fold thick paper in half and glue the prepared part to it. The ship will be on top, and a contrasting base will be visible through the sea and the anchor.
 YouTube channel Hand Made
 Print a small congratulatory inscription on colored paper, cut it out and glue it onto the card. Trace with a felt-tip pen. Draw dotted lines along the contour of the glued element and the postcard itself, simulating stitches. Sign the composition from the inside.
 YouTube channel Hand Made
 2. Folding card with a star
What do you need
- scissors;
- white thick paper;
- ruler;
- pencil;
- red, yellow, white and blue paper;
- glue;
- stationery knife;
- pen or felt-tip pen.
How to do
Cut out a piece measuring 17 x 15 cm from thick paper. Step back 8.5 cm from the narrow side and draw a vertical line. Draw another line 2 cm from this one.
Cut out a square with sides 11 cm from red paper. Make a star out of it, as shown in the video. Glue this element to the cardboard so that the top and bottom corners are located exactly on the second drawn line.
Using a utility knife, make cuts along the contours of the star on the right side. On the left, work the contours only up to the first drawn line. With pressure, draw something thin, but not very sharp, along the two marked lines, and then bend the paper. Write your congratulations on the back of the star.
Cut out a square with sides of 7 cm from yellow paper and make the same star as from red paper. Bend it along the marked lines so that it is voluminous, and glue it to.
Cut two thin strips from red, blue and white paper. Glue them diagonally to the white paper to create Russian flags. Attach finished flags with clearly defined contours to the lower and upper corners of the postcard.
Cut out a small thick strip of white paper, trim the corners to make a ribbon, and fold it. Write congratulatory words on it and stick it on the card.
3. Postcard for Superman
What do you need
- white, red and yellow paper;
- scissors;
- stationery knife;
- pencil;
- glue;
- white thick paper.
How to do
Print the template onto white paper and cut out the large piece. For internal areas it is better to use a utility knife. Trace the entire figure on red paper, and only the outline on yellow paper. Cut along the drawn lines.
Glue the red piece onto the yellow one. Place the piece at the bottom of the construction paper with the sharp end close to the edge. Fold the paper along the top drawn line and cut along the bottom.
Glue the colored shape onto the white one. Sign the inside of the card.
4. Postcard with a developing pattern
What do you need
- scissors;
- paper of two different colors;
- ruler;
- pencil;
- glue;
- thick film;
- black permanent marker;
- colored markers or felt-tip pens.
How to do
Cut out a rectangle measuring 19 x 14.5 cm from colored paper. Measure 1 cm on one narrow side and bend the sheet along this line. Then fold it in half crosswise. From the inside, on the side of the sheet where there is no bend, draw a smaller rectangle. Carefully cut out the resulting window.
Fold the card and trace it on a different color of paper. Add 0.5 cm on both long sides and cut out. Bend the piece along the marked lines. Lubricate narrow strips with glue and attach to the inside of the card. There is no need to glue the bottom part of the sheet. Then you will have a paper pocket.
Then glue the card together so that the holes are on both narrow sides. Cut out a rectangle measuring 15.5 x 8.8 cm from paper of the second color, and from paper of the first color - measuring 8.8 x 2 cm. Trace the larger shape on the film and cut out.
Fold the small piece in half lengthwise. Glue the part up to the fold to the narrow side of the rectangle, put the film on top, and then attach the second part of the small part. Details are shown in the video.
Draw a tank, plane or something else thematic under the film with a pencil. You can write a congratulation, but the letters must be large. Color the picture or letters. Cover the image with film and trace along the outline with a permanent marker.
Insert the sheet with the design into the pocket of the card, and the film into the paper window. Only the outlines of the picture will be visible from the outside. But if you pull the part, the color will appear. You can leave the card as is or sign it in the window.
5. Postcard costume
What do you need
- scissors;
- blue, white and red paper;
- ruler;
- pencil;
- patterned paper;
- glue;
- 3 buttons.
How to do
Cut a rectangle measuring 31 x 18 cm from blue paper. Draw lines on the two narrow sides at a distance of 8 cm from the edges of the sheet. Fold the paper along the marked lines. You will get a jacket.
Cut a rectangle measuring 34 x 14 cm from white paper and fold it in half crosswise. This will be the shirt for the suit. Insert it into the jacket with the fold down and glue the patterned paper on top.
For the collar, cut out a piece measuring 11 × 5 cm from white paper. Draw a line on the long side, 1 cm from the edge, and bend the piece to it. Cut off the top as shown in the video. Glue the remaining part on the collar to the top of the shirt, and attach it to the jacket. The shirt sheet should open downwards. All the details are in the video.
Close the jacket and make lapels by folding the paper diagonally at the top. Direct the ends of the white strip towards each other and form a collar. Cut out a square from red paper and make it as shown in the video. Glue it to your shirt.
From above, run a little scissors along the ends of the shirt so that they become semicircular. Cut two small long rectangles from blue paper. Twist them slightly and glue them to the bottom of the jacket on both sides. These are pockets. Attach buttons and a small handkerchief made of red paper. Sign the card on the inside of the shirt.
The design allows for variations. For example, you can add a vest and bow tie:
Or make a retractable shirt instead of an opening one:
6. Postcard with a helicopter taking off
What do you need
- blue thick paper;
- pencil;
- ruler;
- scissors;
- stationery knife;
- glue;
- White paper;
- markers;
- foam double-sided tape.
How to do
Make marks on thick paper on all sides at a distance of 1.5 cm from the edges and draw lines through them. Fold the sheets in half crosswise. Draw scissors along the lines on one side. On the other hand, cut out the drawn squares in the corners of the sheet and fold the resulting strips inward.
Open the future card and on the side of the paper where there are no folds, place marks at a distance of 5 cm and 8 cm from the fold on the left and right. At this height, mark a distance of 2 cm from the edges of the paper. Connect the dots with lines and cut out a window.
Close the card. To the right of the window, place the symbols at the same height on the curved strip. Use scissors to separate the intended piece. Cut a strip measuring 19 x 3 cm and get rid of the corners on one side. Attach the element horizontally to the strip you obtained from the window.
Glue white paper inside the card. Insert the connected strips inside as shown in the video. Glue the bottom and top of the card together. The strips should come out and expose the white paper. Write your congratulations on it.
Cut out clouds and a helicopter from white paper and color them. Use foam to glue the helicopter to the retractable strip and the cloud to the card.
7. Postcard with a three-dimensional ship
What do you need
- thick white paper;
- stationery knife;
- pencil;
- colored paper;
- scissors;
- glue.
How to do
Print the template and cut along the gray lines. Using pressure, drag something thin, but not very sharp, along the red and blue strokes. Gently bend the figure. Along the red lines you need to direct movements inwards, and along the blue lines - outwards.
Unfold the card and trace it on a colored sheet. Cut out and glue along the outline with white paper. The ship itself does not need to be attached so that it remains voluminous.
The postcard can be signed on the outside or on the inside next to the ship.
8. Postcard with a butterfly
What do you need
- colored thick paper;
- scissors;
- paper of two different colors;
- glue;
- glue gun;
- White paper;
- pen.
How to do
Fold a thick sheet of paper in half crosswise. Cut out three medium identical squares from paper of the same color. Fold each one in half and then in half again. Then unfold them and bend them along the lines in a zigzag pattern, as shown in the video.
Glue the folded parts to each other so that you get a large accordion. Cut out a small strip and a rectangle of the second color. Glue the strip in the center of the accordion and push the edges apart.
Attach the resulting butterfly to the card using a glue gun. Place a colored rectangle at the bottom, and on top of it - a smaller rectangle made of white paper. Write congratulations on this element, as well as inside the card.
Instead of a butterfly, you can decorate the composition with paper ties:
9. Card with a balloon
What do you need
- white and brown paper;
- blue paint;
- thin and wide brushes;
- scissors;
- pencil;
- paper of different shades of blue;
- double-sided tape - optional;
- yarn;
- black pen.
How to do
Fold a piece of paper in half. Using a thin brush, draw the outlines of the clouds in front, and using a thick brush, create a blue background, as shown in the video.
Cut out four identical circles from colored paper. Fold three of them in half. Glue them with their folds to the center of the fourth circle. Attach the balloon to the top of the card using glue or tape.
Cut four small strips from yarn and a basket for the ball from brown paper. Glue them from the bottom, draw circles under the yarn, and a thin mesh on the basket. In the lower cloud and inside the postcard.
10. Postcard with the Russian flag
What do you need
- scissors;
- red, blue and white paper;
- glue;
- green and white thick paper;
- black pen.
How to do
Cut out identical wide strips from red, blue and white paper. Glue the narrow edges of each of them. Attach the pieces to green paper.
Cut a long thin strip from a white thick sheet. Cut the top of the paper with scissors to create a diamond shape. Glue the strip to the left of the colored parts.
Cut out a ribbon from white paper, secure it under the flag and write a congratulatory inscription on it. Trace the ribbon and card along the outline. Sign the composition on the reverse side.
You need to congratulate your beloved men, grandfathers and fathers on Defender of the Fatherland Day in a special way. A handmade postcard will perfectly express love and respect. Some of them will require a mother’s painstaking work, others can be made even by a child. Choose according to your taste!
A postcard in the form of a men's suit, shirt, tie is a classic option that is suitable for congratulating the father of the family not only on February 23, but also on his birthday and any other holiday.
You can make a complicated card with many details that your imagination suggests. Or you can limit yourself to a simple scheme that children can handle quite well under the guidance of an adult. So, let's stock up on colored paper - and get to work!


You can put a congratulation inside the card on a separate sheet, or write it on the card itself.

A shirt made using the origami technique can be glued onto a regular postcard.

The simplest option for making a shirt postcard: make cuts on the sides and fold the edges of the “collar” towards the middle.


It is somewhat more difficult to make a postcard in the shape of a man's jacket. Below is a diagram of how to fold the paper.

Another folding pattern - this time you will end up with a shirt-shaped envelope. You can put your own baked cookies inside.

A real man looks great in a tie. Here is a diagram for folding a tie from colored paper.

The tie can be secured under the collar of a paper shirt.

The green shirt makes one think of a military uniform. After all, the holiday is dedicated to the Defender of the Fatherland!

The symbolism of the holiday on February 23 suggests a military theme. Therefore, stars, ribbons, weapons and military equipment would be appropriate. Khaki color and colorful camouflage will complete the look.


With the help of the proposed scan it will be easier to make this spectacular postcard.

Postcards that gain volume when opened look interesting. Hidden inside this postcard is a ship rushing across the waves straight towards the viewer. The main difficulty in manufacturing is to correctly glue the three-dimensional elements so that the postcard can fold and open; Therefore, before gluing, check the functionality of the elements. Rubber glue is good for this purpose, because... it allows you to adjust the position of the glued parts without damaging the paper.

Invite your child to decorate the card with the sun, clouds, and flying seagulls. It would be useful to equip the ship with an anchor and a life preserver!

This card using the through-cutting technique () can be done by more experienced needlewomen, but it is very impressive and will decorate dad’s desk!

Below is a template for cutting out a postcard with a sailboat.

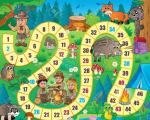
The vytynankas look very good against a contrasting background. You can make such a card together with your child: the mother will cut out the thin details, and let the child stick on the letters and numbers.

A white backing sheet is glued in so that the protrusions are perceived against a smooth, contrasting background. And on the next page you can place a congratulation.


The popular quilling technique can also become the basis of a postcard. Look how fun the congratulation looks against the backdrop of festive fireworks!

Silhouettes cut out of paper (colored or white) can be pasted onto a contrasting background to create an original postcard.


Cutting templates can be chosen according to your mood. For example, in a serious style.


Or in a humorous way.


Or even historical.


Military equipment can also be used.


If these pictures seem too complicated for you to use as cutting templates, then simply print them out (most pictures will be larger than they appear on the screen when saved) and offer them to your child as a coloring book. The painted drawings can be pasted onto a postcard and given to dad or grandfather.