Small cards for the New Year. DIY New Year's card ideas
For this we need:
- Colored cardboard of different colors (the thinnest, it will be more convenient to bend and glue, and the ends of the folds will not be whitish)
- Thick thick colored cardboard for the cover.
- White paper (landscape sheet).
- Sequins, sparkles and other “tinsel” for decoration.
- Scissors, glue
We try to involve children, even small ones, to the maximum. Of course, at the age of three, a child will most likely not be able to fold a beautiful “accordion” or cut out a Christmas tree, but it’s easy to stick it on, sprinkle it on, and decorate it.
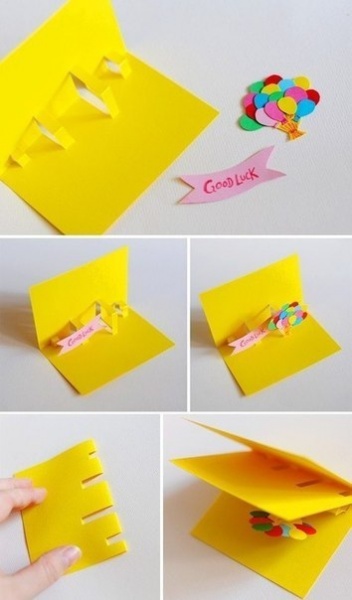
So, bend a sheet of thick blue cardboard in half and, if desired, glue an applique onto the front side. We also decorate the inside with snowflakes (you can use your finger to apply white paint or toothpaste to a snowball, sky, snowdrifts, etc.). Pre-cut to width to the depth of the postcard, we fold a white A4 sheet along the long side into an accordion (ideally, it’s better to take an even longer sheet, then the postcard will open wider, or make the folds very shallow, which is also not good - the effect of “snowdrifts” is lost). We coat the ends of the accordion with PVA and glue it to the base of the card. We close our card and squeeze its sides for a few seconds. All. All that remains is to glue pre-cut Christmas trees, houses, bunnies, etc. onto the “drifts”.

This photo shows how best to hold the accordion before gluing it on. After each accordion, close the card and squeeze it for a few seconds. Please note that thin uncoated cardboard is grabbed by PVA almost instantly, and when you try to remake or move the accordion, some of its ends may “remain” on the substrate.
You can make such a lush beauty from thin green cardboard.

The principle is the same - we make several accordions out of thin green cardboard,” but there is a nuance: we cut an A4 sheet along the length into strips of different widths and the width (depth) of the fold for each strip is also different: in the diagram I tried to show how approximately The part of the sheet I have drawn looks like.

As a result, we begin to bend the widest strip, making it the deepest folds - this will be the base of the tree. If you take a closer look at our Christmas tree, you will notice that the tiers of the tree are most advanced at the bottom, while the accordion at the bottom is folded with a large “step”. Further, moving towards the top of the tree, the depth of the tier and the depth of the bend decreases. We decorate the top of the tree with a star, gluing it tightly to the backing. The Christmas tree can be “dressed up” with sparkles and sequins
Cute three-dimensional New Year cards

In order to make such a card, you need to make triangular blanks from colored or decorative paper, and then glue the edges together sequentially. Decorate the card with a bow and write congratulations!
Volumetric Christmas tree
In order to make such a card, you will need to print two layouts on thick paper and arm yourself with scissors. Layout one, two (files in Word). It is better if your sheets are of different colors. Next we follow the photo instructions:

We decorate the resulting Christmas tree with sparkles, painted or glued toys, you can draw snowdrifts and a snowman, or gifts nearby, and we get, for example, this cute creation:

Origami Christmas tree
Even a small child can make such a postcard with his mother’s help. It is better to take paper with a beautiful background (for example, for scrapbooking). If the child wants to do it himself, take thinner paper, since it will be difficult for him to bend a thick sheet properly.


We decorate with ribbons, buttons and in the end we get these cute cards:

There is another way to make absolutely stunning cards, the manufacturing technology of which can be used not only for New Year’s holidays, but also for any others: March 8, February 23, birthdays.
These cards will occupy the recipient's attention for a long time and will cause a lot of delight. What do you need:
- Transparent plastic lid (from food packaging), you can use lids from sour cream or yogurt.
- Cardboard or thick paper for the base of the card
- Filling material: beads, seed beads, pictures, buttons, etc.
We fold the base of the card into a booklet; it should be at least 3 centimeters wider than our lid. We cut off the side of the lid with scissors, which is used for closing, leaving only the area for gluing (see photo).

In the front part of the card we cut out a round window with a diameter 2 mm larger than the diameter of the lid window. This can be done perfectly smoothly using a compass knife or just nail scissors.

Using a thin pencil, mark a place on the back half that will be visible through the window. Glue the lid to the hole in the front of the card.
On the second side we make our picture, and then glue both halves. Can be decorated with braid and sparkles.

And here Santa Claus and the Snowman are hurrying through the snowy snowdrifts))). The snowdrifts and cloud are cut out of felt, the characters are made from buttons and felt, the tree is a real twig, which is slightly pasted over with pieces of padding polyester, snowflakes are drawn with a helium pen. Something like this picture can be “hidden” inside a plastic lid.

We hope that we have inspired you a little to be creative and charged you with New Year's enthusiasm :) And you can learn more from our blog!
In contact with
It is customary to give cards for all holidays, both marked and unmarked on the calendar. This applies to major religious holidays, such as Easter, or personal and small ones, such as the day of acquaintance or a big purchase. All memorable dates need cards and New Year is no exception. As you know, you can’t buy something made directly by human hands in a store and you won’t find it anywhere else. Everything is unique.
We invite you to please and surprise your friends and acquaintances, colleagues and friends with New Year's cards. And to this we attach a selection of ideas for inspiration on the theme of New Year's cards.
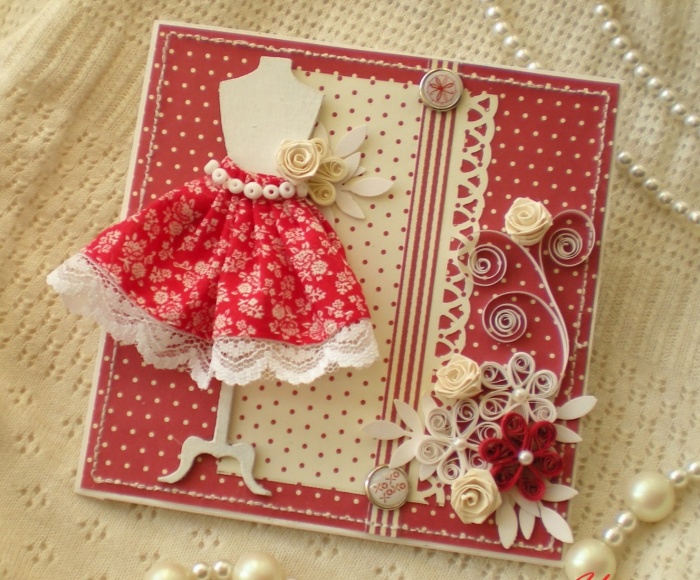
Idea No. 1. New Year card with a Christmas tree in a skirt
This is a voluminous postcard. If you plan to write a wish and then print it on a printer, then this should be done before decorating.

So, what do you need to create a card with a Christmas tree from corrugated paper:
2. Corrugated paper.
3. Scissors.
5. Double-sided tape and/or PVA glue.
6. Simple pencil.
Let's start by preparing the base for the card. To do this, take cardboard or thick paper and bend it in half. In principle, a standard move for a postcard. Next, on one of the halves, make a rough sketch of the future Christmas tree. This can be done with a couple of lines.
Now let's prepare the corrugated paper. You need to cut it into strips about one and a half centimeters in height, and in length, this value is curled depending on how fluffy the Christmas tree needs to be made. We suggest taking a third of the planned length as an allowance. The strips should be of different sizes to maintain the triangular shape of the Christmas tree. That is, both the shortest and longest strips should be available.

Now you need to glue the corrugated paper strips into place. It is better to start from the lower tiers and gradually move up. Focusing on the marks made earlier and using glue or double-sided tape, glue the strips, tucking them in a little. To get some kind of skirt with tails.
Upon completion, you can decorate the top of your Christmas tree with a star and glue sparkles, rain, bows or something like that.
You need to pick up some elements or come up with kind words. So that your postcard leaves an even greater impression on the recipient.
Idea No. 2. New Year card and some scrapbooking
In this option, it is better to print the wish in advance or print it on a separate piece of paper, which can also be played up and presented in an original way.

So, what do you need to create a postcard:
1. Thick colored cardboard or paper. A4 format will be sufficient.
2. Scissors.
4. Elements for decoration, at your discretion.
5. Scrap paper.
6. Any object shaped like a pencil.

Scarpbooking postcard, for beginners
Decide on the size of your Christmas tree. And based on this, plan how much paper you will need. More precisely, how many and what size do you need to cut rectangles from scrap paper.

Then, once you have decided on the number of rectangles and cut them out, you need to roll each one into cylinders. The basis of which will be a pencil or something cylindrical that you have on hand. You need to twist the tubes in the direction of width, and so that they keep their shape, after you remove the base, you need to secure the structure with glue.

After each rectangle is twisted into a tube, you need to connect all the tubes together with glue. Naturally, you should stick to approximately the shape of the Christmas tree, that is, a triangle.

Now let's work on the base of the postcard. Take a prepared sheet of cardboard or thick paper and fold it in half. Now you need to glue the Christmas tree onto one of the halves. But before that, the glue on the Christmas tree must set sufficiently and dry.

After the Christmas tree is glued to the base of the card, it's time to decorate it. For this purpose, you can use all kinds of decorations - buttons, miniature bows, ribbons, beads, rivets, sparkles, sequins, in a word, whatever your heart desires.

Decorations can be attached with double-sided tape.
Don't forget to write something nice to the recipient inside.
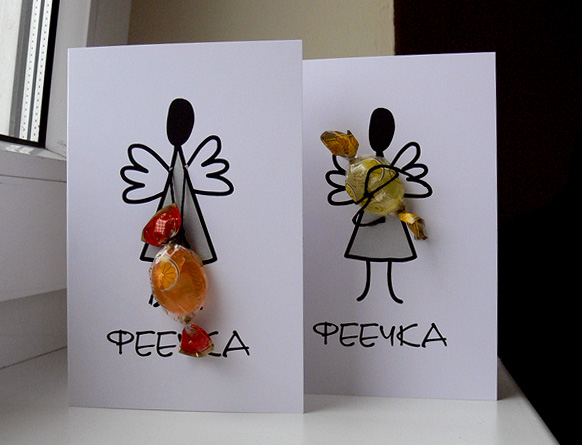
Idea No. 3. New Year card in the style of “children's hands”
This idea is perfect for little crafters and needlewomen. She is uncomplicated, but sweet and open, just like a child's soul. Let's not hesitate, call the kids and let's get started.

1. Colored cardboard. We suggest taking a classic color combination: red and green. But you are free to change them.
2. Sparkles, rhinestones, sequins.
3. Wrapping paper or candy wrapper.
4. Black fine marker.
5. Scissors.
6. Double-sided tape and/or PVA glue.
7. Elements for decoration, at your discretion.
8. Stapler.
9. Hot melt adhesive.

Let's start by preparing the base for the card. To do this, take red cardboard and simply bend it in half. You can slightly cut the corners of the resulting rectangle. This will make your message more interesting.

We make a Christmas tree. You will need to take green cardboard, fold it in half and then cut it. Bend one half into an accordion. Determine the width of the “step” yourself. We recommend at least one centimeter and no more than three. Grab one end of the accordion with a stapler; you can apply two staples for security.

Now let's create a stump. To do this, you need to cut out a simple rectangle from wrapping paper or candy wrapper. If you use the latter, do not forget to first iron it through a simple piece of paper. This will help straighten the wrapper.
Now you need to glue the Christmas tree to the base of the card. Hot melt adhesive is perfect for this purpose. It is better not to trust this operation to children. Tuck a stump under the free end of the Christmas tree and glue it too.

Advice. Since the heat gun heats the rod to a fairly high temperature, the child can get burned or ruin the whole work with a careless movement, which will be offensive.
It's time to decorate the Christmas tree. Glue the decorations you prepared to the crown. Don't forget to place something big and beautiful on the top of your New Year's beauty.
Give your child a marker and let him write some simple and kind words on a postcard and let him make a couple of mistakes, where would he be without them?
Idea No. 4. New Year card in the style of "minimalism"
We offer you a postcard with a Christmas tree in a minimalist style for your consideration and inspiration. At first glance, a simple and even modest postcard becomes quite complex when studied in detail. But you're not looking for easy ways, are you?

So, what do you need to create a minimalist greeting card?
1. Thick colored cardboard or paper. A4 format will be sufficient.
2. Stationery knife or shaped hole punch.
3. Thread and needle. It is better to choose a thread color that contrasts with the main color of the card. And the type of thread you can take is similar to “iris”.
4. Pencil and ruler.
5. Sequins.
6. Scissors.
DIY New Year card for children
We will start, as they say, from the beginning. Fold the cardboard sheet in half. Now you need to make some sketches on one of the parts. This applies to the location of the top of the Christmas tree and the Christmas tree itself. The field of how you conventionally placed the Christmas tree on half of the postcard. Carefully cut through the top of the Christmas tree. If you have a shaped hole punch, then this task will not take much of your time. Well, if there is no hole punch, then first draw a star, then carefully cut it out using a stationery knife. By the way, before starting work it is better to renew the tip of the blade.

After you are done with the star. Take a thread and a needle and, using your marks as a guide, start making stitches. Remember to thread enough sequins onto the thread after piercing the paper. It is not advisable to tighten the thread too much and it is also not advisable for it to sag.

Now you need to make notes through the cut hole of the star. So that its location can be seen inside the postcard. Use a sticker in the shape of a star or any other, not necessarily this exact shape, the main thing is that it is not clear what kind of sticker it is when the postcard is closed.

That's all. Write something good inside and feel free to give it!
Idea No. 5. Postcard with a Christmas tree using origami technique.
Origami is a very complex and interesting technique. Her Asian roots give her a certain charm and mystery. When this technique is mentioned, complex designs and intricate diagrams immediately come to mind. But don’t worry, the Christmas tree proposed below is not aerobatics. You can definitely handle it.

So, what do you need to create a postcard with a Christmas tree using the origami technique:
1. Colored thick paper, but not cardboard.
2. Colored cardboard.
3. Double-sided tape and/or PVA glue.
4. Elements for decoration, at your discretion.
Let's start with the base of the card. Carefully bend a sheet of multi-colored A4 cardboard (you can use another one) in half.

Tip: keep in mind that some cardboard sheets tend to crack when folded. This greatly affects the aesthetics of the postcard itself. If you have the trouble of running into such cardboard, then the bend can be decorated with figuratively cut colored paper or ribbon, or even braid.

So, now we need to fold about three origami modules. Depending on the initial size, you can make more or fewer modules. Accordingly, the Christmas tree will be larger or smaller.
Let's start from an example. Take three squares of construction paper or scrapbooking paper. You can print any image you want on thick paper. The sides of the square, as we said above, can affect the size of the tree. In our case, 20 centimeters. The square needs to be folded diagonally, then unfolded and folded again diagonally, crosswise.

You have conventionally marked four triangles, now you need to tuck two opposite ones inward. Now press the resulting triangle to any surface and mark the conditional center of the figure for yourself, bend the lower corner parallel to the marked middle. Repeat the procedure with the second corner. The module is ready. Add two more. You can take a different color of paper.

Let's start assembling the Christmas tree. Glue the origami module onto the base of the postcard. You can use glue or tape. The formation of the Christmas tree should be done from top to bottom, as if inserting the next module into the previous one.

The next step is to fill in the details of your card. Choose how and what to decorate yourself. As an example, we offer bows and buttons.
Idea No. 6. Postcard with ribbon Christmas tree
This idea is also minimalist. And it is not an overly complex design. If you are looking for ideas for working with children, then this idea is perfect for you.
So, what do you need to create a card with a ribbon Christmas tree:
1. Thick colored cardboard or paper. A4 format will be sufficient.
2. Scissors.
3. Double-sided tape and/or PVA glue.
4. Elements for decoration, at your discretion.
5. Decorative ribbons, scrap paper or clippings from bright pages of printed publications.
6. Stickers. In this option, it is important to take stickers in the shape of stars.

We will begin, accordingly, by preparing the foundation. To do this, you need to bend a sheet of cardboard in half. Among the materials prepared, look for paper or tape that is closest in color to brown. We will decorate the trunk of the Christmas tree. The ideal option would be to cut out a very elongated trapezoid from brown paper. Glue the trunk of the Christmas tree onto one of the halves of the base. Try to place it exclusively in the middle of the sheet.

After you have completed work with the trunk, you need to pay attention to the crown of the tree. Namely, cutting the prepared material into strips. Each subsequent strip should be longer or, accordingly, shorter than the previous one. It is better not to change the width. We suggest cutting strips of approximately 1.5-2 centimeters.
Now that you have visually imagined how many strips you need, you need to cut off the corners of the cut strips at an angle of approximately 45 degrees. So that in general the tapes, already placed in their proper places, will form a triangle with a strongly pointed apex. It is better to do this not for each tape separately, but for all of them at once, with one, so to speak, cut.

Place a star-shaped sticker on the very top of your Christmas tree. At this point we can consider the work on this postcard completed. But you can add details with decorative elements. It's up to your taste.
Idea No. 7. New Year card with original Christmas tree
And one more idea for inspiration for a variation of the New Year. The idea is also not characterized by multi-steps and high cost of materials. And the end result is an original and cute decoration for a New Year’s card. If you take pastel or, as makeup artists like to say, nude shades, the postcard will have a fairly bright feminine character. Such a card would be an appropriate addition to a gift for a woman of middle age or older.
So, what do you need to create a greeting card with an original Christmas tree:
1. Thick colored cardboard or paper. A4 format will be sufficient.
2. Scissors.
3. Double-sided tape and/or PVA glue.
4. Elements for decoration, at your discretion.
5. Round napkins or double-sided colored paper.
The first thing we do is fold the cardboard across it. Here is the main part of the postcard is ready.

Now let's make a Christmas tree. For this purpose, you need to take a double-sided napkin in the shape of a circle and divide it exactly in half. In the future, you will only need one part to create one Christmas tree. Well, if you were unable to find suitable napkins, then you can make paper for this purpose yourself. The main thing is to decide what size you want your Christmas tree to be.
Because we must take into account that the average printer is capable of printing any drawing only on A4 format. Accordingly, based on this, it is necessary to calculate the size of the future tree. Alternatively, you can use thick double-sided paper.
In favor of the printed option: if you print only a semicircle, the size of the tree will increase to 20-25 centimeters.

So, you have decided on the paper and there is a semicircle in front of you. In order to fold the Christmas tree you need to perform a fairly simple operation. Step back about 3-5 centimeters along the smooth edge of the semicircle and make an inconspicuous mark for yourself. This is where the top of your Christmas tree will be located. Now fold the paper like an accordion. The step width is approximately five centimeters. Experiment with this. You may be satisfied with other options.

It makes sense to secure the resulting folds so that the Christmas tree does not try to release itself like a spring. This can be easily done using double-sided tape. When your hand becomes more confident in folding the accordion, you can pre-fix the tape on a semicircle of paper.
Now you need to glue the Christmas tree onto one of the halves of the next card. This can be done using tape or glue.
If desired, add details to the card and decorate the Christmas tree with decorative elements.
We have all been familiar with children's books since childhood. Who, without even knowing it, were the founders of modern, trendy 3D. Turning over the next piece of paper, we met foxes, wolves or Koloboks, who rose above the book pages as if alive. Agree, then for us it was almost magic. We have grown up, and now we can try on the mantle of a wizard simply by making voluminous cards for the New Year.
So, what you will need to create a New Year's card with a 3D effect:
1. Thick colored cardboard or paper. A4 format will be sufficient.
2. Scissors.
3. Curly scissors (optional).
4. Pencil and ruler.
5. Stationery knife.
6. Elements for decoration, at your discretion.
Let's start making 3D cards for the New Year
You need to cut out several triangles from colored cardboard; for this purpose, take curly scissors. In the future, these triangles will become tree crowns. You don't have to make them the same; you can experiment with the sizes.

Now let's get down to preparing the base of the postcard. For this purpose, you need to take two sheets of cardboard and paper. The cardboard will act as the base, and the paper will be the inner edge of the card. And bend them in half
The sheet of paper that will play the role of the inner liner must first be drawn out, and then cuts should be made using a stationery knife or scissors. The marks are made perpendicular to the fold of the paper and represent something like steps, namely stumps for poor Christmas trees.

The crowns of the Christmas trees prepared in advance now need to be glued into place. To do this, open the inner insert of the postcard and you should get something like steps, so stick the Christmas trees on them. Have you already understood the principle of the postcard?


We invite you to familiarize yourself with the idea for creating a very original greeting and not only New Year's card. But still, it will look like the sheets folded in half that are familiar to us. Although, here is a completely different principle. But the recipient will definitely like it.

So, what do you need to create a dynamic New Year’s greeting card:
1. Thick colored cardboard and/or paper. A4 format will be sufficient.
2. Scissors.
3. Stationery knife.
4. Compass.
5. Thick enough thread.
On a standard A4 sheet of paper, draw a circle using a compass. Then cut it out. Now fold the resulting circle in half and use scissors to make cuts that are arranged alternately and reflect the contours of the circle. The cuts should become longer as you move away from the center.

After this you need to straighten the circle. Glue a thread to the center of the circle. To make the product more interesting. A thread is threaded through the top and circles of cardboard of contrasting color are glued to it. The thread is positioned so that the glued circles are located under the base of the circle. Now if you pull the thread, the structure will turn into an unusual garland shaped like a Christmas tree. And bright circles will be playfully visible inside it.

Now you need to glue the Christmas tree after returning it to its folded state. When gluing, make sure that you do not glue too much, and the Christmas tree has the opportunity to spread out. The base to which you will glue your dynamic Christmas tree can be made from cardboard folded in half.
That's basically it. You have an unusual and dynamic card, all that remains is to write congratulations and give it as a gift.
Idea No. 10. New Year cards decorated using double-sided tape with a backing
We offer you several options under one heading. Since they have a common element - all options use double-sided tape with a backing as the basis for decorating and securing the elements.
So, what do you need to create a New Year's greeting card using double-sided tape:
- Double-sided tape with backing.
- Thick colored cardboard or paper. A4 format will be sufficient.
- Scissors.
- Shaped hole punch, if desired.
- Ribbons, cord or thick thread.
Option 1. First you need to prepare the bases for the cards. This is very simple to do - you just need to take several sheets of cardboard and bend them in half. You can make not only rectangular shapes, but the simplest and most familiar ones are just like this. Triangular or cardboard ones will also be quite original, but you need to take into account that not all decorative elements look equally good, for example, on a round shape.
Video, DIY New Year cards
Then we will prepare the elements for decoration. Using a shaped hole punch, cut out many circles from colored cardboard from colored paper. It is desirable that the size be different. Well, if you don’t have a hole punch on the farm, you can simply cut everything out with scissors. True, this will take more time, but we are not looking for easy ways, are we? It is better to take paper that is hard and of different colors. The ideal option would be to use colors that differ in several tones, but within the same shade. You can take paper that imitates a mirror surface and introduce it as an addition.

Now you need to take the prepared card base and stick tape on it. By creating a semblance of a circle on the sheet. Then remove the protective layer from the tape pads and glue the multi-colored circles. Repeat this procedure, adding more layers. Try to alternate mugs of different sizes. The number of layers is up to you. Add them until you get the desired result. Then simply tie a colorful ribbon in a bow and glue it at the top, making the layered mugs into a sort of wreath.
Option 2. A fairly minimalist option. Good for men or guys. You will need a prepared card base, on which you will glue a piece of tape, and on it a square of plain cardboard. Decide on the size yourself. Place a slightly variegated ribbon bow at the top of the cardboard square. The result will be some stylization of the image of the gift.

Option 3. Cut out several rectangles of various shapes from colored cardboard. They should be wrapped with thread in the same way as gifts are wrapped with ribbon and a bow should be left on top. Then glue the postcards in a row along the bottom edge of the blank on the double-sided strip. You can succinctly add “Happy New Year!”
Simple DIY New Year cards. Ideas for creativity
Idea No. 11.
This is an extremely interesting idea. Because even the thought of stitching paper is already surprising. This idea is based on an applique that is secured in place using machine stitching. Naturally, the stitching can be applied manually; you can find a certain charm and originality in this. Both options should be tried, since different stitching techniques can give a completely different look to the card.

So, what do you need to create a New Year's card decorated with a stitch from a sewing machine:
1. Sewing machine. In principle, you can make stitches by hand.
2. Thick colored cardboard or paper. A4 format will be sufficient.
3. Scissors.
4. Additional decorations at your discretion.
Let's get started.
Now cut out decorative elements from any type and color of paper. These can be Christmas trees, balls, stars. And the paper can be plain or variegated, monochrome. Wrapping, for scrapbooking, simply, printed on a printer or colorful pages of old magazines. Then stack all the elements on top of each other and stitch them with a machine. Try to secure all layers with one line. Take a bright thread so that it is clearly visible against the general background. Set the thread tension to the lowest setting.
You can place one element or make many layers. Experiment to your heart's content. The line can be placed succinctly or made in multiples by crossing them.
Video, DIY New Year and Christmas cards
This is the selection of ideas we came up with this time. We hope that you found something for yourself among the proposed ideas. Give more cards and fill them with warm wishes and kind words. Happy New Year!
Summary: DIY New Year's cards. How to make original cards for the New Year with your child. New Year's crafts. Homemade New Year cards, postcard ideas. Volumetric cards for the New Year holidays. New Year's paper crafts with children. New Year's application.
1. DIY New Year cards (“Christmas tree”)
The New Year tree is an indispensable attribute of the holiday. Therefore, postcards with her image will be especially appropriate. Plus, these cards can be very easy to make.
The New Year's tree applique can be made from plain or multi-colored strips of paper. Even a small child can make this New Year's craft with his own hands.


Strips of paper can be replaced with colored tape or braid. They also make very beautiful New Year's cards.


A more complicated option is a New Year's card "Christmas tree" made from paper tubes. This original three-dimensional New Year's card "Christmas tree" is made of paper tubes. The Christmas tree is decorated with multi-colored buttons. Its trunk is made from a twig. To make this New Year's card, it is advisable to use special scrapbooking paper or corrugated cardboard.


It’s very easy to make a Christmas tree applique using store-bought stickers. Even a two-year-old can do this craft for the New Year with his own hands.


Simple and effective - homemade New Year's cards "Christmas tree" from ordinary buttons.


You can also embroider a Christmas tree with threads. Only in this case, the New Year's card should be made of high-density paper or cardboard. The holes must first be carefully made with an awl. For the simplest version of a Christmas tree, see the photo below.

For a more complex version of a New Year's card with a Christmas tree made of threads, see here >>>> To make this New Year's craft with your own hands, you will also need sequins or beads.


By the way, you can embroider not only a Christmas tree with threads, but also something else, New Year’s. For example, this cute deer.

You can make an original DIY New Year's card from a fern leaf or any other plant similar to it. For example, cypress branches. Just take the top of the leaf and glue it onto the card. This will be a Christmas tree. All you have to do is decorate it with sequins or confetti made using a hole punch from colored paper. Instead of confetti, you can glue multi-colored pieces of plasticine to the Christmas tree. Even a child can do this part of the work of making a homemade New Year’s card.

You can make a New Year's card either from a whole leaf of fern, or just from its upper part.


The technique for making three-dimensional Christmas trees is similar to the method for making New Year's balls. See the link >>>> But you don’t have to glue them together completely, instead glue the Christmas trees onto the card.
Option 3.
Do-it-yourself voluminous New Year's card. To make such a voluminous card with a Christmas tree for the New Year, you will need three square sheets of green paper: large, medium and small. Also, in order to make a Christmas tree trunk, you will need a rectangular sheet of brown paper.

Fold each square piece of paper in half first (horizontally and vertically) to mark the center lines. Then fold them two more times diagonally. After this, fold each sheet into a pyramid (see photos 3 and 4). Glue a Christmas tree from the resulting pyramids by inserting them into each other. How to make a trunk for a Christmas tree is shown in photos (8, 9 and 10). Finally, glue the Christmas tree to your New Year's card.

Option 4.
Do-it-yourself voluminous postcard for the New Year. Making this voluminous paper card is much easier than it might seem at first glance. First you will need to cut out 5 halves of circles of different sizes from green paper: large, smaller, even smaller, etc. Fold each half of the circle in half, then in half again, and in half again. Unfold each piece and form accordion folds (see photo).

Now insert one piece into another and glue them together along the three central folds.
For the trunk, cut out a rectangle from brown paper and also fold it like an accordion.
Glue your paper Christmas tree onto the card base. The easiest way to make snowflakes is from white paper using a hole punch or drawing with a cotton swab.
Option 5.
A very beautiful DIY New Year's craft, accessible in complexity to a preschooler - a voluminous New Year's card "Christmas tree". The Christmas tree is made of rectangular strips of paper folded like an accordion. But there is one nuance here. If you look closely at the photo, you will see that the tiers of the Christmas tree are made of strips of paper of different widths: the ones at the bottom are the widest, the closer to the top the narrower. In addition, the depth of the fold of the accordion is also different. The bottom strips of paper are folded into an accordion with a large "step". The higher you go to the top, the shallower the bend depth.


Here are two more voluminous cards with a New Year tree made from a triangular-shaped sheet of paper folded like an accordion. Simple and tasteful!


Option 6.
Another voluminous New Year's card. Again, this New Year's craft for children is attractive not only in appearance, but also in its ease of manufacture.

To make such a New Year's card with your own hands, print out the templates (template-1 and template-2) on two sheets of cardboard or thick paper and use the detailed instructions from the photographs below. It is better if the sheets of cardboard are of different colors.


 Finally, decorate the Christmas tree to your liking. The voluminous New Year's card is ready!
Option 7.
Origami Christmas tree. We invite you to make a three-dimensional New Year's card decorated with a Christmas tree made of paper made using the origami technique. To make the card look more elegant and festive, choose more beautiful paper for your New Year tree. Special paper for scrapbooking is well suited for this DIY New Year's craft. By the way, making such an origami Christmas tree is much easier than it seems at first glance. For one origami Christmas tree you will need 4-5 square sheets of paper of different sizes.

Option 8.
There is an easier way to make a Christmas tree using the origami technique. Detailed instructions in the photo below.


Option 9.
You can make a voluminous New Year's card with your own hands from corrugated paper.

Option 10.
The elements of the New Year's card in the photo below are made using the quilling technique.

3. DIY New Year cards (“New Year’s balls”)
Do-it-yourself New Year's cards with images of New Year's balls look good. The New Year's applique "Christmas balls" can be made from bright paper and decorated with ribbons.

Beautiful New Year's balls are made from colored strips of paper. Cut an unnecessary glossy magazine (advertising brochure) into thin strips and stick them on a white sheet of paper. After this, cut out circles of different sizes from the resulting striped paper. Decorate your New Year's card with them.

New Year's balls can be made not only from paper, but also from buttons.

Instead of buttons, you can use purchased decorative rhinestones.

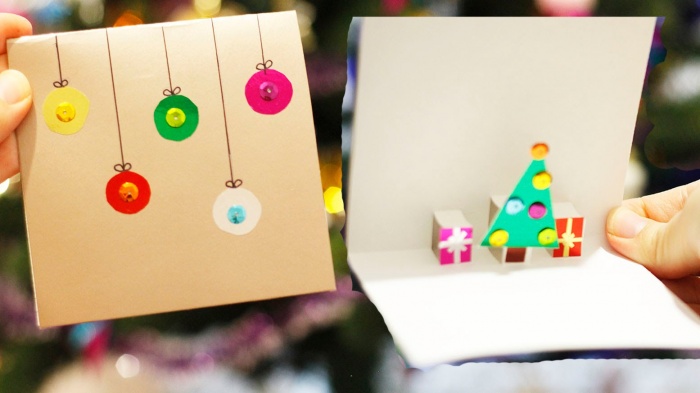
The website www.hgtv.com offers to make original three-dimensional New Year cards with images of Christmas tree balls.

To make such a New Year's card with your own hands, print the following template. See link >>>> Draw a circle on each square using a compass or an object with a round bottom of a suitable size. Cut out all the circles, then use the following instructions to make Christmas balls. See link >>>> But you don't need to completely glue the balloon, stick it onto the card instead.

Another New Year's decoration - a garland of flags - will look impressive on a New Year's card. Flags can be made from paper or fabric and then glued or sewn onto the card.

Even very young children can make their own New Year's card with the image of a multi-colored garland of fingerprints.

And from a handprint you can make a New Year's card with Santa Claus or funny snowmen.


1. On any surface that does not absorb paint (for example, a regular sheet pan), make a rectangular frame (the size of your card) from tape or tape.

2. Apply paint to the surface in an even layer. Use a cotton swab to draw a picture on a New Year's theme.

3. Attach a piece of paper. Your DIY New Year's card is ready!


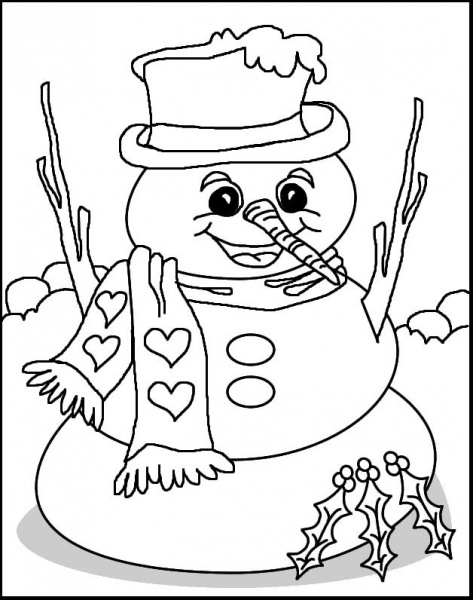
4. Do-it-yourself voluminous New Year’s card “Snowman”
Separately, I would like to talk about this original, voluminous postcard for the New Year. Making such a paper snowman is very simple. Even a preschooler can cope with the task. You need to cut out three circles of different sizes from thick white paper. It is advisable to shade the edges of the circles so that they stand out better against each other. This can be done using crushed pencil lead or eye shadow. Also cut out a scarf, pens, a carrot nose, eyes and buttons from colored paper. Glue all the parts of the snowman sequentially onto the blank of your New Year's card.
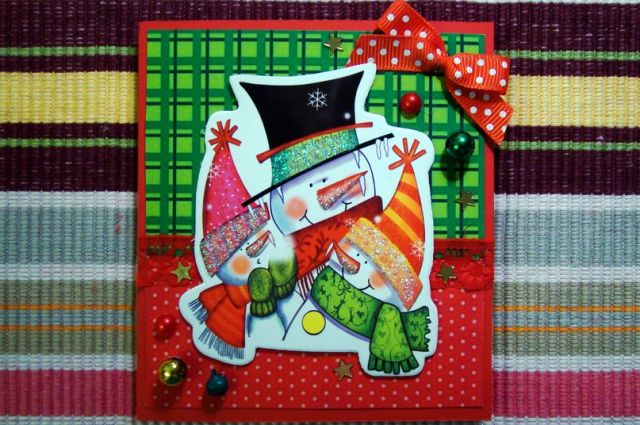
Here is the original card made by a scrapbooking artist.

And here are the versions of this voluminous New Year's card made by children.


5. DIY voluminous New Year cards
Another way to make voluminous New Year cards can be found on our website at the link >>>>

6. New Year's crafts for children. New Year's applique
Postcards decorated with New Year's appliqué made from grains of rice turn out to be very delicate.


7. DIY New Year cards. New Year cards with snowflakes
Another DIY New Year's card idea is a card decorated with a snowflake cut out of paper. For information on how to cut very beautiful, unusual snowflakes from paper, see our special section “DIY New Year’s snowflakes”.

If you have paper lace doilies at home, you can cut out snowflakes from them.

8. New Year's paper crafts. New Year cards made using the Iris folding technique
The Country of Masters website offers to make original New Year's cards using the Iris folding technique. The name of this technique - iris folding - can be translated as "rainbow folding". The design is filled with thin paper strips, which, overlapping each other at a certain angle, create an interesting twisting spiral effect. For a detailed master class on making this New Year's paper craft, see the link >>>>

Here is another New Year's card made using this technique. Instructions at the link >>>>

9. Original do-it-yourself New Year cards. DIY New Year's Eve
We would like to introduce you to another interesting technique for making New Year’s cards with your own hands. The Christmas tree and New Year's ball in the photo below are made using this technique.


To make a Christmas tree card, you will need:
Red cardboard sheet
- a sheet of colored origami paper (on one side - dark green,
on the other side - light green)
- scissors or a special knife for cutting paper
- glue
Print a stencil on a piece of green origami paper. Make cuts along the lines on it. Where the trunk of the Christmas tree is located, cut out a piece of paper completely. If you fold a sheet of paper in half before making cuts, you can cut it with scissors. In this case, even a preschooler will be able to make a postcard. If you want to avoid a fold in the center of the card, then it is better to make cuts with a special knife for cutting paper. Now all you have to do is fold the corners back and stick your workpiece onto the cardboard.

The "New Year's Ball" card is made in the same way. The stencil for making this original New Year's card can be downloaded from the link >>>>
The snowflakes from the section were made using the same technique. They can also decorate a New Year's card.

And another do-it-yourself New Year’s card “Christmas tree”, made using this technique.

To make this New Year's card, print the template onto a piece of white cardstock. Glue a thin sheet of green paper on the back side. Using a paper cutter, cut out the corners and fold them over. Now cut out and fold your New Year's card in half. If you want to write New Year's greetings inside, then glue an additional sheet of green paper so that the letters do not show through the holes. For a detailed New Year's master class on making this card, see.
Another idea for a New Year's card that you can make with your child yourself. For a detailed master class, see the photo below.


DIY New Year's card ideas. When making New Year's cards with your own hands, it is appropriate to use colored self-adhesive foil. It can be purchased at craft supply stores.

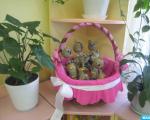
The last card with which we would like to complete our review of DIY New Year cards is the voluminous “Snow Globe” postcard. In the photo below it is shown on the left side. This Christmas card is made using a clear dairy lid. You will find a master class on how to make such original three-dimensional postcards on Veronica Podgornaya’s website.

These two postcards were made by the author of the blog Naftusina's hand-made art. A snowdrift and a cloud are cut out of felt. Christmas tree and bear - figured buttons. There are white beads sprinkled inside the card. The postcard looks incredible! You shake it and it snows! On this site you will find two more interesting DIY New Year cards. Santa Claus and the Snowman are hurrying through the snowy snowdrifts. The snowdrifts and cloud are cut out of felt, the characters are made from buttons and felt, the tree is a real twig, which is slightly pasted over with pieces of padding polyester, snowflakes are drawn with a helium pen.

Material prepared by: Anna Ponomarenko
Content
If you have already prepared everything for the New Year (and if not, then you need to read our articles) and you still have some finishing touches from the series: cards for relatives, for school, kindergarten, etc., then it won’t hurt you to read either our articles. Or, more precisely, this particular article, which we completely decided to devote to beautiful cards for the New Year. Our ideas, as always, are a wagon and a small cart. So stock up on time, materials and let's create together.
Postcard options
With drawings
As usual, let's start with a simple option - these are painted postcards. All you need is thick cardboard or whatman paper, pencils, glitter glue, paints, felt-tip pens, wax pencils. In general, any option for drawing a picture that you or your child likes.
You can fold a rectangular sheet in half and apply a specific design to the front side. You can use the template and decorate the drawing.
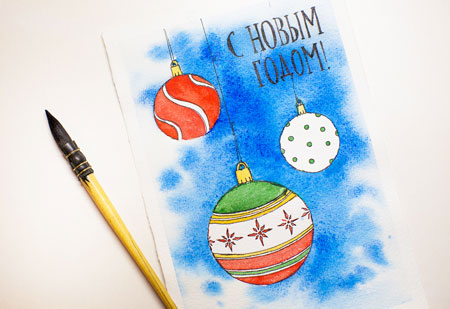
Don't forget about the funny inscriptions on both the front and back. Use a special stencil or calligraphy tools to make the lettering beautiful and even.
Draw something touching and sweet, you can even without the inscription “Happy New Year”. In a drawn postcard, you can combine several techniques: some can be partially drawn, and some can be three-dimensional, made of some material, as in the photo. Or the design can first be applied to paper, then the paper can be glued to thin foam plastic, and then this design can be glued directly to the postcard and it will turn out three-dimensional.
We offer you several images that you can use as a template for your future 2018 New Year's card with your own hands:


Textile
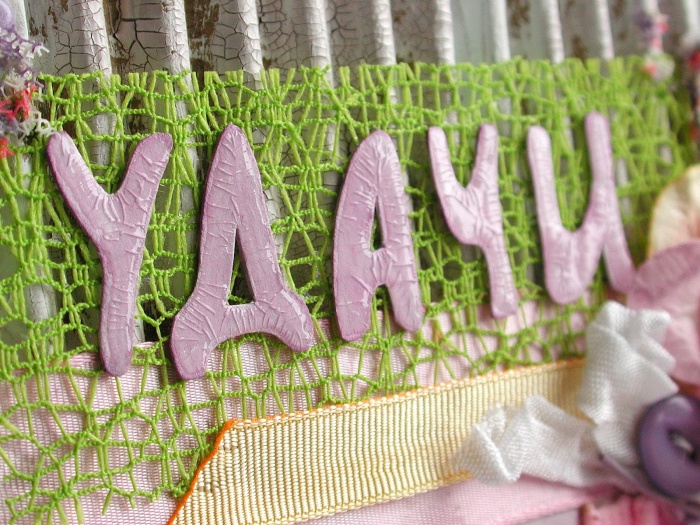
Collect all kinds of pieces of fabric, sewing scraps, old jeans, pillowcases, pajamas, and socks around the house. All of this can make great products. Please note that even the base of the postcard itself can be made of material, see the example in the photo:
Making a postcard from textiles is quite easy. For example, in this case, felt parts were used, but you can use any other material. On the wrong side you can sew something like a lining, which will serve as a kind of wish list for the New Year 2018.
For the product, you can use a cardboard base on which you will attach textile parts using a glue gun. Various beads, buttons, lace, ribbons, natural materials, and knitting threads are also suitable as decoration. It turns out very beautiful and unusual.

You can give similar crafts for the New Year to your mother, a school teacher, a friend, or a work colleague. You can write the congratulations inside with a pen or cut out letters from fabric; it will look quite original.
Scrapbooking
This option is more complicated, because it is no longer just a postcard, but a whole album. We can include photographs and some tickets to the theater or cinema where you went with the recipient of the scrapbooking.
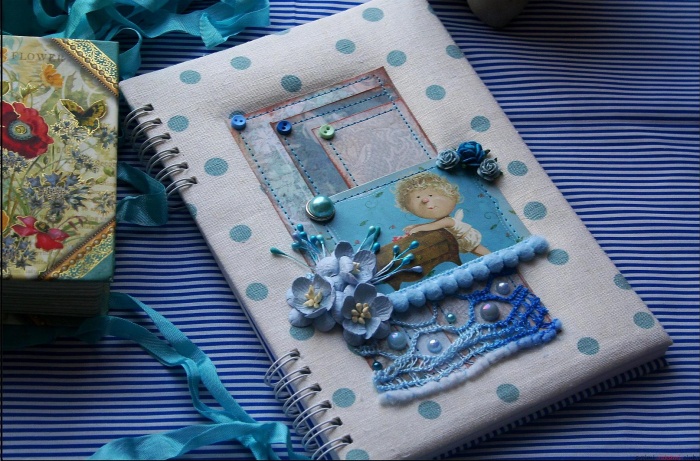
In general, scrapbooking has recently become a whole movement, a fairly popular technique for decorating postcards and creating memorable diaries. Literally, the word “scrapbooking” itself is translated as “book of scrapbooks.” To create such a book, special sheets and materials are sold. They are quite durable because the book is designed for long-term storage. But we can make a postcard using the scrapbooking technique from available materials, the main thing is that it is cool and impressive.
Use three-dimensional details to decorate the front side. Scrapbooking involves the use of various pockets, envelopes for storing tickets, photographs, dried flowers, sweets, and labels. In general, look at the photo for everything that can bring back pleasant memories and give joy:

The most important thing in this technique is to correctly and correctly arrange the decorative details so that the card turns out beautiful and unpretentious. You can use some creative details, say, nails, screws, nuts, if the congratulations are intended for a motorist. Or letters from a keyboard, parts of a floppy disk (if you find it), if the postcard will be received by a person associated with computers. You can use buttons, pins, clothespins, disposable tableware, newspapers. The number of ideas and topics will depend on the interests or work of the gift recipient.

3D postcard
So we come to another interesting idea of creating a New Year's card with your own hands using three-dimensional technique. 3D is, of course, a strong word, but something like that can be created, that is, a three-dimensional postcard. What do you need:
- a lot of colored cardboard;
- colored paper;
- PVA glue or office glue;
- pencils;
- markers;
- transparent sour cream lid;
- beads;
- paints.
This is a list for several postcard options. For example, let's make it with a three-dimensional pattern inside. Take a rectangular piece of paper, make small cuts in it so that you can pull out unique stands for the future composition.

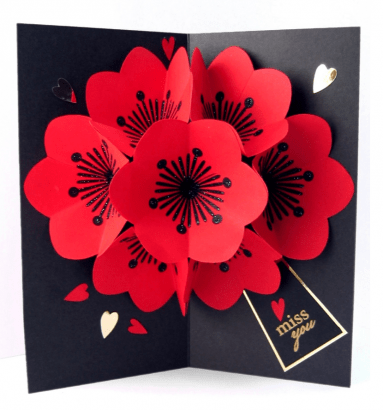
Now prepare the decor of the composition itself - it can be something with a plot, or it can be flowers, patterns, hearts, even photographs.
After you attach the decorative elements, the blank itself needs to be inserted into the main pages of the postcard and glued well, look at the photo to see what can happen:

You don’t have to cut out the base with original supports, but rather cut out the pattern itself directly from the sheets for the postcard. Volumetric cards look original and will delight not only children, but also adults.
And here is the template for such a DIY postcard:

And a few more wonderful ideas for voluminous do-it-yourself greetings for the New Year:

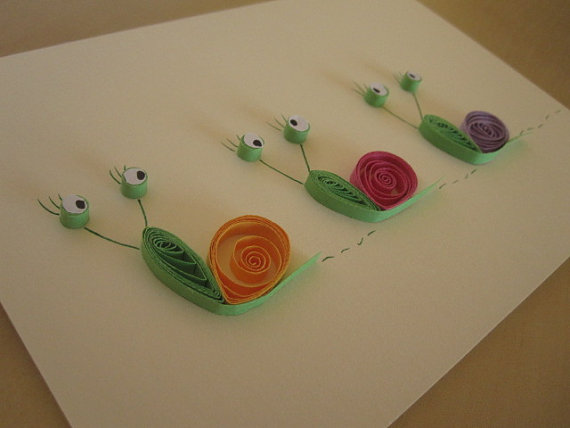
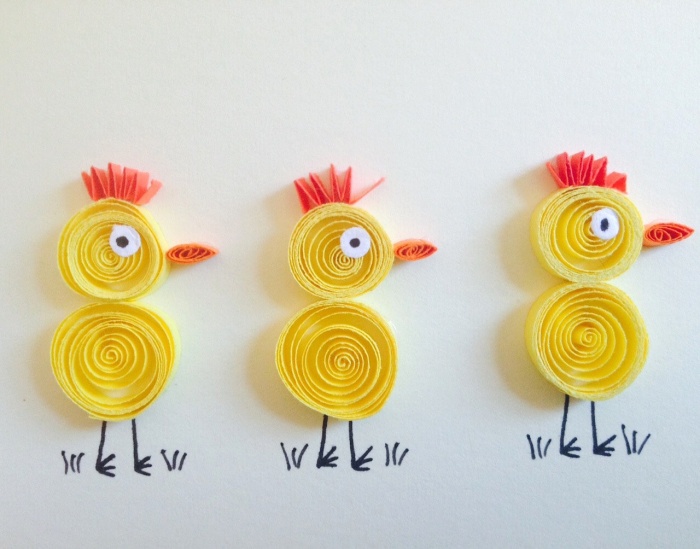
With quilling elements
Quilling is also a fairly popular technique lately. Quite original three-dimensional designs are obtained from twisted thin strips of paper. This technique can be used to decorate a New Year card.
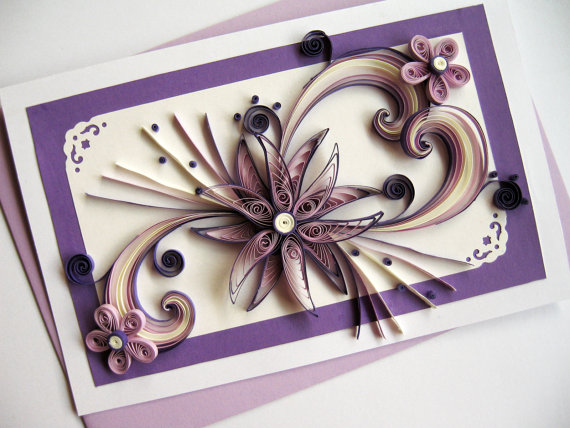
To make such beauty using the quilling technique, of course, you will need skills and experience. But even kids can do the simplest options.
For a more complex version of the quilling technique, you will need a little more skill and special tools. At the end of the article you will find a useful video master class on this topic.
More ideas for original cards
The most amazing thing is that to create a postcard for the New Year 2018 with your own hands, you only need a little imagination, a good mood and a minimum of materials. In addition to colored cardboard and paper, these can be newspaper or magazine sheets. In general, anything that is lying around the house is suitable for scrapbooking. For children's cards, good pencils or felt-tip pens are enough. And if there is something left over from past needlework: felt, wool, natural materials, then all this can be used to create a gift for the New Year 2018.
Do you want to give a nice gift to your relatives, friends, and acquaintances for the New Year? A beautiful card is always needed.
To pleasantly surprise the person you are preparing a card for, you can make a card with your own hands, decorate it as you like and give it as a gift.
There are many ways to make a beautiful postcard with your own hands, and there are several simple, but very beautiful and original ones here.
Choose what you like best. You can try one of the suggested options or borrow the idea to make something of your own.
In any case, anyone will be pleased to receive such a gift.
Handmade New Year cards. Christmas tree made of corrugated paper.

You will need:
- corrugated paper
- scissors
- decorations, optional

1. Fold a sheet of thick paper in half.
2. Mark the place where you will glue the corrugated paper, or simply draw the outline of the Christmas tree with a simple pencil.
3. Cut out several rectangles of different sizes from corrugated paper.
4. Glue each rectangle as shown in the image.
* If you wish, you can decorate the card with a star (finished or cut out of paper), stickers, glitter, etc.
How to make a three-dimensional postcard
A very beautiful DIY New Year’s craft, accessible in complexity to a preschooler, is a voluminous New Year’s card “Christmas tree”. The Christmas tree is made of rectangular strips of paper folded like an accordion. But there is one nuance here. If you look closely at the photo, you will see that the tiers of the Christmas tree are made of strips of paper of different widths: those at the bottom are the widest, the closer to the top the narrower. In addition, the depth of the fold of the accordion is also different. The bottom strips of paper are folded into an accordion with a large “step”. The higher you go to the top, the shallower the bend depth.


Another voluminous New Year's card. Again, this New Year's craft for children is attractive not only in appearance, but also in its ease of manufacture.

To make such a New Year's card with your own hands, print out the templates (template-1 and template-2) on two sheets of cardboard or thick paper and use the detailed instructions from the photographs below. It is better if the sheets of cardboard are of different colors.


Finally, decorate the Christmas tree to your liking. The voluminous New Year's card is ready!
How to make New Year cards with your own hands
New Year's card "Snowman"

Cut a wide strip with a shaped edge from white paper. It will be a snowy hill. Glue it to the bottom of the card. Attach white acrylic letters to the center of the pre-made snowmen.
Postcard “Congratulations to Santa Claus”

The basis for this card will be paper with a pattern. Cut out elements of Santa Claus's face from paper of different colors. Glue them together. Use pink chalk to tint Santa's cheeks. Glue the face to a card made of construction paper. Glue the card onto folded paper with a larger design, so that the design looks like a border on the right and bottom of the card. Write a congratulations.
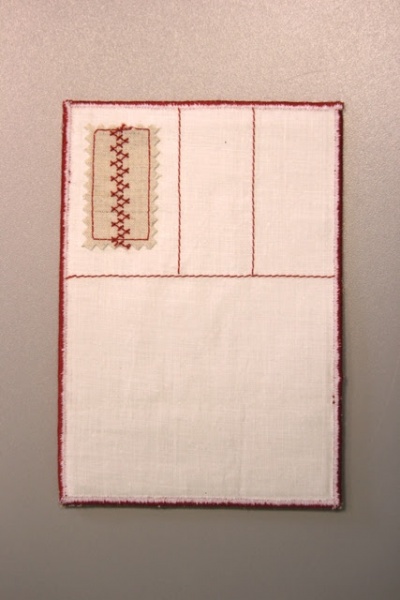
Postcard “Christmas tree in retro style”

Sew the edges of a Christmas tree made from construction paper using a sewing machine. Decorate the Christmas tree with snowflakes. For a simpler version of the card, glue the tree with an additional layer of thick paper to get a three-dimensional image.
Scrapbooking. New Year cards.

You will need:
- thick colored paper or colored cardboard
- scrap paper
- PVA glue
- pen, felt-tip pen (or other similar item)
- decorations

1. First, you need to know exactly what size the tree will be, and, based on this, cut several rectangles of different widths from scrap paper.
2. Using a pen or other cylindrical object, roll each rectangle into a tube (widthwise). Secure each tube with glue to prevent it from unraveling.

3. Glue the tubes together.


4. Prepare the base for the card and glue your pre-prepared Christmas tree to it.

5. Decorate to taste.

Children's New Year cards

You will need:
- colored cardboard (green and red)
- sparkles or rhinestones
- wrapping
- black pen or marker
- scissors
- stapler
- decorations

1. Let's make a Christmas tree. Prepare green paper and cut it in half (crosswise).

2.
Make a blank by folding a thick sheet of paper (any color) in half - this will be the base of the card.
3.
Use one half of green paper to make an accordion that will act as a Christmas tree. Fasten one end of the accordion and glue the Christmas tree to the base of the card.

4. Prepare wrapping paper and cut out a small rectangle from it, it will act as a stump.

5. Decorate to taste.

Beautiful New Year cards

You will need:
- thick colored paper or colored cardboard
- a stationery knife or a shaped hole punch (for cutting out an asterisk)
- needle
- pencil and ruler (to mark where the thread will be threaded)
- sequins


Making New Year's cards. Origami Christmas trees.

You will need:
- colored paper (thick paper is fine)
- colored cardboard (for the base of the postcard)
- button, ribbon and other decorations to taste.


Creative New Year cards. Christmas tree made of ribbons.

You will need:
- colored cardboard
- scissors
- stickers (in this case in the form of stars)
- decorative ribbons, scrap paper or clippings from bright magazines

1. Fold a piece of construction paper in half to make the card base.
2. Cut out a tree trunk from brown paper.
3. Glue the trunk to the base (in the middle).

4. Start cutting ribbons of colorful paper into several pieces of varying lengths.
5. Glue all the pieces onto the trunk (top), starting at the bottom with the longest piece.
6. Decorate the Christmas tree as desired.
New Year cards using quilling technique

You will need:
- colored cardboard
- paper strips for quilling (preferably several shades of green)
- scissors
- white corrugated paper or napkin
- toothpicks (for rolling paper strips)
So, let's start making a card:


How to make a New Year's card from round napkins

You will need:
- colored cardboard
- scissors
- round napkins (or double-sided colored paper)
- Double-sided tape
- decorations to taste

1. To make a Christmas tree, you need half a circle. To do this, fold the round napkin in half and cut it.
2. Fold into a semicircle as shown in the image.
3. Using double-sided tape, glue the layers of the tree together.
4. Glue the Christmas tree to the card base
5. Decorate the Christmas tree to your liking.
Volumetric New Year's cards

You will need:
- colored cardboard
- scissors
- pencil and ruler
- decorations


1. Cut out triangles from colored cardboard - these will be your Christmas trees.
2. Prepare two sheets of thick paper. Fold both in half - one will serve as the base of the card, and the other as its inner part.
3. The diagram shows how you need to cut out “steps” from the sheet for the inside of the card, onto which you will then need to glue the Christmas trees.

4. After you have glued the Christmas trees, decorate them and the rest of the card to your liking.
New Year's greetings. Postcard from circles.

You will need:
- colored paper
- stationery knife
- colored cardboard

1. Take a sheet of A4 paper (plain or colored). Using a compass, draw a large circle on it.
2. Cut out the circle.
3. Fold the circle in half and make cuts in a checkerboard pattern (see picture). The cuts need to be made in a circle - start from the fold line and move to a point slightly further than the middle.

4. Unfold the circle and glue a thread to the top of the head.
5. Glue the circle to colored cardboard folded in half (the base of the postcard).
* You can glue small red circles to the thread so that they hang down from the top of the tree.
6. Decorate your card to your liking.
Now you can not only give this card as a gift, but also decorate the New Year tree with it.
New Year cards (master class)

You will need:
- colored cardboard
- buttons
- Red ribbon
- pencil or pen
1. Prepare the base for the card by folding colored cardstock in half.
2. Draw a circle on the base using a compass or pencil and any small round object.

3. Prepare the buttons and start gluing them carefully along the drawn circle.
4. Cut a piece of red tape and stick it wherever you like.
Ready! Everything is very simple, but at the same time beautiful and neat.
Design of New Year cards. Bright lanterns.

You will need:
- scrap paper (or regular thick paper)
- scissors
- paints (can be watercolors)
- tassel
— a set of markers
- a simple pencil
1. Prepare the base for the card. Fold a thick sheet of paper in half.


2. Using a pencil, draw a wavy line on one side of the card. You can add curls.
3. Now draw lanterns on the line.


4. Use paints or multi-colored markers to color the lanterns.
5. Add a caption, for example, “Happy New Year!”
New Year cards with snowflakes
Another DIY New Year's card idea is a card decorated with a snowflake cut out of paper.

If you have paper lace doilies at home, you can cut out snowflakes from them.

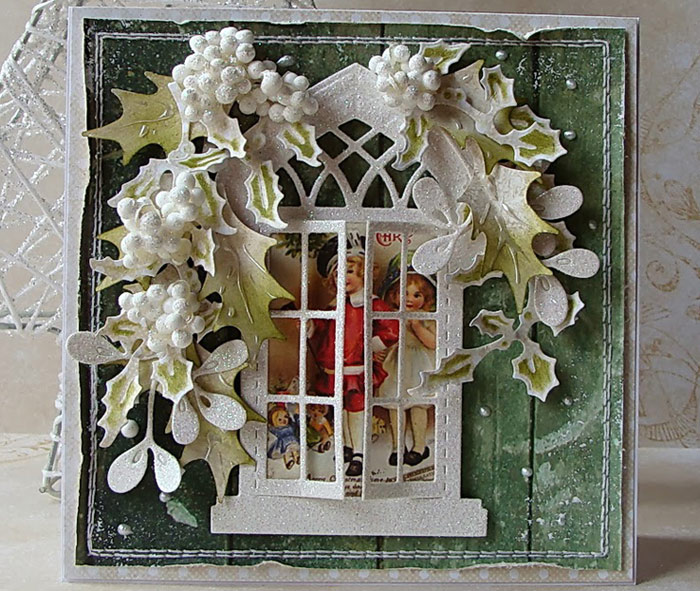
Postcard with New Year's embroidery.

Such a postcard will not leave even the most fastidious recipients indifferent. After all, here you invest your strength and soul not only in collecting ready-made parts and giving them a festive look, but also creating these very details with your own hands. For embroidery, you can choose any pattern that matches the theme of the New Year. This could be Santa Claus, a cheerful snowman, a festive tree, New Year's balls, the symbol of 2017 - the Fire Rooster and more.
To create such a New Year's craft you will need: glue, scissors, embroidery, satin ribbons, and other decorative elements, if desired.
As in the first option, we first prepare the base of the postcard and give it the desired shape. Then we glue the embroidery and decorate the edges of the picture. This can be done in the following ways: use satin ribbon, half beads, rhinestones and sparkles. Such a card in itself is already a finished product and does not require any special additions in the form of sparkles and sequins, but if you think that they will only complement the overall look, then add them. If the card is intended for a friend, sister or mother, you can use a bow made of satin ribbon; such decor will make the product more pretty.
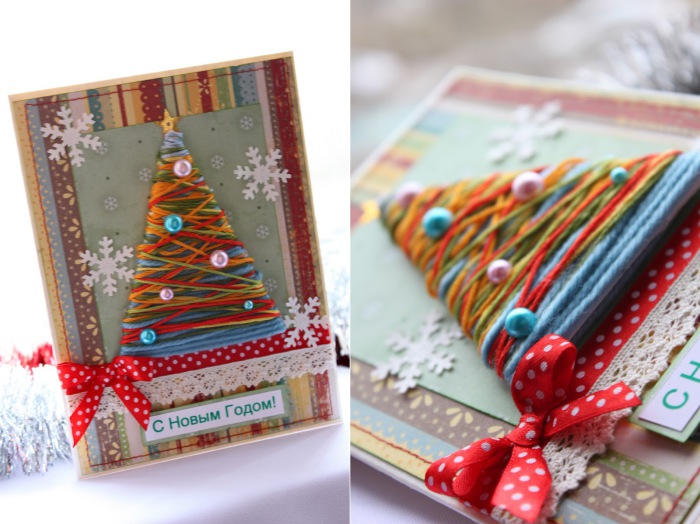
Postcard made of colored threads
 Handmade card with a New Year tree made of colored threads
 The forest beauty is the main symbol of the New Year. And in such an unusual embodiment, both adults and children will like it! To create this craft you will need:
- three sheets of cardboard or thick paper
- scissors
- PVA glue
- Double-sided tape
- dense threads of different colors
- colored pens
- ruler
- decorative beads
- paper snowflakes
- ribbon
Fold a sheet of colored cardboard or thick paper in half. It will serve as the basis for the postcard. Cut out a rectangle from paper of a different color and stick it closer to the top of the card. Cut a triangle from the third sheet of cardboard. Wrap it with multi-colored threads, securing them to the back of the tenderloin. Decorate the Christmas tree with shiny balls of multi-colored beads and glue the tree to the card. Decorate the craft with an elegant ribbon and don’t forget to print and stick a congratulatory inscription.