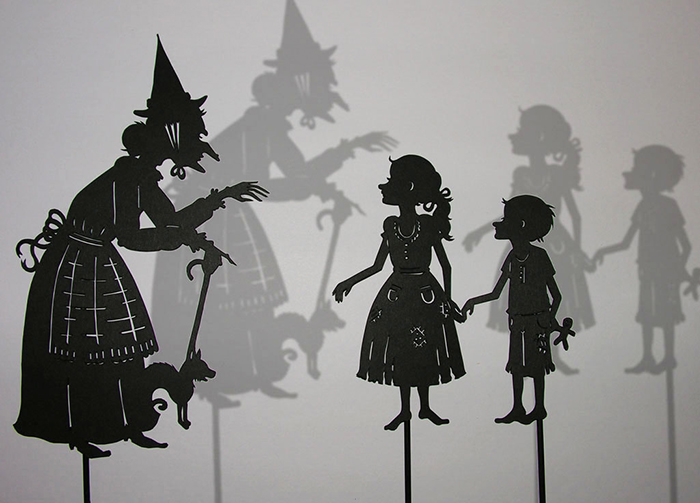
Little Red Riding Hood. Table shadow theater
Home theater of shadows. We do it ourselves.
Designer: Irina Ivanova

Every child is capable of creativity. If you are not yet sure of yours, then the creative principle in it is still dormant. Better wake him up! For example, play theater - shadow theater. Such representations develop both speech and fantasy. And they won't let you get bored.
You can add effects if you want. If you draw the scenery on a transparent film with stained glass paints, and place the drawing between the lamp and the actors, the performance will become a little colored.
Remember that the lamp must be located between the screen and the person.

Materials:
Foam board sheet 100x140cm 3mm thick
tracing paper sheet 86x62
PVA glue
5 paper napkins for decoupage with a star pattern (preferably golden)
blue acrylic paint
glitter glue or universal glitter contour
thin wire 1 mm thick - 50 cm
very thick wire - 3 mm thick - 250 cm or metal children's headbands about 1 mm thick and about 3 mm wide - 4-5 pieces
cardboard
Tools:
Thick dummy knife
ruler
scissors
round nose pliers
wire cutters
pencil
synthetic brush no. 7
sponge
awl

From the foam board, cut out a 50x70 cm rectangle. Inside the rectangle, draw parallel lines at a distance of 6 cm from each side. Cut out the inner rectangle outlined by them with a breadboard knife.
Got a frame.
By the way,
foam board can be replaced with any other cardboard. The advantages of foam board are that, with light weight, it is quite rigid, easy to cut, holds its shape well, is resistant to moisture, easily glued and is ready for applying paint and any other decor. You can buy it in a large store for artists.

To turn the frame into a screen, you will need a 100 x 70 cm sheet of tracing paper, folded in two across the long side. Carefully glue the tracing paper onto the frame with PVA glue. Where there is no fold, first glue one layer, then the second.

The legs of the screen can be made simple or curly. For simple legs, we need 2 isosceles triangles with sides of 30 cm. The screen on curly legs will look more complicated, but more beautiful.

From tracing paper you need to cut 4 strips 4 cm wide and as long as the width of the legs. Attach the leg to the bottom of the frame at a right angle. Using PVA glue, glue a strip of tracing paper so that it connects the frame and leg. Half of it should be glued to the frame, and half to the leg. The connection should be end-to-end, but note that the legs should fold. The same operation must be repeated on the reverse side of this leg. Glue the second leg in the same way.

Cut out a strip of 57x7 cm from foam board. This will be the stage-shelf of our theater. It can also be made foldable. To do this, draw a line parallel to the edge at a distance of 1 cm and cut it along the entire length with a breadboard knife so that the last layer of cardboard remains intact. Glue the part with a width of 1 cm with PVA glue to the frame on the same side as the legs, where the screen begins. The stage allows the puppeteers to navigate the screen space and the characters will "stand on the ground" instead of "floating in the air".

The theater is assembled, now it can be decorated. Cut out the stars from the napkin and separate the extra layers - for work we need only the first, colored layer of the napkin. Attach the stars to the foam board, circle and cut along the contour with a breadboard knife.

Use small and large stars to decorate the screen and its legs using the direct decoupage technique. To do this, place the star on the surface of the cardboard so that all the rays match. Drop PVA glue in the middle and smear the glue with a brush from the center of the sprocket to the edges with light short strokes. Decorate the frame with stars in the same way. Draw dots and swirls on the stars with a glitter outline.

When the applications are dry, paint the frame on both sides, as well as the legs, with blue acrylic paint. It is best to apply the paint with a piece of sponge in a rotating motion, as if drawing curls. The paint will lay down unevenly, so the background will look voluminous and deep, like the night sky. Let the paint dry, then glue the cardboard stars to the frame with PVA glue.

For action figures, you will need thin cardboard for crafts. Transfer the character pattern to cardboard, cut it out and pierce the junction of the parts with an awl. Cut a small piece from the wire - about 3 cm. Using round-nose pliers, bend one end of the wire into a loop. Insert the free end of the wire into the hole, fastening two cardboard parts. Twist the other end of the wire as well. Such an impromptu carnation quite firmly connects the cardboard parts, while allowing them to be movable.

We, the puppeteers, will drive the actors with the help of special tools. Bend one end of a piece of 50 cm thick wire with a hook the other end - and on the other side with a loop, so that it is convenient to hold on to it. The hook-like end of the wire, in theory, should be attached to the doll on one side. But experience suggests that it is most convenient to make the rod removable. And on the doll, provide a special loop for which to hook the hook.

The loop is done like this. Attach a rod to the figure, glue the hook-like end with a piece of tracing paper, like a plaster. When the glue dries, pull it out like a plaster, then hold it for a while and carefully stick the rod out from under the tracing paper. If you make "pockets" for the rods on both sides of the figure, then you can drive the doll from right to left and from left to right.
Instead of wire for making a puppeteer's tool, you can use thin metal children's hair bands. If they are unbent, then very convenient flat rods are obtained for controlling the puppets.

Shadow theater is ready.
We put a lamp behind the stage, turn off the light and start the performance.
A theatrical performance of shadow and light is an unusual and interesting activity that will appeal to all children without exception.
Fascinating preparation, creating a scene and characters with your own hands will give a good incentive to develop imagination and become one of the brightest and kindest memories of their childhood!
How to make a Shadow Theater at home? Brashechka will tell!
Preparing the stage for the Shadow Theater
We need a light source, an impromptu screen and a place where we can feel comfortable as actors :)
As a screen a piece of wide white wallpaper remaining after the repair, a white sheet, thin paper or, in extreme cases, several sheets of paper fastened to each other in a butt, are perfect.
light source an ordinary table lamp or lamp will serve - it will need to be installed behind and slightly to the side of the screen.
Important! The smaller the screen, the thinner and more transparent it should be, and the brighter the light source needed!
Now let's decide on the size of the scene.
A large stage for several children or a compact version for one participant? Decide for yourself!
Option 1. Stage of the Bolshoi Theater
 Is there a bunk bed? Consider the stage of the Shadow Theater is ready! Happy owners can safely take the entire first floor for the actors. It is only necessary to fix the screen on the curtain rod and press it from below with a mattress.
Less "lucky" with furniture? No problem! :)
Hang a sheet over a doorway, arrange a "house" under a desk, or simply stretch it between two chairs!
Option 2. Compact stage for one actor
A very convenient option to store and use many times.
Minus - suitable only for puppet shows and it will take a little longer to make it.
 Take an unnecessary (or make it yourself from improvised materials) large wooden frame, A4-A5 format will be just right. Stretch a thin cloth or transparent matte paper over it, secure it with small carnations and place it on a stand. The stage is ready!
A wonderful folding stage can also be made from a large cardboard box, in the form of a window with shutters. The "glass" of the window will be the screen of our theater, and the "shutters" will provide stability to the improvised stage.
An excellent lighting option for a puppet shadow theater is a headlamp! :)
Take care to securely fasten the screen canvas.
In the future, this will greatly simplify the work of small actors!
The stage is almost ready!
Let's make a curtain for her so that our Shadow Theater looks more solemn and very, very real! :)
Scenery and figures of characters for the Shadow Theater
Folding the shadows with your hands
 We have all played with hand shadows on a brightly lit wall more than once.
Let's remember a few basic shapes to start with:
Click on the picture to view or print out diagrams of how to fold the shadow of a wolf, dog, goat, rooster, hare, swan, goose or piglet with your hands.
Figure out how to portray someone else!
Figures and scenery for the Shadow Theater made of cardboard
 For the puppet theater of shadows, we need pre-prepared figures and scenery. You can find and download ready-made stencil pictures for the Shadow Theater, but it is much more interesting to come up with a story and draw its characters for the Shadow Theater yourself!
Ask the child who is the main character of his fairy tale? Is he good or evil? What happened to him? And together you will come up with a great story!
Start with a small number of characters - two or three is enough for the first time. After practicing, you can easily move on to more complex productions :)
Scenery for the Shadow Theater it is better to make it from thick cardboard, which is used for packaging household appliances. We don't want our castle or a big tree to bend under its own weight?!
Characters, drawn and / or printed on plain paper, glued onto a rigid base and cut out with scissors. As a base, thin cardboard for applications is perfect.
If you plan to use the made figures for the Shadow Theater repeatedly, we recommend that you laminate them.
Mounts for scenery and characters
Mounts are needed to control the figures without casting unnecessary shadows with your own hands.

Option 1
Use small hooks made from folded paper clips as holders for large figures and decorations.

Option 2
Split the cocktail tube at one end and glue it to the figure from the wrong side.

Option 3
Attach thin wooden or plastic sticks to the figurines with duct tape.
Staple mounts (option 1) are convenient because such decorations can simply be leaned against the screen. In this case, our little actors will not have to puzzle over where to get a few more hands in addition to the ones they already have :)
Thinking of a performance in several acts and need to change the scenery? Arrange a small but real intermission! :)
Add some color to the Shadow Theater
Color spots will add even more mystery to everything that happens! :)

Method 1.
Use a colored canvas for the screen. Shadows on a color screen are visible almost the same as on a white screen.
 Method 2.
Try cutting shapes out of tinted sheets of paper, for example, for drawing with pastels. The color of the paper will show through the white screen.
Finishing touch
Here we are, ready to put on a show!
It remains quite a bit - to draw invitations and send them to friends and acquaintances. And after the performance, do not forget to have a tea party with a joint discussion of the performance you have watched!
Shadow theater is an art that originated somewhere in the ancient civilizations of India and China more than 1700 years ago. The legend tells that the gods themselves, walking on the Earth, saw pretty dolls in the window of the workshop and decided to play with them. The figures, as if alive, spun in a dance, fluttered like moths, casting bizarre shadows.
This magical dance was secretly spied on by the master. He really wanted to repeat the amazing dance. And then he attached barely noticeable threads to the pupae and gave them a new life.
Let's fast forward to that distant time and arrange a fabulous performance filled with shadow and light, goodness and magic.
You will need:
- cardboard box,
- white parchment,
- black cardboard,
- markers,
- scissors, stationery knife,
- adhesive tape,
- hot glue,
- barbecue sticks,
- desk lamp.

First, let's create a scene. It can be made in the form of a window, a castle, a fabulous tent and even a detached house. It all depends on the size of the box and your imagination.


Let's use the simplest option. Let's make a stage for the performance in the form of a window.
1. Cut out the bottom of the box and glue it with parchment. Secure the edges of the parchment with duct tape.

2. Make shutters from the rest of the box. Draw with markers.


Great! Half done!

And here's another version of the screen:

Well, now, so that our stage is not empty, fill it with bright characters. And, of course, I'm not talking about color (dolls can be made black). The silhouette of each hero should reflect his characteristic features of appearance and character.
3. Cut out cardboard figures of animals, trees, houses, your favorite cartoon characters.

4. Glue with hot glue to a barbecue stick.


5. Illuminate the box with a table lamp, and you can play.


More characters - more amazing stories!


Here's what it looks like from the back:

Now the classical shadow theater is threatened with extinction. But in the 2000s, a new direction arose in this mysterious art. Instead of puppets, dancers create incredible performances on stage, captivating the audience with the flexibility of bodies, the play of light and shadow.
We offer two workshops on making shadow theater for children at home. You will learn how to make a screen and actors for a theatrical performance from light and shadow with your own hands, get acquainted with the theater of manual shadows, download templates for figurines of fairy tale characters and find useful tips on working with shadow theater.
Shadow theater helps children get acquainted with theatrical activities in a fun way, develop speech, show imagination, encourage children to actively interact, communicate, etc. Theatrical performances can be performed with children of all ages, both in a group and individually.
Shadow theater from Lego
We present a step-by-step master class with photos on how to make a shadow theater from the Lego Duplo constructor or its analogues.
Necessary materials:
- constructor Lego Duplo ()
- Lego Duplo green building plate ()
- sheet of A4 paper
- phone with a flashlight function or other light source.
How to do
Build a theater stage frame out of red blocks and adjoining turrets out of colored bricks.

Source: lego.com
Place a white sheet of paper between the designs.

Build a stage behind the screen and build a phone stand out of blocks. Place the light source in front of the paper sheet.

Decorate the theater and prepare the actors for the performance.

Turn on the flashlight on your phone and start the show.

Shadow theater "Gruffalo" out of the box
Create your own shadow theater based on the popular book by Julia Donaldson "The Gruffalo" (,).
"The Gruffalo" is a fairy tale in verse for adults to read to children. A little mouse goes through a dense forest and, in order to escape from a fox, an owl and a snake, invents a terrible Gruffalo - a beast that loves to eat foxes, owls and snakes.
But can the resourceful little mouse outsmart all the hungry predators? After all, he knows very well that there are no Gruffalos ... Or does it happen?
 Source: domesticblissnz.blogspot.ru
Necessary materials:
- hero templates for printing (download);
- A4 paper;
- black cardboard;
- wooden skewers;
- scotch;
- glue;
- cardboard box;
- scissors.
How to do
1. Download and print shadow theater templates. Stick on black cardboard. 
2. Cut out the figures and glue a wooden skewer to each.

3. We make a screen (screen) for the shadow theater.
Lay the box flat. On large rectangular parts of the box, draw a frame, stepping back 1.5-2 cm from the edges. Cut along the marked lines.


4. Reassemble the box in its original state, but with the colored side inward.

RECOMMEND ON LABYRINTH.RU
5. Take a sheet of white A4 paper and cut it to fit the box. Cut out a rectangle of the same size from black cardboard.

6. Cut out trees from black cardboard and stick on a white sheet.

7. Glue the paper to the inside of the box as shown in the photo below.

8. Make a slot in the bottom of the box for the figurines.


9. Fix the screen to the edge of the table with tape.

10. Install the lamp at the back at a distance of 2-3 meters from the screen. In order for the shadows to be clear, the light must fall directly, and not from the side. Remember to warn your child to be careful with the hot lamp.

Shadow theater is ready! Turn off the lights, invite the audience and put on a shadow show.
Theater of hand shadows
Hand shadow theater is one of the simplest types of shadow art. For his equipment, you will need the most common items - a table lamp and a screen - a large sheet of white paper or cloth. If the room has light walls, a theatrical performance of light and shadow can be shown directly on the wall.

The drawings show how with the help of hands you can create silhouettes of animals, birds, people. With practice, you can bring the shadows to life and tell your own story.


- You can start introducing children to the shadow theater from 1.5-2 years old. The first classes should take place as a theatrical performance, when the roles are played by an adult, and the children act as spectators. After the child understands the rules and traditions of theatrical art, he can be included in the game as a participant in the action. Children play and voice roles, learn texts and poems. At first, trust small uncomplicated roles. Then gradually get harder.
- Cardboard figures of shadow theater actors should be black, then they will be contrasting and noticeable on the screen. For self-production of figures, use curly stencils. If you plan to reuse homemade figurines, we recommend that you laminate them.
- In order for the shadows to be clear, set the light source behind, slightly to the side of the screen. The light source will be an ordinary table lamp or a flashlight.
- The size of the shadow on the screen depends on the distance from the figurine to the lamp. If you bring the figure closer to the screen, then its shadow will become small and clear. If placed further away, the shadow will increase in size, and the contours will be blurry.
- To ensure that the scenery does not move during the performance, fasten them to the screen itself with adhesive tape or paper clips.
- Whatman paper, tracing paper or a white sheet is perfect as a screen. The smaller the screen you use, the thinner and more transparent it needs to be, and the brighter the light source you need.
- In order to create a theatrical atmosphere, you can draw a poster, tickets, and even arrange an intermission.
********************************************************************
We recommend the book "A Night's Tale" by Beatrice Coron (
Good day to all! Today I want to tell you about one very exciting and simple activity that will not only amuse you and your children, but also help develop hand plasticity. Also, do not forget that the New Year is ahead))) You can prepare a whole scenario or just a short number and, together with your child, please relatives and friends!
As you may have guessed from the name, we will talk about the shadow theater for children. Shadows can be created both with the help of cardboard figures on sticks, and simply with your hands, without any special devices. It's easy to organize!
There are several options:
1. First of all, we make a screen that can be installed on the table.
2. Another version of the shadow theater for children looks like this:
Use hands instead of stick figures.
The main thing is that the light source is behind you.
The screen here can serve as an ordinary wall, and a large-format drawing paper, and even an ordinary sheet in the doorway. The number of actors is not limited!)))
Check out this mesmerizing video for inspiration, it's really impressive!
Or here's another option:
How to portray such wonderful characters for the shadow theater yourself?
Here I will help you! I throw up a couple of ideas. Train yourself, teach this to the kids and I'm sure they will be delighted!!!
To get started, take a look at the illustrations for the wonderfully cute book "Shadows" from 1942.
The authors of the book give the following recommendations: “On a sunny day or in the evening, with a lamp, clear shadows appear on a brightly lit wall. Fold your arms, as shown in one of the drawings, stand against the wall so that the shadow from your head and shoulders does not block the shadow from your hands, and the shadow of a goat, a dog, a hare will appear on the wall.
If you move one or the other finger, and the shadow of the animal opens its mouth, the dog will bark, the hare will wave its paws. You can put a paper cap on your finger to make the ears longer (donkey), a beak cut out of paper, and pinch the tail between your fingers.
If two shadows show, you can play whole scenes: the dog barks, and the goat threatens to gore her, etc. In order for the shadows to be clear, the light should fall directly, and not from the side, and the lamp should not be close, but two or three meters from the wall.
We only give 18 shadow pictures. But everyone can come up with just as much, if not more. Showing shadows is a lot of fun and kids love watching them so much.”
Shadow theater is a whole art that attracts crowds of spectators around the world! Chinese pictures:
And some more interesting ideas:
3. For the smallest, you can use an ordinary children's tent, which is covered with a white sheet. The sheet, so as not to fall off, can be attached with clothespins. A lamp is placed inside the tent and a child climbs in. Remember that it is best to use lamps that do not heat up - energy-saving ones so that the child does not get burned !!!
Finger shadow theater is not only a fun and exciting activity, but also a game that helps your child develop imaginative thinking and fine motor skills!
For older children, in the puppet theater of shadows, you can make complex performances based on fairy tales, fables, small plays. This requires quite a long preparation (especially a lot of time is spent on making dolls), but the result can be more than spectacular.
Here is an example of such a performance staged by adults:
And this is a performance staged by students in grade 4:
If you are interested in the idea of shadow theater for children, then it's time to get the kids interested too!!! A cartoon about how cool and fun you can play with shadows!
All the best to you and success in your work!


