Decorate your birthday cake with your own hands. Birthday cake for a boy - we fantasize and create it with our own hands
Sometimes you need to make a birthday cake. For the birthday of your child whom you love. Country Crock recently released the results of a survey of 1,000 parents. It turned out that 55% of them eat a birthday cake before their child’s actual birthday. I invite all parents to improve and learn original but simple ways to decorate birthday cakes for children.
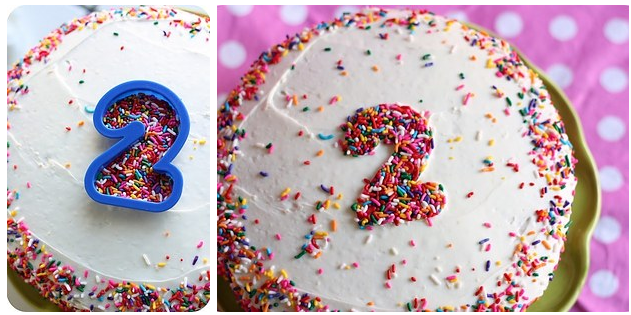
1. Decorate the cake (it can even be store-bought) with a number made from confectionery sprinkles
2. Buy two round cupcakes from the store or bake them yourself, and cut them so that you can put the number 3. Cover the cake with icing and candies.
3. Cupcakes can be turned into pandas using chocolate sprinkles and candies.

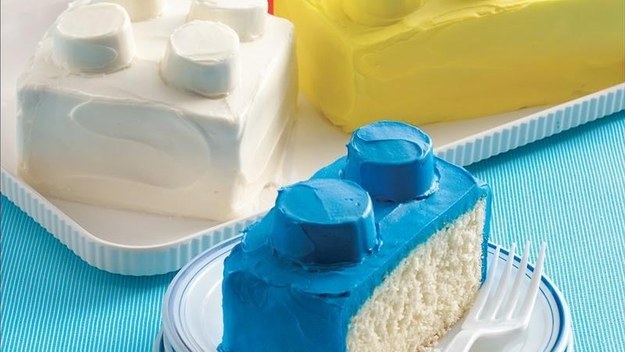
4. Cut the sponge cake into rectangles, place marshmallows on top, cover with icing, and the Lego cake is ready!
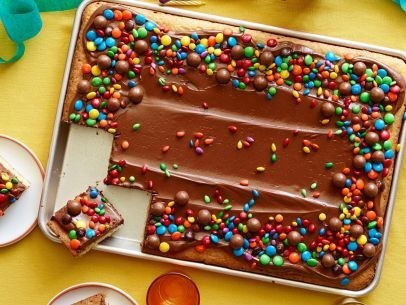
5. Decorate the cake with M&Ms and Kit Kat bars
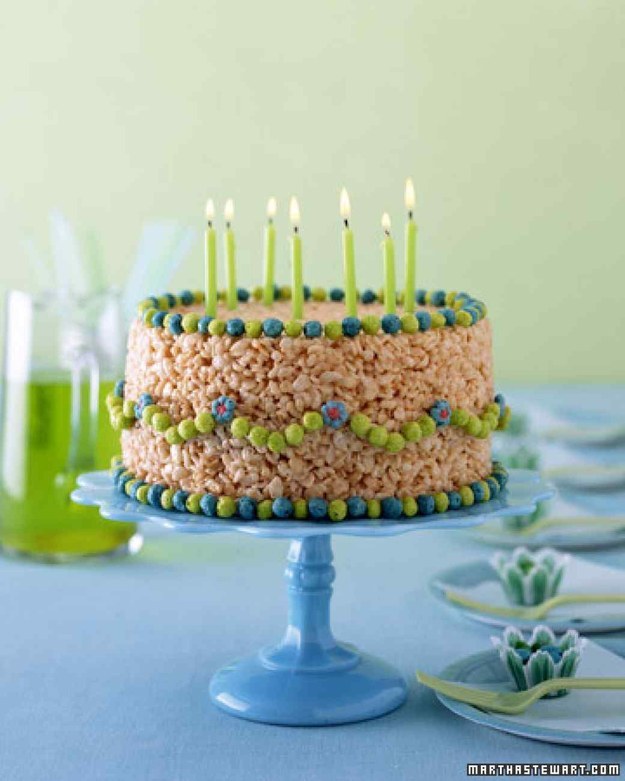
6. Fish Cake: Super cute and totally doable!
7. And you don’t have to bake a cake made from puffed rice at all.
8. Bake the cake, cover it with chocolate glaze and decorate with candies
9. Decorate half of the cake with M&Ms, arrange the candies by color to make a rainbow

10. Bake cakes of different colors by adding food coloring to the dough

11. Ice cream cakes are delicious and don’t require baking. Just buy ice cream and cookies.
Organizing a fun children's party that all participants would enjoy is a difficult and responsible task. The culmination of the celebration at all times was and is, of course, the cake, which is worth paying special attention to, because the price for a successful dessert design idea is the admiring eyes of your child.
And we will tell you several options for decorating children's cakes in the photo.
To begin with, it is worth mentioning 3D cakes in the form of your favorite toys or cartoon characters. So, for example, for girls, the ideal design could be a dessert in the form of a princess doll made from mastic...
...or combining elements of a plastic doll (usually waist-high) and an edible skirt made of dough and cream.


Desserts depicting various bears and bunnies look quite cute.


And of course, the most popular are cakes in the shape of characters from comic books, animated series and fairy tales.


Entire compositions with many small details made from sweet mastic, chocolate and sugar figures, sweets and marzipan look great.


The design of the cake may reflect the time of year your child was born or how he prefers to spend his time.


If you do not feel inclined towards confectionery design and mastic modeling, you can decorate the finished cake with cream designs using a special syringe (or bag) and various attachments for it.


Decorating cakes is not such a difficult task, the main thing is to show your imagination. And if you involve your children in this, then preparing for the holiday can become no less exciting and memorable than the celebration itself. In addition, the child will have a chance to show off his new knowledge and skills to his peers.
All that remains is to decide on the recipe for the holiday treat. It should be as tasty and healthy as possible, so all kinds of chocolate pastries can be the best option.
DIY CHILDREN'S CAKE DECORATION!!!
What treat does your child look forward to most on his birthday? Of course, he is looking forward to the appearance of a bright, beautiful and delicious cake with a lit birthday candle!
Nowadays, confectionery shops offer such a variety of cakes decorated with sugar figures that, perhaps, not a single child can resist them. Many parents, for one reason or another, cannot afford to buy or order such a cake, and yet you can prepare a similar one at home, even without any special tools or without any special cake decorating skills.
Sugar mastic or marzipan for decorating the cake can be bought in stores in your city, the order is usually delivered in 1-2 days - OR YOU CAN MAKE IT AT HOME from marshmallows-marshmallows (these are marshmallow-like candies, an analogue of marshmallows, sold in stores, consisting of sugar or corn syrup, gelatin, softened in hot water, dextrose and flavorings, whipped to a sponge consistency).
YOU WILL NEED:
1 pack of marshmallows - (100 g)
Approximately 200-250 g of powdered sugar (be sure to sift!)
Starch
WE'RE COOKING:
1. Melt a package of marshmallows with 2 tbsp. water. in the microwave. Attention! When heated, the soufflé swells; it must be thoroughly stirred periodically during the melting process, otherwise the mass will “run away” from the container or become rubbery (3 packs of soufflé are usually melted in 2 minutes, stirring 2-3 times). It is very important that the entire soufflé is melted; if lumps remain, they will create a defect when covering the cake, and the structure of the mastic will be slightly rubbery. When the mass becomes homogeneous, you need to gradually add powdered sugar, stirring constantly.
2. When the mass reaches a thickness and it becomes difficult to mix with a spoon, pour the mass onto a table generously sprinkled with powdered sugar and knead the mastic with your hands, periodically adding powdered sugar. The mastic must be kneaded well until the consistency of a fairly dense dough.
3. The mastic remains quite sticky. In order for it to stop being so sticky, you need to place it in a sealed bag and put it in the refrigerator for at least 30 minutes, and preferably 2 hours.
4. Before work, remove the mastic from the refrigerator (you can heat it in the microwave for 20 seconds, as the mastic hardens a lot), knead, adding powder or starch if necessary until it reaches the consistency of plasticine. For sculpting, the mass must be more dense. And for coating, the mass must be elastic, so try not to transfer the powder, otherwise the mastic may crack or fit poorly on the cake.
5. Dyes (preferably liquid) should be added to the mastic during mixing.
As an example of a simple decoration, we present to your attention the appliqué technique. If you and your child worked on appliqué, then you won’t have any problems with the cake.
For decoration you need:
Any cake of your choice with a diameter of approximately 21 cm.
Approximately 200 g butter cream (condensed milk + butter)
Approximately 300 g sugar mastic
Liquid food dyes
A picture of your favorite cartoon character printed in 2 copies (Krosh will be in this cake)
Starch
1. First, you need to carefully grease the top and sides of the cake with butter cream in order to level and smooth the surface of the cake, and also to prevent the mastic from melting later - butter cream prevents this. The accuracy of the finished cake depends on how smooth and even the surface is. The cake itself can have any filling, as long as the top and sides are coated with a thin layer of buttercream. Then put the cake in the refrigerator for 1 hour
2. Paint most of the mastic (200 g) in the desired color. In this case, the color is pink, because... cake for a girl.
3. Roll out the mastic in a thin layer on a table dusted with starch. Make sure that the mastic does not stick to the table when rolling out.
4. Carefully transfer the mastic onto the cake.
5. Using your palms or a special pastry iron, first smooth the top of the cake, and then carefully the sides.
6. There is no need to try to smooth the sides on both sides at once with both hands; it is better to smooth it starting from one side and in a circle. If you iron it correctly, there will be no creases. Carefully cut off excess mastic with a sharp knife. Place the cake in the refrigerator for at least another hour.
7. If you do not have experience in decorating cakes, then you should choose a simple picture for the applique, with a small number of details. When printing a picture, consider the size of your future cake.
Carefully cut out the printed figure along the outline. Attach the cut out silhouette to the cake to estimate the approximate location of the design.
8. Roll out a piece of mastic, painted blue, into a thin layer. Cut out the body-circle of Krosh along the contour and place it on the rolled out mastic. Using a sharp knife, carefully cut the mastic along the contour of the paper.
9. Lightly moisten the back side of the cut-out mastic piece with water (without fanaticism) and carefully place it on the surface of the cake (moistened side down). In order not to make a mistake with the location of the part, you can attach the paper crumb ears to the cake, and only then glue the body to the cake.
10. Next, in the same way, you need to cut out the remaining parts of Krosh one by one. First the ears, arms and legs, and then the eyes, nose and mouth. During the process, do not forget to check the printed copy so as not to make a mistake with the location of the parts. You can outline the contours of Krosh with a blue food marker, but this is not important. Food markers are often on sale during Easter.
11. To make the cake more festive, you can decorate it with mastic balls. Balls are much easier to make than Krosha, you don’t need to cut them out, just give the ball shape to pieces of colored mastic. The threads are made from white mastic rolled into a thin rope. All parts are glued using water.
12. The inscription on the cake is also made from mastic rolled into flagella. The flagella need to be shaped into the required letter; modeling skills with plasticine will help here. To decorate the sides, use a cookie cutter to cut out flowers from mastic rolled out into a thin layer. To do this, you can use small cookie cutters or borrow a mold from your child's modeling kit, which must be thoroughly rinsed before use.
13. The cake is also decorated with waffle butterflies; they are sold ready-made, but you can do without them.
Sugar fondant serves as an edible decoration for the cake, but is not the main ingredient, and due to the large amount of sugar, children should not indulge in eating fondant, which most will try to do. You can remove mastic from a piece of cake intended for a child.
A holiday is a time to please your loved ones with unexpected gifts, pleasant words, invite guests to visit and make little dreams come true. And to make sure the day is memorable, you can find out in advance how to beautifully and originally decorate a birthday cake and see step-by-step photos.
Decorate a homemade dessert with fruit - what could be simpler and more affordable. At the same time, baked goods can look very original and appetizing, which will only delight the invited guests.
You just need to know a few simple secrets and not be afraid to put them into practice:
Coat the top of the cake with sour cream or custard. We arrange a berry-fruit mix of kiwi, banana, cherry and strawberry in a spiral. We dilute the jelly in a small amount of water (choose the flavor at your discretion) and apply it to the berries with a pastry brush. Place the dessert in the refrigerator for half an hour, then repeat the procedure.

Prepare syrup from one glass of sugar and a glass of water. Cut the apples into thin rings and boil them in the sweet mixture until plastic. We roll the first petal into a tube, and twist the rest on top until we get a flower. Turn the edges of the apples slightly outward.


A simple and effective option for decorating a birthday cake (photo can be seen below) is to use fresh (or frozen) raspberries and “plant” them on mint leaves. Unforgettable taste and pleasant impressions are guaranteed.


Many people cannot imagine their life without chocolate, which is why jewelry made from this “material” is so popular. Some ideas can be brought to life even at home.

The simplest and fastest option that beginner confectioners will like.

To create it you need:
- Place the chocolate bar (most often milk is used) in a warm place for 10-15 minutes. Sometimes it takes a little more time.
- Working with gloves, cut the shavings with a knife, which will immediately begin to curl. We hide it in the refrigerator until it hardens completely.
- After the required time has passed, decorate the cake in any order.

To make a more elegant dessert decoration, you will need a little more time.

But all the efforts will be justified by a wonderful result:
- Melt the dark chocolate bar over low heat (with a little milk) or in the microwave. It is better not to use a water bath, as condensation will begin to form.
- We draw any pattern on parchment paper - snowflakes, stars, hearts, lace, flowers.
- Pour the melted chocolate into a pastry syringe and carefully trace the resulting pattern. Another option is to use a plastic bag and make a small hole in it.
- You need to work quite quickly, since the chocolate “paint” hardens in a few minutes.
- Place the parchment in the refrigerator for about half an hour. After the specified time, carefully separate the edible layer and decorate the dessert with it.

Read also 
I think that there is not a single Soviet child who has not tried or at least heard about this masterpiece...
Increasingly, birthday sweets are decorated with chocolate leaves. It’s quite easy to repeat this trick at home if you take into account all the details and advice from professionals.

Here's how to decorate a birthday cake, also focusing on special photos:

Many are amazed at what wonderful desserts modern confectioners produce.

But to make your own “magic” glaze, you only need a few ingredients. Namely:
- 150 ml glucose syrup;
- 150 g granulated sugar;
- 100 g condensed milk;
- 75 ml drinking water;
- 12 g gelatin (small package);
- 1.5 chocolate bars.

Main stages of preparation:
- Soak the gelatin in 60 ml of cool water. Mix it a little and set it aside.
- Combine the glucose syrup with granulated sugar, put it on low heat and wait for the mixture to boil. If necessary, you can add a little water.
- Then turn off the comfort and wait for it to cool completely.
- Carefully add the swollen gelatin and pour in the condensed milk. Mix the mixture thoroughly until smooth.
- Grind the chocolate in any convenient way. You can simply tap it on the table without taking it out of the package. Transfer it to a deep bowl and fill it with the resulting syrup. Beat the glaze with a blender at medium speed for several minutes.
- We hide the container in the refrigerator at night. Before decorating the birthday cake, heat the icing in the microwave to 35 degrees and immediately begin covering the surface of the dessert with it. The result is excellent, as in the photo below.

Read also 
Anyone can make Napoleon cake from ready-made puff pastry with condensed milk. The main thing is to listen to...
Stencils for decorating a cake at home

If a person knows how to draw at least a little and beautifully cut out contours, then you can use the following option for decorating homemade baked goods:
- We take a sheet of paper whose diameter is slightly larger than itself. We draw on it any ornament that comes to mind.
- We cut out the contours as evenly as possible, but if some error occurs, it’s okay.
- Hold the sheet over the cake (it’s better to ask for help if you don’t feel comfortable doing everything yourself) and sprinkle it with powdered sugar or sifted cocoa.

Some more interesting ideas
If you don’t want to spend a lot of time decorating or if nothing good comes out, this is not a reason to be upset. After all, there is always the opportunity to use simpler options that can look no less impressive.
First of all, these include:
- Drizzle the sides with chocolate or multi-colored glaze. With its help you can also make a beautiful inscription for the hero of the occasion.


- We use ready-made chocolate figures, which should be ordered in advance online or purchased at a confectionery store.


- Whole (or chopped) walnut kernels are great for decorating desserts. With their help, you can “draw” a tree or flowers, and also draw a border on the sides. Almonds are well suited for the same purposes.


- A classic combination is chocolate with whipped cream. Various fruits or berries are often placed on top. And so that they do not lose their appearance, they should be dipped in transparent jelly.


- It’s very easy to decorate the sides of a birthday cake at home with cream stripes (use a pastry syringe for this) or “broken” chocolate.


- You can also decorate the sides with a picket fence made of wafer rolls or long cookies. But in this case, you should make sure that the dessert does not turn out too sugary.


- Another option is to miss