How to set the strings on an acoustic guitar. How to change the strings on a guitar? Instructions for changing and installing new strings
Many are already familiar with nylon strings. And they know very well that they do not have "hammers"
(special small balls, thanks to which the strings stay on the bridge - bridge.)
For such strings, a special knot was invented that needs to be tied around the bridge.
In fact, there are several nodes, one of which I remember well. This method is a little more complicated than others, but more versatile and accurate in the end.
It's easier to show you visually with the help of the photos below. The third black string is taken exclusively for better visibility. :)
1. Insert the end of the string into the hole of the tailpiece and drag it about 10-15 centimeters (look at the photo).
2. We tie a knot at the end of the string, the closer to the edge, the better. 
3. We take the knot and wrap the string with a ring, passing it under it, (as in the photo).

4. We pass the end with a knot into the resulting ring, thereby forming a loop around the bridge. You don't need to tighten it.
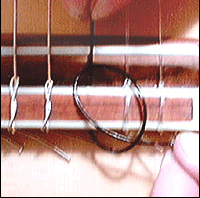
5. Again take the tip of the string with the knot, as if trying to wrap it around the loop a second time. (look closely at the photo)
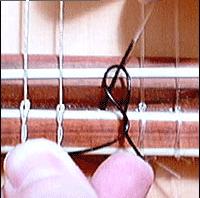
6. We wrap it around the loop a second time to form a loop, wrapped twice around its axis. (photo explains more clearly 🙂)

7. We start the tip with a knot under the string holder (bridge) and slowly pull the free end of the string. At this point, you need to try to keep the end with the knot under the bridge. (photo to help)
There comes a time in every guitarist's life when you need to change strings on your instrument. And if for the majority this is a task that is quite trivial and does not require much effort, then for a beginner, changing strings turns into many hours of "dancing with a tambourine", and not everyone succeeds. change strings the first time.
Why change strings at all? Over time, their sound gets worse. And sometimes it happens that the strings break. Then you have to replace them. What happens to strings if they are not cleaned and changed?
That is why we decided to devote this article to the question: "". Here we will try to give the most complete instructions, as well as analyze all the possible complications that may arise during this simple operation.
What will be needed when replacing
So, to change the strings on an acoustic guitar, we need to prepare the following tools:
- new strings (for acoustic guitar my favorites are Elixir strings or Ernie Ball strings);
- napkins;
- pliers or pliers;
- a device for winding strings (hands are fine);
- lemon oil (optional)
- a small box or other container in which you will put small parts;
- tuner.
Removing old strings
To start we need remove old strings with pegs. Many people think that just cutting them is enough, but there are a number of reasons not to do this.
Firstly, thick and metal strings will be extremely difficult to cut. I personally tried to cut the strings with various cutting tools, ranging from kitchen and outdoor knives to wire cutters. These attempts only led to the fact that the strings were either bent, or the knives and wire cutters stupidly fell into disrepair.
A second reason Do not cut the strings is the possibility of deformation of the fretboard. We will not go into details, as the explanation of this phenomenon will take us a very long time and requires some additional reasoning, so just take this fact on faith.
In general, we realized that strings should not be cut. Now let's see how to remove them correctly. If you are a complete beginner, then first you should familiarize yourself with the structure of the guitar.
We start by completely weakening them. After loosening, remove the strings from the pegs. It is almost impossible to make mistakes in this operation, so do not be too afraid.
And now we need to release the strings from the stand. On almost all pop guitars, this process is carried out in the same way - you pull the pins out of the stand and take the strings out of the body. Pins are such plastic rivets, vaguely resembling mushrooms, which are inserted into the stand behind the saddle. Finding them is easy, as the strings go exactly under them.

We take out pliers or pliers and pull them out. Do this carefully, as you may scratch the guitar or damage the pin itself. Put the pins in some box so as not to lose them.
With classical guitars, the situation is slightly different. If you have nylon strings with tips, then you just pull them out of the stand and that's it. If not, then they should first be untied or cut.
Cleaning the guitar from dirt

Next comes fretboard cleaning is a completely different song. Lubricate our napkins with lemon oil and begin to wipe the neck. Particular attention should be paid to cleaning the fret sills, because a huge amount of all kinds of dirt and dust accumulates there. We wipe very carefully.
And now, when the guitar has regained its presentation, we can begin installing new strings.
Installing new strings
There are many opinions about the order in which the strings should be placed. I start the setup on the sixth string and go in order, i.e. after the 6th I install the 5th and so on.
Another debatable issue is how exactly to wind the string on the peg. There are those who believe that it is not necessary to wind it in principle, but you just need to insert the string into the peg and twist it. Others, on the contrary, argue that you must first wrap the string around the peg, and then twist it. Here the choice is yours, but I think the first method is much easier for a beginner.

In any case, first you need install new strings in the stand. To do this, insert the tip of the string into the hole in the bridge, and then insert the pin into the same hole. After that, pull the other end of the string until it stops, so that the tip is fixed in the pin. It is important here not to mix up the pins and prevent the strings from getting tangled, so it makes sense to secure the string in the tuning head first before installing the next one.

When setting the strings into the tuning pegs, it is very important not to mix them up. Pin numbering starts at the bottom on the right row, and ends at the bottom on the left row (assuming you hold the guitar with the top facing towards you and look at the headstock).
When fixing the string in the peg, try not to bend it, otherwise it will burst in this place when you start to pull it. If you decide to twist the strings on the peg before tightening, then the following can be considered the optimal twisting scheme: 1 turn of the string above its tip, looking out of the peg, and 2 below it.
Tighten the strings carefully. Do not try to tune the guitar right away, as there is a risk that the strings will burst from this. Just pull each one lightly.
Tuning a guitar after changing strings
And then everything is quite simple. Grab a tuner and start tuning your guitar. It makes sense to start on the 6th string, so you don't have to tune the guitar 300 times. When setting do not twist the pegs sharply(especially for thin strings), as there is a risk that the strings will break from too sharp a tension.
After tuning, carefully put the guitar in the case and take it out after a couple of hours to adjust and check if the neck deflection has changed. We do this several times.
Ready! We've installed the strings. I hope, after reading this article, you have an idea of \u200b\u200bthat.
To understand the principle string tension on the guitar, first consider the types of strings. They are metal and synthetic.
Metal - stretch more than synthetic and are used in reinforced guitars (which have a truss rod). Putting them on a classical guitar is a thankless task and can result in damage to an expensive instrument, but they are louder than synthetic ones.
Synthetic - find their application for classical guitars. They are durable and very good for beginners. after playing the guitar, the fingers do not hurt as much as after the steel ones.
The first three strings in them are made of carbon or nylon. The rest are covered with copper or silver-plated winding. Carbon is more durable than nylon, but more expensive.
But as they say, closer to the body)
How to string nylon strings?
To do this, pass the string through the hole of the guitar stand and fix it according to the picture.
After that, you need to push it into the hole of the peg you need, not too deep, so that it does not stick out. It was in the USSR that upright strings were fashionable, but as practice shows, they give nothing but a torn case.
Wind the rest of the string by hand around the peg in a clockwise direction - this is what most guitarists do.
For convenience, I give a photo of the headstock so that you do not get confused on which peg the string under which number is to be pulled

After you have set the strings, you need to tune them with the help of peg mechanisms. I recommend that you first put all the strings, pulling them to the point where they stop rattling. And then adjust each separately. Otherwise, you will have to check the standard more times (for example, with).
It is not necessary to tune nylon strings very precisely right away, because. they tend to get very upset for quite a long time. So tune your guitar and let it lie down for a couple of days. At the same time, tune the instrument from time to time.
There is a way to quickly tune nylon strings. It consists in the fact that you pull them one and a half to two tones above the standard system, repeating this procedure after a couple of hours. But strings stretched in this way “live” less.
Another tip for installing new strings, many guitarists practice it. Before as pull on must be pulled out by hand. You need to pull from the nut to the stand.
Stretching the stringson electric guitar
First install them in the tailpiece of an electric guitar or in a stand, depending on the design of the guitar.
On Stratocaster guitars, the tailpiece is located at the back of the body. And, for example, on such models, the design of which is similar to the Gibson SG - it is located on the upper side of the case.
Stretching guitar strings with locking mechanics
(Such mechanics are often referred to as Floyd Rose-type mechanics.)

To string a guitar with floyd, first fix the string on the stand by locking it with a screw mechanism. Next, thread its free end into the hole in the fixing nut.
See below for more information on how to string a locking action guitar.
- Bite off the ball end with pliers.
- Secure the string to the bridge using an L-key or some other tool, depending on the guitar model.
- Loosen the locking mechanism of the saddle and pull the string through the hole in the direction of the pegs.
- Tune the string to a pitch close to the desired note using the peg. At the same time, turn the tuning screw on the stand to an intermediate position in which the string will not be too tight yet.
- Tighten the latch located on the top nut.
- Adjust the sound to the reference with the tuning screw.
- Carry out the procedures described above for the remaining 5 strings.
- Another important addition. If you change the strings to thinner ones- do not forget release the springs inside the case. This is done in order to compensate for the reduced tension of the thinner strings.
If you have unscrewed the tuning screw to the stop, release the latch on the saddle, put the tuning screw in an intermediate position, pull the string with a peg and tighten the latch.
How do you string the strings on a guitar with a conventional tuning machine?
- Fix the string in the stand and stretch it towards the pegs. Without a pull, the string will often not fall into place and this can create extra work for you when it is pulled.
- Thread it into the peg you need, while leaving slack (for strings with a braid - 5 cm, without it - 10 cm).
- Bend the string in the direction of rotation of the peg. Most often counterclockwise.
- Tighten the string with a peg, while holding it in tension with your free hand for a tighter winding of the turns.
- When it has pulled up a little, insert it into the slot of the nut.
- Stretch it as in the case of a nylon guitar. While stretching, tune the string again and again until you get it to hold the line.
- Cut off the remaining piece of string with pliers.
That's it, the guitar is in tune. Enjoy your game!
Sooner or later, any guitarist is faced with the need to replace old strings with new ones (we wrote about the signs by which you can determine that the strings should be changed in the article:). But not everyone, and especially a beginner, knows how to do it correctly, so in this article we will talk about this, although not a difficult, but very important process.
Changing strings on an electric guitar

How to remove old strings
The easiest way is to first loosen the tension of the strings, in order to avoid injury, bite them with wire cutters, then remove the remnants from the typewriter and pegs. The method is more complicated, first you need to twist the old strings from the pegs, you can do it quickly with the help of such a turntable (we talked about it and other accessories useful for the guitarist in this article:).

How to install new strings
Before installing new strings, make sure that you put them in the correct order, usually each envelope from the package is marked with the number of a particular string, but if there is no such marking, and this also happens, you will have to select the strings by eye, and it’s better to do it in advance and not in the process, so as not to spoil the kit.
It is best to set the strings not in order, but in the sequence 1-6, 2-5, 3-4. Such an installation will make the tension force of the strings on the fingerboard symmetrical and uniform, which in turn will positively affect the state of the neck and minimize the possibility of violation of its geometry.
Setting the strings in the bridge primarily depends on its design, if with a tom, a hadtrail and a classic Strat tremolo you can simply thread the strings through the bridge, then with a floyd, caler, etc. everything is not so simple and the string will still have to be fixed in the typewriter using special keys.
After installing the strings in the bridge, you should pass the string through the hole in the tuning rod, however, there are nuances, such as the number of turns, because if there are a lot of them with the system, there will be problems, the optimal number is 2-4 turns on the strings without a braid and no more than 2 -x turns on braided strings.
For a more secure fixation of the string in the peg, you can install it as follows:

However, such manipulations are often unnecessary and, of course, on instruments with lock pegs or top locks, such an installation will not bring any benefit.
Changing strings on an acoustic western guitar

How to remove old strings
There are also two ways here: the first, with the help of wire cutters, is simply to bite the strings and remove the remnants from the pegs and the bridge, and the second, also using the turntable for the pegs, loosen the tension of the strings, and use it to remove the buttons holding the strings in the bridge:

However, if you do not have such a device, you can remove the locking buttons with improvised means, for example, with a coin.
How to install new strings
Installing new strings on a western guitar is very similar to the procedure described above with an electric guitar, in the same way you should set the sequence of strings, make no more than 2-4 turns on the strings without a braid and no more than 2 turns on the strings with a braid and fix on the tuning pegs string.
However, the installation of the string in the bridge is very specific, first you need to place the string in one of the holes in the bridge, close the button and press it well so that it does not squeeze out when the string is pulled.
Changing strings on an acoustic classical guitar

How to remove old strings
The easiest way is to simply loosen the tension of the strings, cut them and carefully untie the knots on the pegs and bridge, you can of course untie them without cutting, but this method will take more time and effort.
How to install new strings
To begin with, before installing, make sure the order of the strings is correct. Then thread the string through the hole in the bridge and carefully make a knot as shown in the picture:

Make sure that the knot is tight and does not fall apart.
Then thread the strings into the pegs, starting with the first and, according to the diagram in the figure, make a knot:

Again, keep an eye on the density of the knot and do not forget that 4, 5 and 6 strings are wound in the opposite direction from 1, 2 and 3.
Changing strings on a bass guitar

How to remove old strings
Due to the fact that cutting or biting the strings on a bass guitar is a rather complicated and time-consuming task, the easiest way is to simply loosen the tension of the strings with the help of tuning pegs, do not forget about the turntable, it will be much faster.

You need to loosen the tension in the following order 1-4-3-2, so the force acting on the neck is relatively evenly distributed and the chance that you will break the geometry of the neck will be close to zero.
Then you should remove the strings from the holes of the pegs and the bridge.
How to install new strings
First of all, before installing, you need to make sure that the order of the strings is correct. Then thread the strings through the holes in the bridge, depending on the design, the strings can also pass through the body.
It is worth noting the fact that the strings on bass guitars are often inserted directly into the tuning pole:

To correctly insert the string there, you should attach it to the peg imitating tension, step back 1.5-2 centimeters to the top and cut off the end of the string, this will be easy, since the strings at the end of the bass guitar are usually much narrower. The strings should be placed in the same order as the strings were removed 1-4-3-2.
Conclusion

In conclusion, I would like to say that, depending on the instrument, the force acting on the strings can reach up to 100 kilograms, as a result, in order to avoid injuries when replacing, you need to be very careful and not apply excessive force, especially when tensioning new strings.
Consider installing nylon strings using the classic pigtail binding and one hole for each string. Fixing strings on guitar pegs in a separate article
In this article, we will discuss in detail how to tie strings. We will also learn some principles that are important to remember so that the strings do not untie or gradually unravel.
I must say right away that we will consider fastening strings on a stand using two holes for each string in a separate article, as well as fastening with beads in a separate article.
So we consider a simple but insidious knot.
You yourself have tied the usual knot for attaching nylon strings more than once, you can imagine it well and you can see it in the first photo. Everything is simple.
This method is used everywhere. The knot is easily and clearly formed, put the string into the hole, wrap the tail around the base from either side and thread it through the loop. Like a normal node. But there are a couple of points to pay attention to.
Wrong stringing and two golden rules
The first rule of a good setup:
In order for the string to be held securely, you need to bring the tip of the string over the edge of the string-holding panel.
I see the incorrect fastening of the strings on the stand all the time. It doesn't matter what qualifications the guitarist has. Moreover, slipping of the string due to the edge can occur with a slight weakening during tension. Those. the guitarist ties everything correctly, but then, when he turns his attention to tightening the strings on the peg mechanism, loosens the string, the knot unravels a little, and this is enough for the tail to pop out.
We look at the wrong engagement in the photos, which are even posted on photo services.
The photo above clearly shows that the 6th and 4th strings are tied incorrectly when the tails of all the other strings are thrown over the bone edge. Although there is an interesting fact that the tails of the wrong strings are pushed under the adjacent string. More photos.

Anyone who understood everything from the above, in this photo sees the wrong fastening of the 6th, 4th, 3rd and 2nd strings. Not bad at all - only two out of six, four penalty loops! And no knots.
The insidiousness of the situation lies in the fact that such an unfinished knot will hold for some time, and for bass strings with a gimp, perhaps even for quite a long time. But I recommend that you do not tempt fate, because if it pops up it will be ugly and painful.
But that's not all, there is second rule, which is best done when setting the strings:
The first and second strings of the guitar should have a knot that will not allow the string to slip out.
Oh, never slipped! What are you talking about!
Never slipped, because everything is up to the first time. As the string unwinds, it strikes the soundboard with such force that if your guitar has a lacquer coating, and not a lacquer shield, it will break through a decent ditch or make a dent.
Thin and soft strings slip through, and these are expensive carbon kits.

How to set guitar strings correctly
We repeat two rules for those who, instead of reading, run through the article - I'm playing the Aranjuez concerto with an orchestra so that I don't know how to tie the strings! Nevertheless:
- We tie knots on the first and second strings of the guitar.
- When braiding the strings around the stand, we wind the tip of the string over the edge of the string-holding panel ( red line in the photo below). This is what jams the string.
It is better to braid the first, second and fourth strings several times before leading over the edge.

Also a few turns, but a little on the other side.

The option for thick strings differs in that they can be wound immediately over the edge. This is especially true for the sixth string.

The number of threadings or turns can be correlated with the width of the bridge panel. The first thin string allows you to make several turns without any heaps. In this case, the knot will not spontaneously unravel when the tension is released, and the additional knot will itself go around the corner of the stand.
Don't leave string tails too long - they can scratch the soundboard at the same time, these tails are necessary if you do not tie additional knots. While the main knot is tightened, the string can slip and the long tail is pulled up. The tails can be cut off later at the very end, when the strings are already stretched. Of course, do not cut them too short.
The string has no direction, i.e. it does not really matter which end, where you will install it. But on some strings there are sparseness of the gimp for ease of threading. Fasten in such a way that this rarefaction does not fall on the bridge of the guitar. There may be trouble with the cantle.


