Simple cupcake decoration. How to decorate cupcakes with cream? How to bake raisin cupcakes at home
Instead of simply frosting your cupcake, use a piping bag to create beautiful or intricate designs. Both the regular swirls on cupcakes and the more fancy frosting designs you see in bakeries are created using this technology. This article includes instructions for beginners, as well as ideas and practical tips for experienced cupcake decorators.
Steps
Part 1
Preparing for decoration- If you are using parchment paper, to keep the pouch from falling apart, make sure you fold the corners or pinch the outer edges together.
-
Select a large pastry decorating tip. You will need one of the pastry nozzles or nozzles through which the icing will come out evenly. Use a large tip to make a standard cupcake swirl. A regular tip or a bag with a small hole without a tip can make intricate designs, but not the thick, decorative swirls used for most cupcakes.
- You can find the most common, large 1M and 2D Wilton brand piping bags at craft stores. If you want to try different types of curls, you may need to look for other tip designs in online stores.
- The round hole tips create a pattern that looks like smooth, soft ice cream. The star-shaped opening produces raised or ruffled swirls, and you can buy different types depending on which pattern you like best
-
Use a nozzle adapter if you are going to change pastry nozzles. The attachment adapters clip around the pouch so that you can easily remove one attachment and swap it for another shaped attachment. To begin, place the smaller lock ring into the pouch, then pull the larger ring over it from the outside of the pouch, holding the pouch in place. The pastry tip can be attached to the outer ring and can be easily removed when it's time to replace it.
- Use a large adapter for a large nozzle. The nozzle should be easily and firmly attached to the adapter.
-
If you only use one attachment, place it directly into the pouch. Point the decorating tip downwards and push it towards the narrow end of the bag. The spout should fit through the hole at the end, while the walls of the bag should hold it. If necessary, cut the hole a little larger, but don't worry if it doesn't fit perfectly; the frosting should hold the tip in place.
Place your piping bag into a cup or mug. Place the pouch in a long, cylindrical container with the tip facing down. This will stabilize the bag as you fill it with frosting. If you are using a plastic or linen bag, you can fold the edges out to make it easier to access the bottom.
- See the tips section on how to use the least messy method of filling a piping bag using cling film.
-
Spoon the frosting into a piping bag. Frosting is a thick enough consistency to fit into a piping bag, as opposed to soft, liquid-based frosting that may ooze out of the tip before you pipe it out. Either way, filling the bag creates a mess, so take your time.
Gently press down on the icing as you go. Continue filling the bag, lightly pressing the icing towards the bottom to remove any air bubbles. If you don't pack the frosting tightly enough, you will end up with gaps and unsightly air bubbles in the frosting.
Twist the top end of the bag. Twist and hold the top end of the bag so that when you press, the frosting does not fly out from the top. Try to swirl directly above the icing to reduce the chance of air getting in and mixing with the icing. Now you are ready to start decorating.
Part 2
Decorating cupcakes with swirlsFirst, practice on a plate. If you've never used a piping bag before, you might want to start with something less important than your cupcakes. Practice for the first time on a plate or piece of parchment paper, following the instructions below. If you want to get started as quickly as possible, you may still be tempted to squeeze a small strip of frosting onto the plate to avoid any bubbles at the very bottom.
- The instructions below remain the same whether you are decorating a cupcake or practicing on another round or flat surface.
-
Press most of the frosting into the top of the bag. Make sure the top of the pouch is tied or twisted as described in the previous section. Push most of the frosting towards the top of the bag until you have a small amount of frosting left at the bottom. Twist the bag around this mixture so that the rest of the icing does not fall out of the bag. Now you only need to pipe out a much smaller, more controlled glaze. Now you can decorate longer without feeling tired in your hands, and you will have better control over the decorating process. Now you only need to squeeze a much smaller, more manageable amount of frosting. You"ll be able to decorate for longer without your arms tiring, and you"ll have more control over your decoration.
- Warning: Don't try this with a parchment paper bag. It will fall apart or break through. If you find it easier to use a parchment bag, try to fill it only half full or less with frosting.
- When you run out of frosting, unwind the bag and add some more to the bottom. You should have enough frosting to decorate at least one cupcake.
-
Learn how to hold a piping bag. With one hand, hold the bag vertically and squeeze out the frosting, placing it on the mass of frosting that you have separated from the main volume. Use your other hand to guide the pouch. You can guide the pouch by grasping the top of the nozzle and guiding it like a handle, or you can grab it with your first hand, helping it move steadily and evenly.
Hold the bag vertically over the cake. The nozzle should be at a distance of 1.25 - 2.5 cm above the surface you are decorating. You can lift the bag up and down in small movements to see what distance creates the most attractive design, but don't push it close to the surface of the cupcake. This will most likely create a blurry or sloppy pattern.
- If you are decorating a specially shaped cupcake or the side of a cupcake, hold the bag at a 900 angle to the side you are decorating. The bag should be positioned horizontally in relation to the vertical surface.
-
Squeeze the frosting bag over the center of the cupcake. By squeezing the bag with your hand, you should end up with a dot or star on the surface of the cake, depending on which attachment you use. The piping should be slow and smooth, but strong enough to create a continuous flow of icing.
- Read the next few steps before you begin so you know how to properly move the piping bag
-
Continue piping in a spiral from the center of the cupcake. Maintain constant pressure in the bag to release the frosting evenly. Without lifting the bag, circle around the center icing point until it is completely surrounded. Don't leave any space between the circles and the center point. Don't leave any space between the circle and the central dot.
- If your cupcake is large or the dot is small, you can create a second circle around the first in an outer spiral. However, it's easier to create a continuous curl if you're not too close to the edge.
-
Continue squeezing in a spiral in and out. When your circle is complete, lift the nozzle and gently point it inward. The inner loop will create a smaller circle on top of the first. Finish the turn by pointing it toward the center.
- Again, maintain constant pressure in the pouch and guide the nozzle at the same constant speed.
-
Stop pressing and gently lift the bag. It is important to release tension from the bag before lifting it over the cake. If you stop pressing and lift the pouch vertically, your curl will end in a beautiful decoration. This will be a star, typical of most nozzles, or a small round dot, typical of a regular round nozzle. This will be a star shape of some kind for most piping tips, or a small point for simple, round piping tips.
Part 3
Creating other glaze designs.Try different variations of basic patterns. Several basic patterns are described in the chapter “Decorating Cupcakes with Curls.” They have slight differences and use different amounts of icing, but they don't require any specific skills.
-
Use the French tip to create quick and unique designs. The French curl tip releases the icing in tall, thin, wavy stripes. You can hold a piping bag over the center of the cupcake and then start piping and watch the frosting spread evenly outwards towards the top of the cupcake.
- This technique is best used on small cupcakes because the frosting only spreads evenly over a certain area.
Before you are ready to decorate, make sure to prepare the icing properly. The frosting will dry out and set when exposed to air, so don't make it too early while waiting for the cupcakes to cook. Thick, creamy frosting is best for decorating. Icing sugar, which according to the recipe only includes powdered sugar and liquid, is much harder to decorate due to its liquid consistency.
Buy a piping bag or make your own. A pastry bag, also called a syringe bag, is a linen or plastic cone with a hole at the tip through which icing is squeezed out. If you haven't purchased one, you can easily make your own by following the instructions in this article. You can use a rectangular plastic bag (like a string-lock bag) and cut a hole in one of the corners, or cut a large, long triangle out of parchment paper and wrap it in a circle to make a cone.
Cupcake decorating is a very simple but fun activity that is useful for those who love to bake or have children. Confectioners present a huge number of decoration options, which differ from each other in the degree of complexity of execution, range of products, and tools.
Chocolate decorations
Recipes for decorating cupcakes at home can be difficult in terms of preparing creams and the ability to work with a pastry syringe. In this case, chocolate decorations can come to the rescue.
The principle of creating “delicious decorations” from chocolate is carried out in several stages:
- You need to melt 2 tiles in a water bath; you can choose according to your taste preferences, but the best option will be black.
- Apply a design onto perforated paper using a pastry bag. The sketch can be pre-printed on a printer and placed under paper.
- Place the mixture in the refrigerator to allow the chocolate to harden. Place the resulting figure on the cupcake.
And to make the decoration of the cupcakes look appetizing, you need to grease the surface of the dessert with icing or cream. The simplest option would be toffee, on which the chocolate decorations will be placed. There are also more complex options for preparing glaze.
The simplest options for decorating cupcakes
If you don’t have the time or desire to tinker with decorating baked goods, but want to get original and beautiful cupcakes, then you should resort to a trick. The most basic source for ideas will be fantasy.

Options for quick and easy cupcake decorations:
- Grease the surface of the cake with custard. Place multi-colored candies on the surface: jelly, chocolate, marmalade.
- Place ice cream on the cupcake. Dip a tablespoon into boiling water and scoop out the ice cream, quickly placing the sweetness on the cupcake.
- Dip the top of the confection into melted chocolate and sprinkle the sweetness with confectionery powder.
- Sprinkle with shavings and place several multi-colored sea pebbles in the middle of the composition.
May include several options for simple decor at once.
Decorating with cream
The simplest cream with which you can decorate a cupcake is butter cream. The recipe for making buttercream looks like this:
- Mix a pack of butter (200 g) with a glass of sugar.
- Using a mixer, beat the sweet mass at minimum speed.
- Gradually add 5 eggs to the mixture.
- For taste, add a tablespoon of lemon juice and 1-2 drops of food coloring.
Let the cream stand for a few minutes in the refrigerator. Next, the mixture should be placed in a pastry syringe with a serrated nozzle. The easiest way to apply sweetness is to form a curl. To do this, you need to move from the edge of the surface of the cupcake to the middle, in a circle, to release the contents of the syringe. During the application process, you need to rotate the “tool” itself.

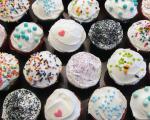
You can see photos of cupcake decorations in our article. They are unlikely to leave sweet tooth lovers indifferent. You can complement the cream rose with other decorative elements, placing them around the perimeter of the curl.
Cupcake painting or fondant
The technique of painting on the surface of cupcakes is especially popular. You don't have to have the talent of an artist to do this. There are techniques for creating patterns on confectionery products that only require compliance with certain rules.
Decorating cupcakes using drawing techniques:
- Place a lace doily on the surface of the cupcake. Sift some powdered sugar through a sieve and remove the napkin. The pattern will be imprinted on the cupcake.
- Drizzle melted white chocolate over surface. Immediately pour a few drops of dark chocolate into the center. Using a toothpick, stretch the dark chocolate over the white chocolate, forming any pattern: stripes, cobwebs, lattice.
Using painting icing and a pastry syringe with a fine tip, you can create the simplest design.

Another option that has become very popular is mastic. It is as easy to work with as with plasticine. You can prepare material for decoration as follows:
- Cut white marshmallows (200 g) into small pieces.
- Pour the mixture with a tablespoon of lemon juice.
- Gradually add powdered sugar while kneading. You should get a mastic that looks like dough.
To make figurines, you can purchase special molds or take advantage of master classes on making figurines from plasticine.
Decorating cupcakes with delicious buttercream, making a magnificent tower, a delicate flower or a star out of it means turning ordinary cupcakes into a festive treat and giving them completely new shades of taste. This is quite easy to do: prepare a butter cream that will hold its shape, arm yourself with a cooking bag or a syringe with curly nozzles, and watch a training video that will reveal all the secrets of this skill. The video lesson is in English, but even if you don’t know it, don’t worry - everything will be clear even without words. So, watch carefully and remember!
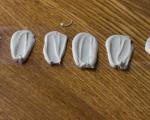
To see and better remember the attachment options, here are a few photos:


The closed star is ideal for creating a curly spiral and a tall tower with swirls.

The open star attachment is one of the most popular and versatile. With its help it is easy to create delightful roses and other flower arrangements.

A wonderful nozzle with a large round hole that makes it easy to create neat droplets and large spiral towers.

Don't be upset if it doesn't work out the first time. Remember that the best way to achieve mastery at anything is repetition. Try again - and you will definitely succeed, it cannot be otherwise.
Surely you are now thinking that this is too troublesome. Not at all. Pastry nozzles are a wonderful accessory; they are easy and convenient to use, because the bag itself in which you place the cream is usually disposable and does not require any maintenance. Once you've decorated your treat, all you need to do is wash the attachment and throw away the bag.
Experiment and enjoy!

Most often, homemade baked goods turn out much tastier than store-bought ones and also have their advantages, for example: the freshness of the product itself, the naturalness of its ingredients and, of course, it reflects the feelings with which it was prepared. According to the recipes on our site, you can bake not only the most delicious cupcakes in silicone molds, but also muffins, cupcakes, and from this article you will learn how to easily and simply decorate them, because recipes for icing from cocoa, granulated sugar, pistachio paste and delicious Philadelphia cheese are actually very simple and quick to prepare.
Custard meringue:
- 100 g sugar;
- 30 g water;
- 2 egg whites.
Preparation:
- Place sugar in a small saucepan, add water and bring to a boil over high heat, then reduce the heat and cook the glaze to a very thick consistency.
Be extremely attentive to the color of the sugar liquid, because if it turns dark brown, this will mean that it has been overcooked, and its smell will correspond to burnt food. - Beat the cooled whites with a mixer until the consistency of thick sour cream, then pour the hot sugar mixture into it, continuing to beat continuously until cool.
The icing sugar recipe described above can be of any shade if you add a couple of drops of food coloring after whipping.
Chocolate ganache:

- 200 g milk chocolate;
- 100 ml cream.
Preparation:
What could be tastier than chocolate? Ganache has an exquisite taste of milk chocolate and natural cream, and is very simple and quick to prepare. The cream needs to be brought to a boil, add pre-grated chocolate, remove from heat and dissolve the chocolate using a spoon (if that doesn’t work, a blender will help).
Pistachio ganache:

- 200 g white chocolate;
- 100 ml cream;
- 30 g almonds crushed in a coffee grinder.
Preparation:
Pistachio ganache is prepared in the same way as chocolate, but with the addition of ground almonds.
Pistachio ganache and spinach muffins make an unusual and intriguing combination. The recipe for preparing them in silicone molds can be found in the article "".
Cheese glaze:

- 200 g Philadelphia cheese;
- 60 g powdered sugar.
Preparation:
The cheese is whipped with powdered sugar and, if desired, tinted with food coloring.
Philadelphia cheese mousse can serve as an excellent replacement for the classic one. It has a more delicate light texture with a pronounced cheese and curd flavor.
Glaze for muffins is quick to prepare, requires the smallest amount of ingredients, but how solemnly it decorates the most delicious baked goods!
The basis of the most exquisite dish is simplicity, which can easily be turned into a masterpiece with the help of imagination and simple culinary techniques.
For example, simple cupcakes with cream or chocolate fudge on top look much more appetizing than undecorated ones, and the frosting makes them tender and juicy. It’s not difficult to prepare such an addition to your favorite pastries, and the additional costs will be more than recouped by the enthusiastic reviews of those who try them.
Cream, impregnation or fondant?
Every housewife who knows more than fry potatoes and make morning omelettes has her own favorite muffin recipe “for all occasions.” Baking using it turns out harmless and tasty, but not too festive.
However, if simple cupcakes made from eggs, butter and flour are saturated with a delicate fruit impregnation, poured with white chocolate fondant or decorated with “caps” of the most delicate cream, they will turn into exquisite cupcakes worthy of a royal meal. But what should you choose to decorate your favorite baked goods?

The classic version is butter cream, which is used to decorate desserts using a pastry syringe. Layered in a curly wave and topped with a cherry preserved in alcohol, it will do honor to any, even the simplest baked goods. But this addition to it contains so many calories that after enjoying cupcakes with cream, you will then have to spend long hours getting in shape in the gym.
A lighter version of buttercream is sweet cream cheese. Its calorie content is an order of magnitude lower, and the benefits are unconditional. By decorating your favorite pastries with delicate curd cream, you will get a much healthier dessert with an amazing taste.
Lovers of mild sweetness will undoubtedly want to decorate their cupcakes with meringue. This dessert decoration is made on a protein basis. There is a minimum amount of oil in it, and you can add fruits, chocolate chips, and candied fruits. If the meringue is prepared correctly, it, unlike a butter or cheese “cap,” will not lose its shape even in a stuffy room.
The fudge is made on the basis of fruit decoction and has a more liquid, delicate consistency. It is ideal not only for decorating muffins, but also cakes and biscuits.
The purpose of soakings for muffins is to add juiciness to a somewhat dry dough. They can be made on the basis of condensed milk, diluting the sweet product with water by half, and also using jam or alcoholic drinks as a basis.
DIY butter-chocolate cream for cupcakes
Since such a cream is more than just a decoration, products for its preparation must be selected with the GOST mark.
The amount of sweet powder can be varied based on your own preferences. Cinnamon, vanilla, almond essence can complement the cocoa aroma or become an equivalent substitute. The quantity of products is designed to decorate a standard serving of 12 muffins.

Ingredients
- Butter – 250 g;
- Sweet powdered sugar - about 4 cups;
- Fresh cow's milk - ¼ cup;
- Cocoa powder – 1-2 tbsp.
How to make delicious buttercream for cupcakes with your own hands step by step
- The butter must be removed from the refrigerator an hour before cooking so that it has time to melt under natural conditions.
- Place it in a deeper container and beat with a mixer until soft for several minutes, and then gradually add powder.
- After adding half the powder, pour in milk (room temperature) and sprinkle in cocoa. Its quantity depends on the flavor and color saturation that we want to achieve. Beat everything thoroughly. If we are making cream with vanilla or other flavorings, they should be introduced at this stage. The same goes for food coloring.
- Add the second part of the powder, adjusting the amount to taste.
Decorate the muffins with the finished cream using a pastry bag with a grooved tip. At the end, you can sprinkle the dessert with multi-colored caramel crumbs. Great idea for a children's party!
Original cheese cream for decorating cupcakes
We suggest using Philadelphia cheese. If you can’t find it in the store, you can look for Mascarpone or any other that is in stock. The main thing is that it is fresh, since heat treatment is not provided. All products should be at room temperature.

Ingredients
- Soft cream cheese - 170 g;
- Soft butter – 50 g;
- Vanilla essence – 2-3 drops;
- Powdered sugar - a little more than 2 cups.
Homemade cheese cream for decorating baked goods
- Place the butter and cheese in a container with sides and begin to beat it. A few minutes after turning on the mixer (it should work at medium speed), add vanilla and begin to gradually add powder.
- When the cream becomes perfectly homogeneous, apply it to the cooled cupcakes with a pastry syringe.
It is best to serve dessert right away. If guests are expected a little later, you should place it on the refrigerator shelf with minimal cooling. Cupcakes with buttercream should be stored in the same place, avoiding hypothermia.
Homemade orange fondant for cupcakes

Ingredients
- Orange – 1 piece + -
- — 1/4 pcs + -
- - 1 PC + -
- — 100 g + -
- - 2-3 tbsp. + -
How to make universal sweet fudge with your own hands
- We wash the fruits, pour boiling water over them, and then remove the zest from them with a sharp knife. It needs to be finely chopped, placed in a container with fresh lemon-orange juice and boiled over low heat for about 5-10 minutes.
- After straining the citrus juice, add butter and sugar to it and mix everything.
- Place the sweet aromatic mass on the stove and heat, stirring constantly until the sweet crystals dissolve.
- We haven’t used an egg yet: use a mixer to turn it into a fluffy foam and add 2 tbsp to it. hot (but not boiling!) sweet syrup. Then, on the contrary, when it is still hot enough, we gradually add the sweet egg mass.
- Stir continuously until the almost finished fudge thickens. Let it cool and pour it over the finished cupcakes, thereby enriching the delicate taste of homemade baked goods.
Delicious cherry impregnation for home baking
Ingredients
- Fresh cherry juice – 1/3 cup;
- White sugar – 2 tbsp;
- Cognac or vodka – 4 tbsp;
- Water - 2-3 tbsp.
Preparing a delicious cherry flavored impregnation
- Sweeten fresh cherry juice with sugar and place it on the stove.
- Heat the liquid over low heat until the sugar grains dissolve in it. Let the syrup cool slightly, and then add alcohol to it and add water to the volume of the glass.
Quick soak for homemade jam muffins

Ingredients
- Jam from any berries to taste – 2 tbsp;
- Vodka – 50 ml;
- Purified water – 1 glass.
How to make a quick and easy delicious jam dip
- Add jam (candied can also be used) to the water and stir.
- We put it on the fire for just a few minutes - in warm water the sweet product “disperses” faster. When the impregnation has cooled, add alcohol to it and stir.
Homemade baked goods usually turn out very tasty, but they are, so to speak, not very beautiful. Add points to the popularity of homemade sweet treats by expertly decorating your favorite cupcakes and biscuits with buttercream, fruit fondant or milk frosting.
Natural decoration of baked goods is an opportunity to show your imagination almost endlessly and treat your family and friends with delicious and healthy delicacies. This means that you should definitely master this very simple art.