How to paint snow in watercolor. Master class "How to draw snow without white"
This lesson will come in handy for you more than once in your life, and not only for art lessons. Infa cell. I'll show you how to draw snow with just one simple pencil. The difficulty is that when trying to depict falling snow, beginners depict snowflakes flying down. The result is rain, or an invasion of flies, but not snow. Below I will show you what the secret is here.
Let's paint this landscape.
How to draw snow with a pencil step by step
Step one. I draw a horizon line. On foreground there is nothing, everything is covered with snow. In the middle plan, you need to show the tops of the house and trees. And mountains in the back.

Step two. You should always start drawing from those objects that are closer to the observer. I will sketch the trees and add the roof of the house.

Step three. Now I draw a wooden house in detail and add a window to the second house. Or is it a shed, I don't know, it's not very important. I draw mountains.

Step four. This is the most important point. Add shadows to the trees, the house, and the mountains where there is no snow. This is the whole secret: to draw snow with a pencil, you need to draw those places where there is no snow, and leave the rest of the space untouched. Look.
A snowball outside the window is an excellent occasion to take a brush in your hands and depict all the charm of winter-winter. Show the kids several ways to draw snowdrifts, "crystal" trees, "horned" snowflakes, fluffy animals, and let the winter "painting" bring the joy of creativity and decorate your home.
Music to create masterpieces
So, let's turn on some nice background music and… draw winter with the kids!
Draw "snow"

mtdata.ru
You can imitate snow in the picture in different ways.
Option number 1. Draw with PVA glue and semolina. Squeeze out the right amount of glue directly from the tube, if necessary, you can smear it with a brush (if you plan to cover large surfaces). Sprinkle the image with semolina. After drying, shake off the excess cereal.

www.babyblog.ru
Option number 2. Draw with salt and flour. Mix 1/2 cup of water with 1/2 cup of salt and the same amount of flour. We stir the “snow” well and draw winter!

www.bebinka.ru
Option number 3. Draw with toothpaste. Toothpaste perfectly fulfills the role of "snow" in the drawings. It can be tinted with watercolor or gouache if you want to get a color image.

Drawings with white paste on dark paper look beautiful. And they SMELL delicious!

The most popular toothpaste won, perhaps, for the fact that it is easily washed off, so you can draw with paste on glass. Feel free to take tubes in your hands and let's go decorate mirrors, windows and other glass surfaces in the house!
 polonsil.ru
Option number 4. Draw with shaving foam. If you mix PVA glue with shaving foam (in equal proportions), you get an excellent "snow" paint.

www.kokokokids.ru
Option number 5. Painting with salt. If you pour salt on a drawing circled with PVA glue, you get a sparkling snowball.
Drawing on crumpled paper
An unusual effect will be obtained if you draw on previously crumpled paper. The paint will remain in creases and form something like crackle.
Drawing with stencils

img4.searchmasterclass.net
Stencils make the process of drawing easier for those who "don't know how" (as it seems to him). If you use several stencils at the same time, you can get an unexpected effect.

mtdata.ru
Leaving the part of the image covered by the stencil unpainted, you can pay more attention to the background: sprinkle salt on the still wet surface, apply strokes in different directions with a hard brush, etc. Experiment!
 www.pics.ru
Several sequentially superimposed stencils and splashes. It is convenient to use an old toothbrush or a hard bristle brush for this purpose.

www.liveinternet.ru
A knitted snowflake will help create real lace on paper. Any thick paint will do: gouache, acrylic. You can use a can (spray from a short distance strictly vertically).
We draw with wax

Wax drawings look unusual. Using an ordinary (not colored) candle, draw a winter landscape, and then cover the sheet with dark paint. The image "appears" right in front of your eyes!
Who are you? Seal?

masterpodelok.com
The effect of fluffy wool will help create a simple trick: flat brush dip in thick paint (gouache) and apply strokes with a “poke”. Drawings with white paint always look better on a dark contrasting background. All shades of blue are perfect for winter motifs.
How to draw winter trees

www.o-children.ru
The crowns of these trees are made using a plastic bag. Dip in paint and dab in the right places - that's the whole secret of "snow caps" for trees.

cs311120.vk.me
Suitable for kids finger painting. We dip the index finger in thick gouache and generously sprinkle snow on the branches!
 masterpodelok.com
Unusually beautiful snow-covered trees are obtained using a cabbage leaf. Cover a sheet of Beijing cabbage with white gouache - and voila! On a colored background, such a painting looks especially impressive.
 www.mtdesign.ru
No cabbage - no problem. Any leaves with pronounced veins will do. You can even donate your favorite ficus. The only BUT, remember that the juice of many plants is poisonous! Make sure that the child does not taste his new “brush”.

www.teddyclub.org
The trunk is a handprint. Everything else is a matter of minutes.

www.maam.ru

orangefrog.ru
A favorite technique for many is blowing paint through a tube. We create “snowiness” using the fingerprints of a small artist.
 www.blogimam.com
Not everyone will guess how this charming Birch Grove. The resourceful artist used masking tape! Cut strips of the desired width and glue on a white sheet. Paint over the background and remove the paint. Draw characteristic "lines" so that the birches become recognizable. The moon is made in the same way. Thick paper is suitable for these purposes, the adhesive tape should not be too sticky so as not to damage upper layer drawing.
Draw with bubble wrap
 mtdata.ru
Apply on bubble wrap white paint and apply to the finished drawing. Here comes the snow!
 mtdata.ru
The same technique can be applied in applications.
The snowman has melted. It's a pity…

mtdata.ru
This idea is suitable for the most young artists, and for those who want to make a gift "with humor". Cut out “spare parts” for the snowman from colored paper in advance: nose, eyes, hat, twig hands, etc. Draw a melted puddle, wait for the paint to dry and glue what is left of the poor snowman. Such a drawing can be a great gift for loved ones on behalf of the baby. More ideas in our article.
Draw with palms

www.kokokokids.ru
An easy way to create amazingly touching new year card is to tell a story about funny snowmen. A whole family will turn out if, on the basis of a palm print, draw carrot noses, coal eyes, bright scarves, buttons, twig hands, and hats to your fingers.
What is there outside the window?

ic.pics.livejournal.com
What does the window look like from the street? Unusual! Invite the child to look at the window through the eyes of Santa Claus or another character who may be outside in the most severe cold.
Dear readers! Surely you have your own "winter" drawing techniques. Tell us about them in the comments.
Snowfall is an inexhaustible source of inspiration. However, trying to capture this beauty in watercolor may not be as easy as it seems.
Masking fluid can help you draw a natural, 3D sky with falling snow in watercolor drawing. The masking fluid is viscous, transparent and can be used as a "mask" for some areas you don't want to paint over. At first it is liquid, but then it hardens to a state similar to rubber. The parts of the paper that you apply liquid to will remain white even if you apply watercolor directly to them. Once the paint is dry, you can remove the masking liquid from the paper without damaging it.

With masking fluid, you can pre-determine snowflake patterns in the future drawing, this is a great time saver. All you have to do is wipe off the liquid drops and the snow will appear on the paper like magic!
In order to bring good example, imagine that you have a pen and an outline ink drawing that you need to color in. You want to create the effect of falling snow. How will you distribute the masking liquid?

Let's look at some of the ways to apply masking fluid when painting a snowfall.
Hand drawing method
Just set the dots with a brush dipped in masking fluid to make them look like snowflakes.

Pros: it's simple and you can control the movements of the brush.
Minuses: looks like a polka dot pattern.
Spray method

Dip the brush in the masking fluid and hold it with one hand. With one or two fingers, gently tap the part of the brush closest to the bristles. Drops of masking fluid will fall in a certain area, but still difficult to control.
Pros: looks more natural.
Minuses: it is difficult to predict where the drops will fall.
Brush spray method

Take a clean waste brush and dip it in the liquid. Gently shake the liquid from the bristles onto the paper.
Pros: unique and chaotic pattern.
Minuses: you have almost no control over the direction of the drops, there may be too many of them in one place.

This is not about the right or wrong method, but even before you wipe off the masking fluid, it becomes clear that the brush splatter method produces the most realistic and accurate pattern. The points placed by hand are too literal, and there can be too many drops from the brush, and then the snowfall will turn into a real snowstorm.
From this it becomes clear: you need to choose a technique and distribute drops of masking fluid immediately before painting with watercolor. When the drawing is dry, scrape off the drops of masking fluid and enjoy your work aesthetically. If it seems to you that there are too few snowflakes, you can draw additional acrylic paints on a dried layer of watercolor.

Translation of an article from www.craftsy.com.
Painting snow, and even watercolor, is often a difficult task for beginners. But we will help! We reveal a few secrets.
masking fluid.
This fluid will help you recreate a natural, voluminous winter sky. Masking fluid is a viscous, translucent substance that can be used to cover certain parts of the drawing - those in this moment you don't want to paint over. When applied, it is wet, and when dried, it acquires a slightly sticky consistency. The "masked" areas will not be affected by the paint, even if you write over a layer of masking agent.
The use of this substance helps not only to get rid of dirt in the work, but also magically eliminates the need to write snow: just peel off the pasted, and - voila! - snow will appear on your picture.
Let's illustrate this with an example. Let's say you have ink and want to draw a picture of falling snow. How to do it?
First method: you can simply apply dots on the sheet that imitate falling snowflakes. The advantages of this method are simplicity and control over the brush. The disadvantage is that the look will be quite decorative, and not every job will suit it.
Second method, “tapping”: dip the brush in the masking liquid, bring it over the sheet and, moving your hand, gently tap the liquid droplets onto the canvas. Here the control is already a little less, but the appearance of "snowflakes" will be more natural.
Third Method, with a toothbrush: Take an old toothbrush and dip it in the masking liquid. Now with your finger, gently pull and release the villi over the sheet, as a result of which liquid will splash onto it. This method of control has the least and most risk of overdoing and screwing up, but the result is completely unique and natural.
Result
After choosing the appropriate method, apply masking liquid with it, and then get to work. It doesn't matter what you work with: watercolor or ink. At the end of the work, dry it, and then simply remove the pieces of masking. Here comes the snow!
Did you succeed? Write in the comments!
Winter is a truly magical time of the year. White, crackling snow underfoot, patterns on the windows, warm hats with pom-poms, snowball fights, new year holidays- it's still far from full list all the wonders of winter. And if you want to keep a little of this magic for yourself, then learning how to draw a winter landscape is what you need.
 Landscape with mountains and a river |
 Twilight in the forest |
 simple drawing |
Draw a rural winter landscape

Although winter can fill the atmosphere of a fairy tale even big cities, rural views acquire a special charm and comfort at this time of the year. We will demonstrate all the beauty of the snow-covered village houses when we learn how to draw a winter landscape in stages.
First, with a pencil, outline the outlines of one Christmas tree and one house. The Christmas tree will be wide, spreading.

And then - two more houses and another Christmas tree. The houses will have triangular roofs characteristic of many villages.

Let's add more Christmas trees and a palisade. This fence, of course, is rather conditional - in the villages people know each other and do not build high fences.

Now, according to the sketch, we will draw the drawing with paints. The trees will be a juicy green, the houses will give off a warm shade of unpainted wood, and the snow will be a little blue. To make the picture look alive, we will seat three birds on the fence.
That's it, the drawing is finished.
Hills and snowfall - draw a winter landscape

Let's continue the theme of rural beauties. This time we will depict the very outskirts of the village - a forest will be visible in the background. And the snowfall will be in full swing. Don't worry, it's not difficult at all - this example is great for practicing and painting a winter landscape for beginners.
First, let's outline the most large forms- in our case, these are hills.

Then we will depict three spruces in the foreground, and in the background we will make a house, a snowman and the sharp tops of smaller trees. Do not forget about the path leading to the house.

Let's fine-tune all the contours. We will also “give” a snowman and a top hat and depict snowflakes falling from the sky.

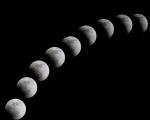
Let's color the drawing. Our landscape will be at night, so we will make the sky dark, grayish (after all, it will be covered with clouds). And, of course, you can not do without a chic full moon. The house will be made in warm colors: the walls will be yellow, the roof will be red, and the doors will be brown.
This concludes - we did a great job.
Magic winter night

Despite the fact that untouched snow even during the day, the smoke from the chimneys of rural houses and the pointed tops of the Christmas trees look fabulous, the true magic lies in winter nights. This is exactly what we will show when we figure out how to paint a winter landscape with gouache.
We will not immediately take up gouache - first you need to make a pencil sketch. Let's start with the general outlines of a hilly area, a house and three trees near it.

Then we will draw another smaller house, a path leading to it and add more trees, coniferous and deciduous. In the very foreground there will be a birch with thin branches lowered down.

After that, we will start working with paints. First of all, with dark tones, we will depict the sky and the forest in the background. You can also grab three spruces near big house. Do not forget to make a month in the sky - for now it will be very thin, young.

Now foreground. We will make the snow a little bluish, the trees green, and the walls of the houses light brown.

Remained small parts- light in the windows, smoke pouring from the chimneys, snow on the paws of the fir trees, the trunk and branches of a birch. And many stars in the night sky.
Now we can safely say - the drawing is over.
Winter landscape with mountains and river
Winter in the mountains is amazing. The forest, which has become harsh and dark, clean rivers, thick snow - all this looks so pristine, clean, untouched that you can admire this beauty for hours. But you also need to add a touch of comfort - a small, but solid and neat village house is perfect for this purpose. So we will learn how to draw a beautiful winter landscape.
First, let's deal with the first plan - there will be two trees with thin branches.


On the right side of the picture, we will depict a house of a peculiar shape and the tops of the Christmas trees in the background.

And now you can take up pencils or paints. On background we will make mountains - they will be completely covered with snow. The house will be made of wood, and the bridge will be made of bricks. You also need to draw transverse stripes on nearby trees - these are birches. Pay special attention to the windows - they should glow, because it is sure sign that someone lives there.
That's it, we've finished the picture.
Twilight in the winter forest
Beyond the night most interesting time days in winter forest are twilight. The stunning shade of the sky and falling asleep nature merge into a marvelous ensemble. Using the example of such a miracle, we will learn how to paint a winter landscape with paints.
First, let's deal with the sky and the general tone of the snow. To do this, we will use watercolor or gouache to get beautiful stains. You need to wet the paper, and then apply paint with plenty of water and tilt the sheet. The paint will flow down, forming these beautiful patterns:

Then we will depict a tree in the foreground. try to make the branches thin enough. Moreover, the brush must be drawn from the base of the branch to its tip.

By the same principle, draw three small bushes.

Then - two Christmas trees. They should be drawn with thick, saturated strokes of a dark green hue.

We sprinkle trees and bushes with snow. And we will also decorate the front bush with juicy red berries.
Now the picture is complete.
Multi-colored house, bunny and snowflakes - fun winter
Winter is the time for fairy tales, which is why it is often depicted in cartoons. In this section, we will also begin to work in a cartoon manner - at the same time we will learn how to draw a winter landscape with a pencil.
First, we outline the house and the bunny looking out the window. All outlines will be very smooth, rounded, without sharp edges.

Then we will finish the Christmas trees (they will be just as smooth and rounded) and the snow falling from the sky.

Now let's paint everything in the brightest colors. But the snow, of course, must be made blue. And the trees are green.
Everything, a cheerful house is ready.