How to clean the headlight from the inside without disassembling. How to clean headlights with toothpaste
Every motorist after a certain period of operation of the car has a problem associated with the wear of the outer surface of the headlights. And this is not surprising, because the headlights are located on the front of your car and, first of all, take on any negative external influences. The following factors may play a role here:
- pebbles from under the wheels of passing vehicles;
- dust, sand;
- shrubs and tree branches;
- ultraviolet radiation;
- aggressive chemical substances on road;
- atmospheric factors: snow, rain, etc.
As a result, the headlights may become cloudy, turn yellow. Chips, scratches and other defects appear on their surface. All this greatly reduces the efficiency of their work and degrades the quality of visibility on the road.
Considering that your safety directly depends on the efficiency of the headlights on a car, the problem requires a prompt solution.
The appearance of such defects is not yet a reason to replace the headlights. They can be simply cleaned and removed damage. To do this, you can either contact a service station, or clean the headlights on your own. This is a job that does not require special knowledge and skills - it can be handled by anyone who knows how to do the job conscientiously and accurately.
Headlight cleaning is carried out using special abrasive pastes. The principle of operation is that we remove a layer of material equal to the thickness of the damage, and then carefully polish the surface.
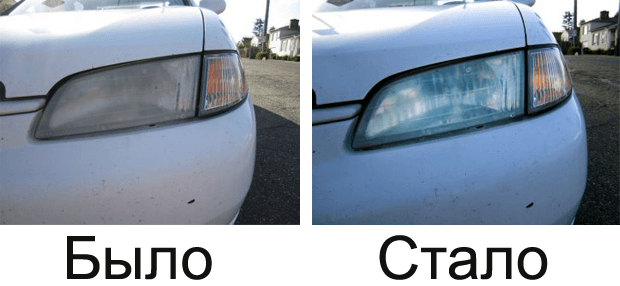
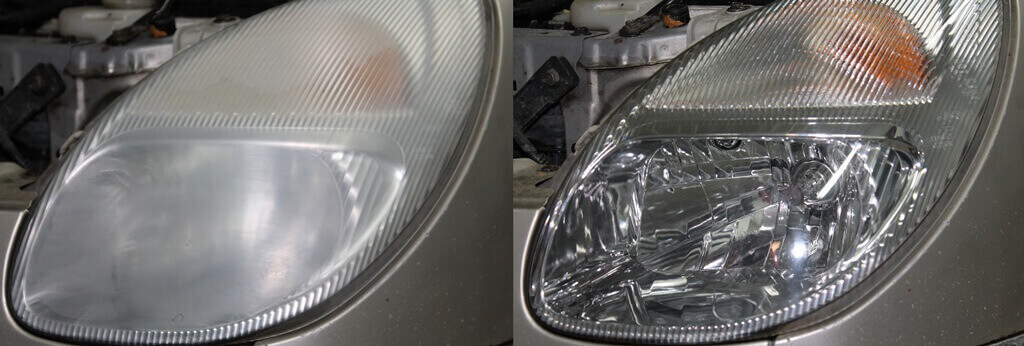 Car headlight cleaning result
 The headlights on your car can be either glass or plastic. In fact, the cleaning method does not depend on the material - in both cases it is the same. It's just that glass is much harder, so the work will require more time and accuracy.
One of the tools that allow you to clean the glass or plastic of your car's headlights can be an ordinary toothpaste or tooth powder. Connoisseurs claim that it is much more effective than many patented polishing pastes. Let's see how you can use toothpaste to return your car's headlights to their former efficiency and attractiveness.
What you need to work
Before you get started, stock up on everything you need. We will need the following tools and materials:
- tooth powder or a tube of toothpaste;
- clean towels;
- White Spirit;
- water and detergent;
- grinder or electric drill;
- nozzles;
- scotch;
- brush.
Before starting work, we recommend that you remove the headlights from your car so that it is more convenient to work. We glue everything except the surface to be treated with film and tape to avoid the ingress of paste and other foreign substances. Now we can get to work.
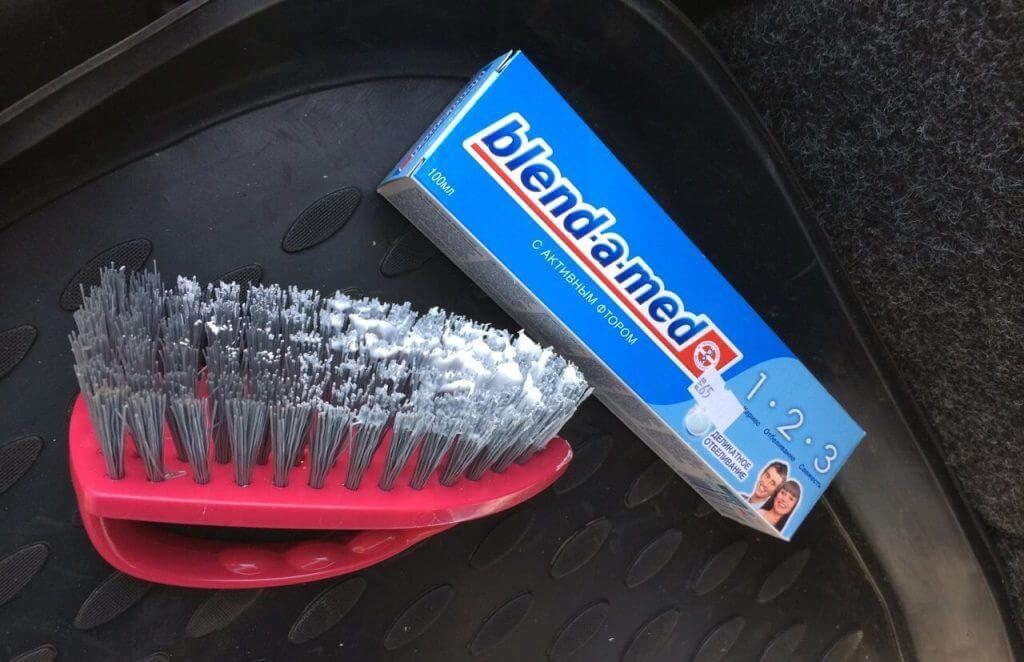 Cleaning headlights with toothpaste
 Cleaning your car headlights with toothpaste
Now let's go through the whole process of working with the lights of your car step by step:
- We clean the lanterns from dirt and dust, wash them thoroughly.
- Wipe dry.
- Degrease the surface with white spirit.
- manually or with a power tool. Squeeze out a pea of toothpaste and rub it in a circular motion with a towel or grinder over the surface. If we use the manual method, the movements should be uniform and circular. If we use a power tool, we monitor the temperature of the heating surface. If the temperature is too high, the glass may burst, and the plastic may deform - we check the degree of heating by hand and take breaks to cool. We do not press on the surface to be treated with a grinder or an electric drill - a uniform small force and the number of revolutions are important here.
 Headlight polishing with power tools
 - We continue the polishing process until all chips and scratches disappear. It is important here not to rush, to be careful and remember that it is impossible to speed up the process. Trying to force things will result in you ruining the headlight.
- After getting rid of scratches and chips, we perform polishing with a polishing wheel without toothpaste. You can use a polish for finishing, which will give shine to your car lights and provide additional protection from negative external influences.
- We install the lights on the car and enjoy the ride with clean restored headlights.
As you can see, the work is quite simple. The main thing here is to take your time, monitor the surface heating temperature and ensure that the processing is carried out evenly.
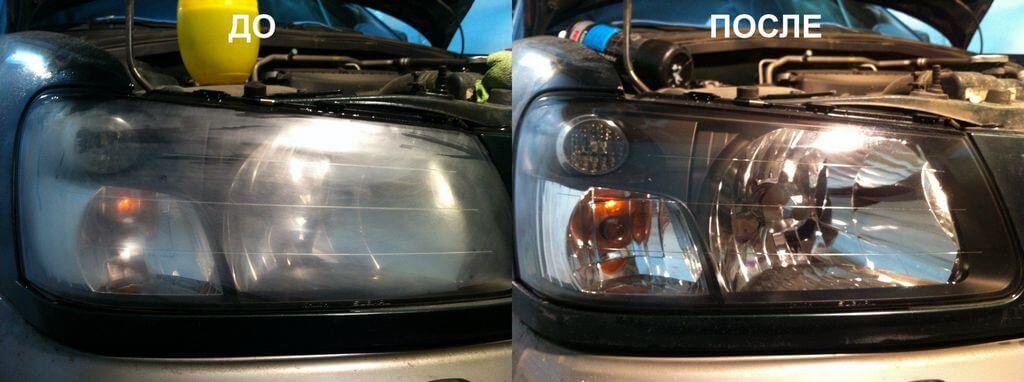 The result of polishing car headlights
 Conclusion
Cleaning headlights with toothpowder or toothpaste is one of the common methods to restore their former efficiency and get rid of damage. Thus, we remove scratches, chips, cloudiness and yellowness, returning the original shine.
Make sure your headlights are in perfect condition. Periodically check them, if necessary, take care of their serviceability and proper functioning in time - this is one of the most important guarantees of your safety on the road.
Since the ATV is operated in rather harsh conditions, it is no wonder that sooner or later dirt gets into the headlight. It can be either dry dust or swamp water. Both that, and another not so well affect a headlight. If the headlight took a sip of water, then you need to take action as soon as possible, until the reflective layer has corroded. Fortunately, I didn’t flood the headlights with water (the headlights of the CF500-A are very tight), but after I changed the size in winter, some of the seals did not install quite well, as a result of which a lot of dust was sucked into the headlight through an unknown gap .
And now, six months later, I finally got around to cleaning the headlights from the inside.
Of the tools, I needed two screwdrivers (Phillips and flat), as well as a socket wrench for 10. In addition, a hair dryer. From the "drugs" - Fairy and distilled water.
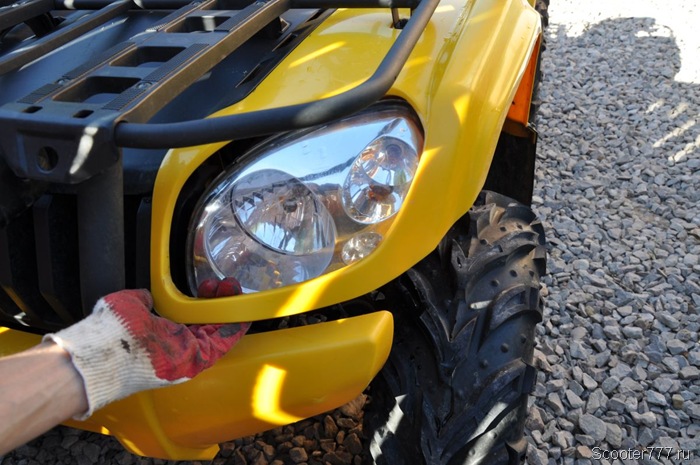
This is what the left headlight looked like with a dusty reflector. Oh yes, in cold weather (it's summer now), it also fogged up. All spots and dust that you see in the photo are internal. Outside headlight is clean.
Here's the right headlight for comparison.
Let's start disassembly. First, remove the mudguard. It is attached with two bolts and one self-tapping screw.

After removing the shield, our eyes appear ... dirt. I flushed it out with a hose before continuing on. The headlight housing is held on three studs (nuts are also 10) and two self-tapping screws.
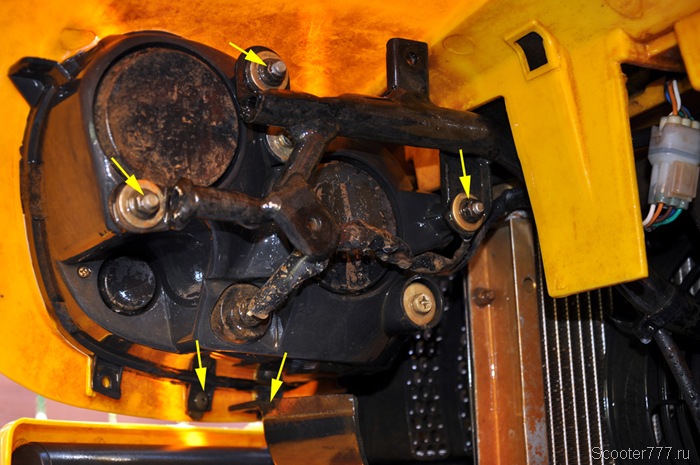
Now the most hard part work: you need to disconnect the electrical connector. Here he is behind the shield.

The connector is very tricky in appearance, it has dummies of latches on all sides;). Go guess where to poke. In fact, there is only one real latch that holds it (in the top photo it is with reverse side). Here is the latch close-up, it must be bent with a thin screwdriver, and the connector will easily disengage.

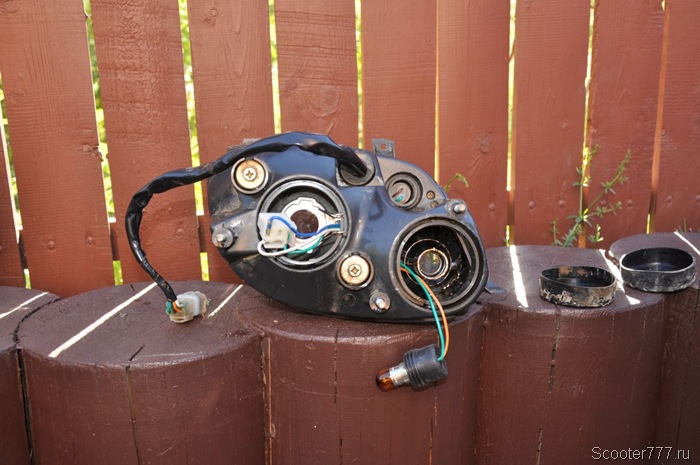
Now you need to carefully bend the plastic with your hand, push the headlight out of the bushings (pulling it towards you), and pull it down.
Next, you need to very carefully wash the outside of the case. And only after that you can remove the sealed plugs (2 large, 1 small) and remove the lamps. True, I did not take out the gauge, it does not interfere too much.
Now we move to the bathroom. A little Fairy is poured inside the headlight and water is poured. After that, shake the headlight, shake it, and so on. Drain, repeat cleaning. The detergent does not damage the inside of the headlight, so there is no need to be afraid.
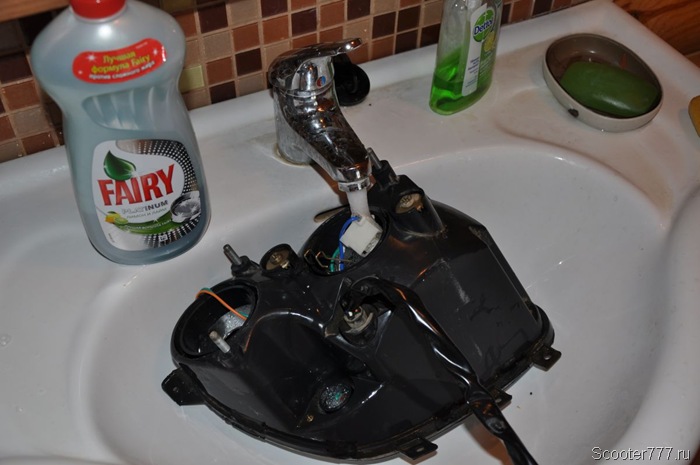
Now you need to thoroughly rinse the headlight (from all sides inside).
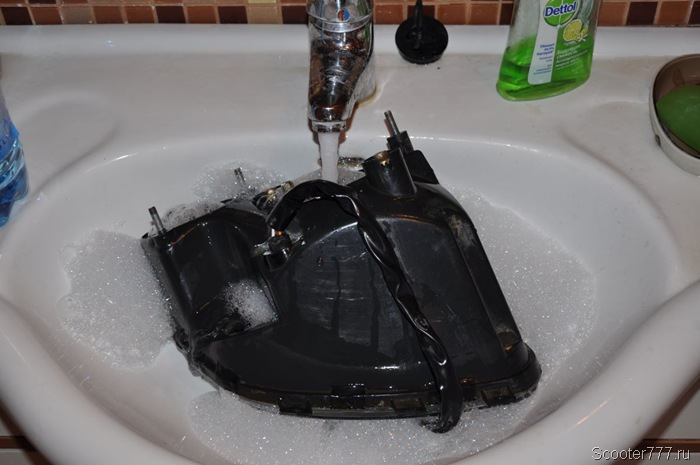
And, finally, when the detergent stops producing foam, we take distilled water, pour 200 milliliters into the headlight, shake vigorously, and repeat this again. Distilled water is needed in order to wash off ordinary tap water, which, when the drops dry, would leave a coating on the reflector and glass. Distilled water contains nothing but H2O.

Now it remains very well to shake out all the drops of water and dry the headlight with a hairdryer. If technical, then dry at a minimum temperature. It takes a little time, about half an hour.

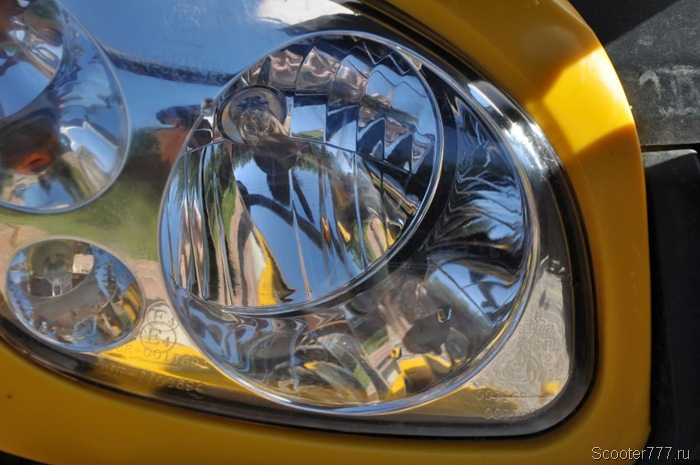
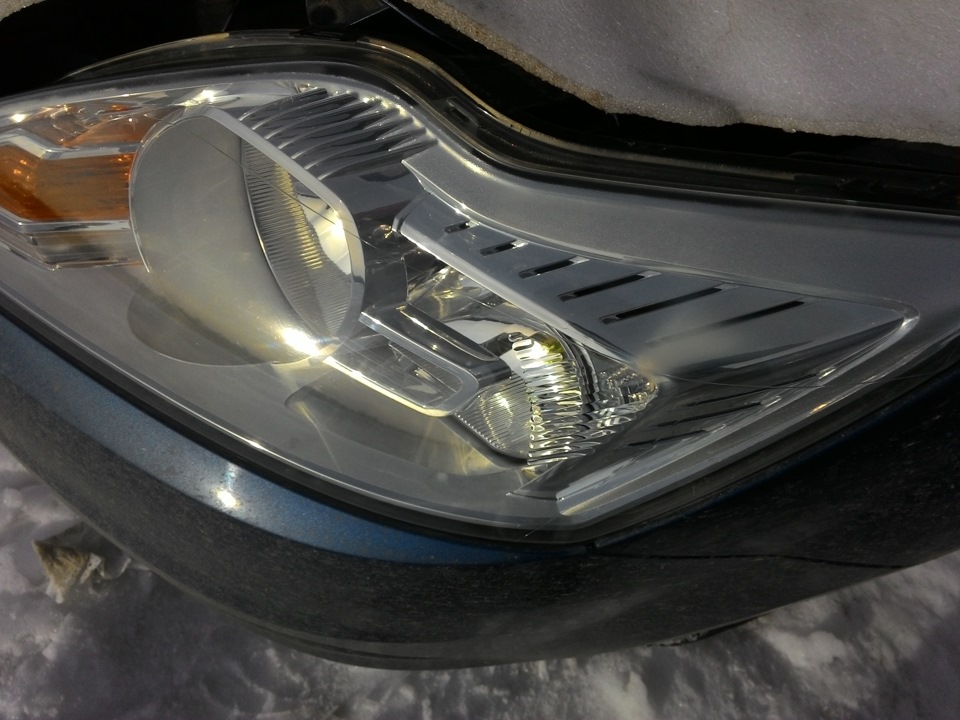
Clean and beautiful headlight assembled and ready to install.

And here is the result.
![]()
Almost like new! Now it remains to do the polishing headlights, but that's for next time.
Car headlights over time become dirty or yellow with a coating from oxidation. Not only does this look bad, but it reduces your visibility at night and increases your chances of getting into an accident (especially at high speeds).
Now, I will briefly tell you how to clean car headlights. This is a simple process and includes some of the simple household items you would find at home.
There are many pastes and solvents in stores. In the online store RESTERM a particularly large selection of any auto chemical goods, as well as car glass cleaners, which can also be used to clean headlights. But, I believe that the following ingredients are simpler and less expensive.
Necessary materials:
Bucket, soda, any soap, clean cloth, sponge, bowl, water, small bowl.Prepare your solution
To do this, we will start by adding a liter of warm water to the bucket and add a bar of soap (about 1/6) to it. In a bowl, we will also pour some water (about 100 ml) and add 5 tablespoons of baking soda. We have a simple pasta. Next we will clean the headlights.headlight cleaning
Take a sponge and soapy water to thoroughly clean all your headlights. Remove all dirt, clean all cracks.You do not have to apply a lot of effort, because soda can easily remove plaque and grime. It is also very good to use an old toothbrush in headlight cleaning. Be careful not to use any solvents as the solvent can eat away at the paint around the headlights.
Remember that your headlights are your safety. For example, for some reason, you had to drive fast and at high speed due to dirty headlights, you may simply not notice the turn and fly into a ditch. So it's better to clean the headlights than to buy later new car. Unfortunately, many do not understand this, and understand only when an accident occurs.
With prolonged use of the car, the headlights get dirty in the same way as any other part. Moreover, pollution can be not only external, remaining, for example, after a trip on the road, but also internal. If dust has got inside the headlight, it is likely that its housing is leaky. Perhaps when installing new lamps, you did not glue the glass firmly enough. And sometimes this happens even at the factory. Be that as it may, the optical device requires thorough cleaning from all sides, including the inside. Of course, the easiest way to do this is to completely disassemble the headlight. But if the headlight is initially one-piece, or you are afraid of damaging its insides, use our recommendations to wash and clean it without disassembling it.
Materials and tools
In order to clean your headlights as much as possible from dust, water drops and dirt, both outside and inside, prepare the following set of tools:
- cleaning agent;
- toothpaste;
- soft cloth made of microfiber or other fabric that does not leave fibers;
- household hair dryer.
- Screwdriver Set;
- insulating tape;
- adhesive tape;
- hard wire;
- two small magnets;
- fishing line;
- stationery knife and scissors.
It is worth dwelling in more detail on the headlight cleaner. Not every liquid is suitable for these purposes, especially when cleaning lenses and reflectors from the inside. There is an opinion that alcohol or vodka eliminates pollution best of all. It really is. However, alcohol can corrode the coating on the reflector and ruin the optics forever. Therefore, do not use heavy artillery. Distilled water with dishwashing detergent will clean the headlight a little slower, but no less qualitatively. Some people use a regular glass cleaner for this purpose.
Another interesting method- use cosmetic micellar water to remove makeup. It is sold in all cosmetic stores. You should not choose an expensive option, most importantly, make sure that there is no alcohol in the composition.
To remove dirt, try using a makeup remover.
How to clean the headlight from the inside without disassembling
The headlight cleaning procedure will be much easier if you can remove the glass and disassemble them piece by piece. Unfortunately, on many modern car models, non-separable lenses are installed. But even they require cleaning from time to time.

headlights must be cleaned not only from the outside, but also from the inside
Over the years of operation, an impressive layer of dust and dirt accumulates on the optical elements. This negatively affects the quality of lighting: the headlights become dimmer and diffused.
Video: why it is necessary to wash the headlights from the inside
Glass cleaning
Even if you do not want to disassemble the headlights completely, you still have to dismantle them from the car. For different cars this process will be different: in some cases, you need to remove the grille, in others, the bumper. Most likely, you yourself know how to properly remove the headlights from your car, but if not, take a look at the owner's manual.
- After you remove the headlight, you need to remove all low beam, high beam lamps, turn signals, dimensions from it.
- Pour a small amount of your chosen cleanser into the holes.
- Now you need to temporarily cover the holes with duct tape and shake it well. Usually after these manipulations, the liquid acquires a dirty yellow color. This means that you did not start cleaning in vain.
- Open the holes and drain the water.
- Repeat steps 2 and 3 until the water runs clear.
- If you poured a soapy solution inside the headlight, rinse it with clean distilled water at the end.
- Dry the headlight from the inside with a household hair dryer. Do not set the temperature too high, so as not to damage the optics. You must get rid of all small droplets.
- Make sure the headlight is completely dry inside and put the bulbs back in.
When working with halogen and xenon lamps, do not touch the bulb itself! Due to the high internal temperature, it will leave traces of grease from your fingers, even if your hands are perfectly clean. This will significantly reduce its service life. Try to hold the lamps only by the base. If this is not possible, wear medical gloves.

to wash dirt from the inside of the headlight, pour the cleaning solution into the housing and shake it
There is one more unusual way clean the glass from the inside. It is not suitable for heavy soiling, but can help if you need to quickly remove a small stain.
You will need two small magnets that need to be wrapped in a soft cloth. Lightly dampen a cloth of one of the magnets with a cleaning agent, fasten it to the fishing line and place it into the headlight housing through the lamp hole. With the help of the second magnet, control the internal and clean the glass in the right places. When you are satisfied with the result, simply pull the line and remove the magnet from the case.
Video: cleaning the headlight from the inside with magnets
Cleaning the reflector
The reflector inside the headlight collects the light from the lamp into a single beam. Constant exposure to a light source may cause it to become cloudy. If you notice that the light has become dimmer and diffused, the problem may be caused by the reflector.
To clean this part from the inside without completely disassembling the headlight, use the following method.
- Remove the car headlight.
- Remove the high and low beam bulbs.
- Take a strong piece of wire about 15 cm long and wrap it up to the middle with electrical tape or tape.
- Wrap a soft, lint-free cloth over the electrical tape.
- Lightly dampen the cloth with glass cleaner.
- Bend the wire so that it can reach the reflector through the lamp hole.
- Gently clean the reflector with a cloth. Do not make sudden movements and do not apply force! With the wrong impact protective layer parts may peel off.
- If, after finishing work, there are drops of moisture on the reflector, dry them with a regular hair dryer.
- Replace the lamps and install the headlight on the car

using such a device, you can clean the reflector through the hole for the lamp
Never use alcohol to clean the reflector! Under its influence, the reflector will delaminate, and you will have to purchase a new optical system.
Cleaning the headlight from the outside
Many drivers, when washing their car on their own, forget to pay due attention to the headlights. However, their cleanliness is much more important than the cleanliness of the bumper or car door, because safety depends on the quality of lighting.
Video: cleaning headlights from dirt
From yellowness and plaque
Sometimes an ugly yellow coating forms on the outside of the headlights. It not only spoils appearance vehicle, but also makes the headlights dim.
regular toothpaste will help remove yellow plaque from the surface of the headlight
Today, the automotive cosmetics market has a large number of products designed to combat this plaque. However, the most effective of them you already have at home is ordinary toothpaste. After all, if the tool is able to remove plaque from the teeth and not corrode them, then it will cope with plastic just as well.
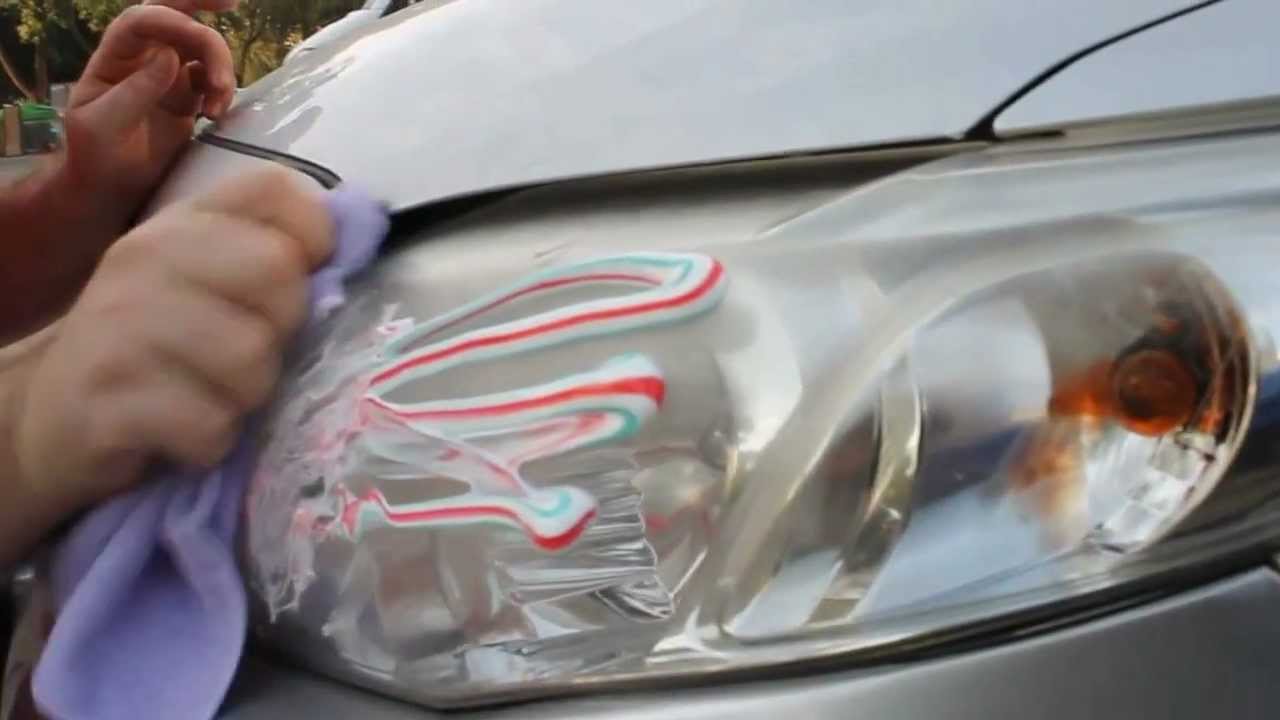
apply a small amount of paste on the headlight and polish it
To clean the headlight with it, apply a small amount of paste to a towel or toothbrush, and then buff the yellowed area in a circular motion. When finished, rinse the headlight and evaluate the result. If the plaque is very strong, repeat the procedure.
after polishing with toothpaste, plaque disappears
Video: how to clean plaque with toothpaste
From sealant, glue or varnish
After inaccurate sizing of the headlights, a small amount of sealant may remain on the plastic. It does not affect the operation of the device, but spoils the appearance of the car. To remove the sealant, it must first be softened.
But what exactly to soften it - big question. The fact is that different formulations removed with various substances. Unfortunately, you hardly know what type of sealant was used at the factory. In this case, you will have to try all these means one by one.
Very often, the remains of the substance can be dissolved with ordinary vinegar. If vinegar doesn't work, try White Spirit. In some cases, treatment with gasoline, alcohol, oil, and even very hot water helps.
If none of the products gives the desired effect, heat the contaminated area with a regular hair dryer. Under the influence of heat, the sealant will become a little softer, which means it will be easier to move away.
In some cases, the headlight can be cleaned with a special silicone remover. You can buy it in almost any store with automotive cosmetics. However, this tool is not universal and is suitable, as you might guess, for silicone formulations.
When you manage to soften the sealant, take a straight screwdriver and wrap it with a cloth soaked in the softening compound. Centimeter by centimeter clean the desired area. Then wipe the headlight with a clean cloth and enjoy its appearance.
Video: how to remove sealant with sunflower oil
Use WD-40 to remove glue or varnish residue from the headlight. Most likely it will be able to solve your problem. Acetone-free nail polish remover is also suitable for removing glue.
Don't use acetone if your headlights are made of plastic! It will corrode the outer layer, and only polishing the headlights in specialized salons can help you.
Skillful hands can remove any dirt, up to bitumen residues. The main thing, when cleaning the headlights with your own hands inside and out, is to follow the basic rules: do not use alcohol for the reflector and acetone for plastic. If you have tried all means, and the pollution still remains, try contacting a car repair shop with this problem. Experienced professionals will do all the work, and at the same time prompt effective method cleansing, which you can successfully use in the future on your own.


