How to draw fruits. Drawing course with colored pencils
You need to learn how to depict the simplest things. Aspiring artists who later become famous or apply their skills to other areas of activity, for example, the participation of artists in apartment renovations, basically start from the very basics and train on simple objects - cubes, balls, fruits. This is what we will do now. For our drawing lesson we will use an ordinary pear. Drawing simple forms will help you to feel the whole philosophy of drawing, the basic laws of form and light and shade, and will also help you to further study the art of still life. It will be a casual sketch - very simple theme, which you should get, if not the first time, then the second one for sure.
What you will need for your first drawing in this drawing lesson: paper (you can use ordinary, office paper), soft and hard pencil, and, of course, an eraser. You will also need a sharpener, as the condition good drawing is a good condition of the pencil.
So, we chose a pear because it is the best subject for the first drawing. regular ball or geometric figure, to be honest, causes extraordinary boredom; an apple, as a guide, is already tired so that it is deposited in the genes of novice artists, and a pear is an incorrect and at the same time simple, original and interesting form.
Before you start painting, try to set the light for the pear, or copy from the original, which is presented here. I recommend using a single light source to begin with, as with two or more lights the shadows will blend and create an almost insurmountable challenge for beginners. So far we are only trying to control the shadow on the paper. Further it will be more and more difficult, but for now you can relax and try to understand the very meaning of the transmission of three-dimensionality.
Don't worry if you make mistakes. There is no learning without mistakes. Don't panic and don't quit. After you have drawn something, it is better to study what you did for mistakes and avoid them in the future. If you find it difficult to see your mistakes right away, then I recommend putting the drawing aside for a while and come back to it in an hour or the next day. The blurred eye will rest a little, and you will see your work in a new light.
fruit outline drawing
If you don't know where to start, then just put a pear in front of you and your sheet. Start at the top of the fruit and slowly, watching with your eyes as the shape of the fruit changes, make an outline. No need to strain your hand, let it relax so that it itself follows the required route.
Try not to make the lines too short and often broken. A combination of short and long lines, as in this drawing, will be ideal for the initial sketch. You can not erase the lines if they do not exactly match the original. No one knows what the pear you drew looked like, so in the first stages of drawing it is worth leaving everything as it is.

pear shading
We begin to hatch or, in other words, create shading for our pear. See where on the body of the fetus there is a bright highlight. Try not to touch this place and carefully bypass it. In case you have touched the place of the highlight, you can simply free it with the help of an eraser. Also, with the help of an eraser, you can lighten some areas if they turned out to be darker for you.
Try to keep the gradation of light and shadow. Make darker shadows on the right side of the pear, lighter ones on the left. No need to pay attention to small details. In this tutorial, we're just trying to create a 3D object using shape, light, and shadow. We focus on the overall effect of the resulting drawing.

Shading shadows and some highlights
If you see dark areas on the pear, then don't be afraid to use dark tones in your sketch. Many novice artists are wary of soft pencils and their drawing comes out too light, although the shaded areas can be quite black. To do this, take soft pencil 2V or 4V. If you get too dark shadows, then you can always shade them and make them lighter with an eraser, an eraser.
Now it's time to compare our drawing with the original. Of course, especially at the initial stage, it should not look like a photograph of a pear, but still we see that the volume and recognition of the subject turned out.
On this our drawing lesson of fruits (pears) for beginners came to an end. Stay with us no matter what you miss following lessons to help you become good artists..
Do you want your sleep to be sound, and in the morning you feel healthy and cheerful? Orthopedic mattresses on MatrasLux will help you with this. The widest range of products for every taste.
To draw such a realistic picture of a tangerine, you need Graphics tablet and besides, you will have to spend a "lot" of time, step by step picking up colors and shades. Therefore, if you need to draw a fruit, in this case a tangerine, let's draw in stages with a simple pencil. On last step, take colored pencils and color the drawing of a tangerine so that this fruit turns out like a real one. If you need to draw several different fruits, then in addition to this lesson, there are others on the site with drawings of fruits, for example, the lesson "How to draw an apple".
1. Draw a rectangular path and subdivide it

It is important that the shape of the tangerine is proportional, not skewed, elongated or flattened. Therefore, draw a quadrangular outline with light strokes and divide it into equal segments. These lines will help you accurately draw the rounded shape of the tangerine. In addition, this drawing of a tangerine also has a broken slice.
2. Rounded outline of a tangerine

On the initial contours, make a general shape of a tangerine and draw seven equal rays from the center. But there will be eight mandarin slices, so draw another outline on the left side for the eighth slice.
3. The main contour of the tangerine

It is convenient to draw a mandarin because its contour lines are wavy. It is only important to accurately maintain the proportions of the shape so that it does not look like another fruit, such as an orange. Please note that the shape of the tangerine is slightly flattened.
4. Mandarin drawing is almost complete

If you have not yet removed the original outline markings from the drawing, then now this must be done. Completely clear the picture of the tangerine from unnecessary marking and contour lines and draw a separate slice in detail.
5. Finish drawing the tangerine

Agree, it is not difficult to draw this fruit in stages. In just a few minutes, we have reached last stage drawing. All you need to do now is draw a few small parts and veins on each slice of tangerine, and we can say that the drawing is completely completed.
6. How to color a picture with a colored pencil

Of course, fruit drawings black and white pencil they don't look "great". Color gives fruits their distinguishing feature and enhances the realism of the picture. Therefore, be sure to color the mandarin with colored pencils. Don't try to paint the mandarin with paints if you don't know how to use them, as you can ruin the whole drawing.
7. Color picture of tangerine

To make it easier for you to color, use this drawing of a tangerine, made by me on a graphics tablet, as a reference.
An apple looks "simpler" than a tangerine, but it's harder to draw. Try to draw an apple so that it is voluminous and with perfectly straight lines, and you will see for yourself.
It is not difficult to draw a banana. It is enough to make the initial markup in the form of a rectangle and divide it into two parts. The main thing is to be able to accurately choose the color of the paint.
We will do the drawing of the mushroom in stages, first with a simple pencil. In the last step, you can color the mushroom with paints or colored pencils. You can draw leaves and grass next to it to make the picture of the mushroom realistic.
Some fruits, as well as flowers, have a unique, inimitable color. And, despite the fact that often these colors are very bright, they are not annoying. Agree, you can look at roses and tangerines for days.
The pattern of a sunflower is very similar to the pattern of a camomile. However, to draw a sunflower correctly, you need to follow a few simple tips.
A drawing of a camomile, probably, will be able to draw everyone. A few petals, a stem with leaves and a picture of a camomile is ready. But for some reason, painted daisies do not always turn out the same as in nature.
Step by step drawing vegetables with children is useful because on these simple objects you can teach children to analyze the shape of an object and decide how to convey it on paper. A lot of vegetables are close to the shape of a ball. Transferring them to the plane, you will draw a circle. But this circle-ball is not always obvious to children. For example, in the bow it must be found. And also find out what needs to be added to get exactly the onion. As with any step-by-step drawing with children, try to avoid mindless copying when drawing vegetables.
All vegetables in the pictures are painted with paints. But pencils are also suitable for working with children. Vegetables are great objects for crafting pencil skills! Tell the children that you need to paint over the ball, taking into account and, as it were, repeating its shape (that is, with rounded lines). Don't press too hard on the pencil. Hand movements should be light. And, of course, you should not go beyond the outline of the picture. But, nevertheless, for preschoolers it is better to work with gouache paints!
Tomato - step by step drawing vegetables with children
Drawing a tomato is very easy! Its almost spherical shape and uniform color are easily transferred to paper. So that we still get not a red circle, but a tomato, add white highlights and green leaves. Pay attention to the children that the leaves look like an asterisk. 
Scheme step by step drawing with the children of the tomato.
Radishes and turnips - step by step drawing vegetables with children
Radish is also a simple vegetable. The only difficulty can be its coloring - a pink radish, gradually turning into a white ponytail. If de painted purple, purple the whole root crop, then you get beets. Similarly you can draw a turnip. But it is rather not a sphere, but an ellipsoid. So on paper you need to depict it as an oval. And paint, respectively, yellow.
 The scheme of phased drawing with children of radishes.

The scheme of phased drawing with children of a turnip.
Onions - step by step drawing vegetables with children
Another "round" vegetable. But here it is no longer as obvious as with the tomato. In the figure, a bow with green "arrows". From the point of view of the culinary qualities of onions, this is not great. But it is very elegant.

The scheme of phased drawing with children onions.
Cabbage - step by step drawing vegetables with children
Although there is no doubt that a head of cabbage is a ball for children, it is a rather difficult object for them to draw. It's all about the clothes-leaves. As in a riddle, a hundred clothes - and all without fasteners. Therefore, we propose to make the cabbage pattern less realistic, more decorative.

The scheme of step-by-step drawing with children of cabbage.
Cucumber - step by step drawing vegetables with children
Cucumber is no longer a ball. It is a very elongated ellipsoid. In a flat drawing, the cucumber will turn into an oval. Cucumber is one of the simplest vegetables in terms of shape. But coloring it in such a way that it turns out not a green oval, but a cucumber is quite difficult. Dots or curls will help here - these are “pimples” on a cucumber.
 The scheme of phased drawing with children of a cucumber.
Carrots - step by step drawing vegetables with children
A carrot is a cone. On the plane, it will turn into a triangle, in which we will then round off the short side.

The scheme of phased drawing with children of carrots.
You can continue the study with children of the shape of vegetables. For example, . And you can first mold, and then try to transfer volumetric forms onto flat paper.
How to paint fruits in watercolor?
How to draw fruits or vegetables in watercolor so that “drooling”? So that the painted fruits are as fresh and juicy as natural ones?
How to convey the volume and texture of the fruit, and at the same time “not dry” the watercolor?
These questions will be answered step-by-step master class drawing a lemon in watercolor!
Basic principles of how to paint fruits in watercolor:
- Best of all, the juiciness and freshness of fruits is conveyed by the a la prima technique, watercolor painting in one layer.
One layer of paint is maximally penetrated by light rays. The light that has passed through the ink layer reflects off the surface of the paper and returns the purest color wave to us.
- In the case of multilayer painting follows:
- apply layers from light to dark
- use transparent, not opaque pigments
- use purer original colors for complex shades
The principle of multilayer writing is based on optical color mixing. That is why you should alternate the layers correctly so that they do not cloud the previous ones, do not reduce the transparency of the final watercolor layer.
For more information on the correct selection of colorful pigments in watercolor, see here:
Perhaps it is better to illustrate these principles with the example of a finished study. Let me show you how to draw fruits in watercolor step by step.
We draw a sketch of a lemon in stages.
So, here it is, my vitamin nature. The more I look, the more “drooling flows”. 🙂 I'll try to keep this feeling of lemon juiciness in the sketch.

Stage I. Study of a whole lemon fruit.
- I'm starting to draw a lemon from its illuminated part.
Here its color is as bright and clear as possible. I use a mixture of lemon yellow and cadmium yellow.
In the most convex part of the lemon, we can see highlights - small light areas on the tubercles of the peel. They must be shown in order to plausibly convey the texture of the surface of the lemon.
To do this, I use the “dry brush” technique. 
2. At the bottom of the lemon there is a patch of light reflected from the surface of the table, reflex. I paint this place with a pale blue tint.
3. Will complete the creation of the volume of the lemon darkening own shadow.
To get the shade shade, I mix cadmium yellow with natural umber.

I write the shadow immediately, until the edges of the illuminated part and the reflex have dried up. This ensures that color flows smoothly into color.
On the border of my own shadow, I emphasize the small pimples of the lemon peel.
Thus, to pass the invoice i use two tricks:
- gaps on the convex part in the light
- roughness of the border at the turn of light and shadow
4. drop shadow from lemon completes its volume.

To write the shadow, I use a mixture of yellow and purple. I make a fill with a predominance of one or the other color. This helps convey the transparency of the drop shadow and connects the lemon to the surface of the table.
5. Since the drop shadow has the same color everywhere, at the same time I write the shadow from the lemon slices: 
As you can see, it takes quite a bit of effort to draw a whole lemon fruit. For this, the a la prima technique is quite suitable. Especially if this fruit is not the main object of the composition, and I do not need its detailed study.
But with lemon slices there will be more work. Juicy pulp, its brilliance, fibers - all this requires more careful work, which means multi-layered painting.
 Start painting with watercolors today!
Learn the basics of watercolor painting with a popular course
“The Taming of Watercolor”
Stage II. Image of lemon slices
1. I prescribe the side surface of half a lemon in the same way as described above.
2. I begin to depict a cut of the fetus.
I pick up several shades of yellow, from pure to mixed with umber, and draw radially spaced pulp fibers. At the same time, I leave white paper in places of glare and jumpers: 

3. In the humid environment of the laid spots, in some places I introduce even more shades. 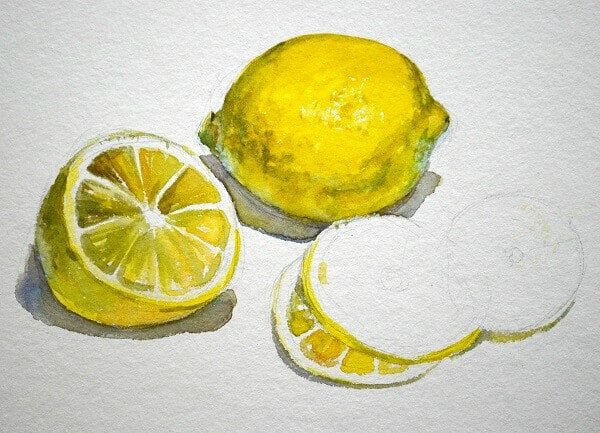
I leave this layer to dry.
More useful stuff:
4. Slices can be written and otherwise.
For example, on these lemon rings, I first completely registered the cut with a pale yellow tint of the illuminated part of the pulp. Wherein. again, left gaps of glare. 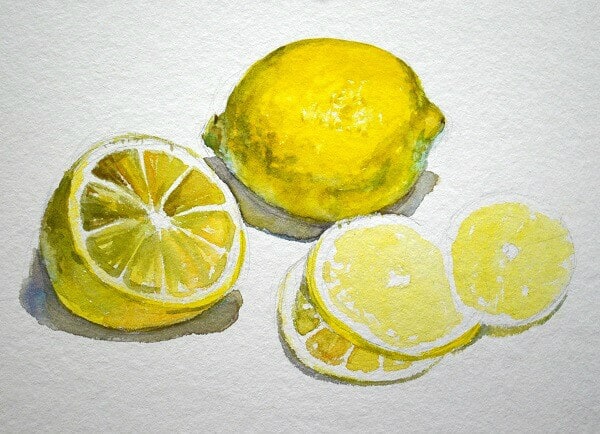
5. When this large light spot dries up, I give radial strokes in darker shades: 
These strokes are quite large. I leave them to dry so that I can divide them later.
6. In the meantime, you can touch a little background.
With a very pale shade of grey, with wide fills, I fill in the background around the lemons.
At the same time, I touch the light areas of the zest on the slices. 
Not only an adult, but also a child can easily cope with such a task as drawing fruits. After all, fruits, if compared, for example, with animals, have an extremely simple structure. The easiest way is to draw fruits from life. But, if there are no pears, no apples, or any other fruits at home, then you can use a high-quality and as clear photo as possible. Beautiful still lifes with all kinds of fruits can be seen on the canvases of many famous painters.
Before drawing fruits, it is recommended to make sure that the following items are nearby:
1. A set of multi-colored pencils;
2. Pencil. Both mechanical and sharply sharpened simple will do;
3. Liner. It is better to use a black liner;
4. A piece of paper;
5. Elastic band or nag.
Learning how to draw fruits will be much easier if you divide this whole process into several steps:
1. Draw horizontal line, thus marking the edge of the table on which the fruit lies. Then, without pressing too hard on the pencil, draw the outlines of each fruit, making a composition out of them. Thus, outline the contours of a banana, apple, pear, plum, and also a cherry;

2. Draw fruits with a pencil, paying more attention to details;

3. Now you know how to draw fruits with a pencil step by step. But in order for the picture to turn out colorful and juicy, it must be colored. Using a liner, carefully outline the initial sketch of the fruit;

4. With an elastic band, remove all traces of the sketch;

5. Now that you have learned how to draw fruit easily and quickly with a pencil, you can color them. Thanks to this, the drawing will look more realistic and interesting. First, color the apple, using brown scale pencils for this, with which you should paint over the stalk, as well as yellow and red-burgundy pencils with which you need to stroke the fruit itself;

6. Color the cherry branches in brown tones. Paint over the cherries themselves with pencils of red and burgundy colors;

7. Color the banana with shades of yellow and brown;

8. To color the pear, choose pencils that have yellow and green colors. And paint over her stalk with gentle pencils


