Program for creating art: description and features. Make art from photo online Program for art drawings from photos
Pop art is the stylization of images for certain colors. To take your photos in this style it is not necessary to be a Photoshop guru, as special online services make it possible to produce pop art styling in just a couple of clicks, which in most photos it turns out to be very high quality.
Here you do not need to make special efforts to achieve the desired effect. In most cases, it's enough just to upload an image, select the pop art style you're interested in, perhaps adjust a couple of settings, and you can download the converted image. However, if you want to apply some other style that is not in the editors, or significantly modify the style built into the editor, then you will not be able to do this due to the limited functionality of the service.
Method 1: Popartstudio
This service gives a large selection of different styles from different eras - from the 50s to the late 70s. In addition to using pre-built templates, you can edit them using settings to suit your needs. All features and styles are completely free and available to unregistered users.
However, to download the finished photo in good quality, without the service watermark, you will have to register and pay a monthly subscription costing 9.5 euros. Additionally, the service is fully translated into Russian, but in some places its quality leaves much to be desired.
The step-by-step instruction looks like this:
- On home page you can view all available styles and change the language if needed. To change the language of the site, in the top bar, find English(default) and click on it. From the context menu, select "Russian".
- After setting the language, you can start choosing a template. It is worth remembering that settings will be built depending on the selected layout.
- Once the selection is made, you will be redirected to the settings page. Initially, you need to upload a photo with which you plan to work. To do this, click in the field "File" By "Choose File".
- Will open "Conductor", where you need to specify the path to the image.
- After uploading the image on the site, you need to click on the button "Download", which is opposite the field "File". This is necessary so that the photo that is always in the editor by default changes to yours.
- Initially, pay attention to the top panel in the editor. Here you can flip and/or rotate the image by a certain degree. To do this, click on the first four icons on the left.
- If you are not satisfied with the default advanced settings, but do not want to mess with them, then use the button "Random Values", which is represented as a game die.
- To return all default values, pay attention to the arrow icon in the top bar.
- You can also customize colors, contrast, transparency and text (the last two provided that they are provided by your template). To change colors, look at the colored squares at the bottom of the left toolbar. Click on one of them with the left mouse button, after which the color selection palette will open.
- In the palette, the control is implemented a little inconveniently. You initially need to click on the desired color, after which it will appear in the lower left window of the palette. If he appeared there, then click on the icon with an arrow, which is located to the right. As soon as desired color will stand in the lower right window of the palette, click on the apply icon (looks like a white check mark on a green background).
- Additionally, you can "play" with the contrast and opacity parameters, if any, in the template.
- To see the changes you have made, click on the button "Update".
- If everything suits you, then save your work. Unfortunately, the normal function "Save" is not on the site, so hover over the finished image, click on the right mouse button and select from the drop-down menu "Save image as...".


Method 2: PhotoFunia
This service has a very poor, but completely free functionality for creating pop art, besides, you won’t be forced to pay for downloading the finished result without a watermark. The site is entirely in Russian.
small step-by-step instruction has the following form:

Method 3: Photo-kako
This is a Chinese site, which is quite well translated into Russian, but it has obvious problems with design and usability - the interface elements are inconveniently located and run into each other, and there is no design at all. Fortunately, there is a very large list of settings here, which will allow you to create high-quality pop art.
The instruction looks like this:

It is possible to make pop art using Internet resources, but at the same time, you may encounter limitations in the form of small functionality, an inconvenient interface, and watermarks on the finished image.
"Art" in translation from English means "art". This word denotes many modern styles: art deco, pop art, retro art, etc. In this article, you will learn how to take an art photo.
How to make art from photos of nature paintings
An unusual effect and an interesting shade of color and contours will be obtained beautiful photos picturesque places of nature, ancient architectural buildings if you do the following in Photoshop:
How to make a pop art portrait
The technique of creating pop art portraits belongs to the American photographer Andy Warhol. His work was a collage of 4 portraits put together with different shades of color in the image. The photographer received well-deserved recognition of his talent after he dared to make and show the world an art portrait of Marilyn Monroe.
After reading the instructions, you will be able to take your photo in this style. To do this, select a face image close-up and torso to the shoulders.

One of 4 portraits is ready. Now you need to make the basis for the entire collage so that you can add the created drawings there.
- In the "File" section, select "New".
- Set the parameters in the opened window: width - 1440; height - 1056; resolution - 72; RGB colors - 8 bits; background content is white.
- Open the Selection section and select All.
- Press Ctrl + C keys.
- Copy the image highlighted with the keys to the clipboard.
- Add the first created portrait.
All other images are made according to our scheme No. 1 only in different color shades. This way you will get your image in pop art style.
Drawing from a photo in art style
You can make an art-style drawing from a photo as follows:

Our photo is ready!
Online resources
For those who have Adobe Photoshop does not support the necessary functions for creating works in art style, you can make a collage online for free on this resource. And on the site you can simply upload a photo, and you will immediately be given the finished result in the form of an art-style photo - you can download it to your PC.
On this resource, it is proposed to create online graphic patterns in the art style by simply clicking the mouse at any point on the proposed plane. The drawing can then be saved to your computer.
It is not necessary to resort to complex graphics to get an image with meaning. In this piece, freelance artist Tom Starley has used basic colors, shapes and brushes to create a well-balanced, euphoric mood with a hint of the fetal life theme. Technically, this is not complex pattern- most of the work is done by the photo itself, but the graphic additions enhance the emotions that are hidden in the original.
Lesson techniques will teach you how to skillfully apply the filter overlap(Overlay) and tool Selective correction colors(Selective Color) to change the mood of the photo. You'll also learn how to place shapes to maintain an abstract visual style, how to use brushes to create movement, and how to add depth. foreground. We will also use a great trick to highlight the hair.
Step 1
First download the In The Moment brush set and double click on it to install.
We need a shot of the model, preferably with a limited palette of tones. I took a nude shot from iStock.
Note: when choosing a photo, you can use the author's recommendation or make color correction of the image yourself, for example, using the Gradient Map.

Step 2
Double click on the background layer to unlock it. Create a new layer in Photoshop, drag it below the photo. Fill the layer with white. Everything is simple.

Step 3
Now we need to cut the model and paste it on a new layer while keeping the background. Select a photo, zoom in to 300% ( Ctrl+"+"), then press R by selecting the tool Feather(Pentool). Carefully create an outline around the model, ignoring the tousled strands of hair - don't be sorry, we'll bring them back later anyway.

Step 4
Once you've created a path around the model's body, right-click inside it and select Generate Selection(Make selection). Click OK. We will split the photo into two layers. Click ctrl +X to cut and ctrl +V to paste the selection on a new layer. Reduce opacity(Opacity) of the background layer to 64%.

Step 5
Now you can return the naughty strands of hair. Turn off all layers except the model. Choose a tool Finger(Smudge tool), use brush size 1 or 2, set Intensity(Strength) to 95%, then check the box Sample from all layers(Sample All Layers) on the panel Options(Options bar).

Step 6
Redraw the strands that you could not cut earlier. Moving in the direction of the hair, swipe with the mouse or digital pen along the cut ends, redrawing the hair (the more the better). When you're done, turn the layers back on.

Step 7
In this step we will add some color using the blend mode. overlap(Overlay) - it can be found either in the drop-down menu of the palette Layers(Layers palette), or in the menu Layers > Layer Style > Blending Options(Layer > Layer Style > Blending Options). Create a new layer, fill it with yellow (#ffff00), cut down opacity(Opacity) to 16% and set the blending mode overlap(Overlay). Mmm, lovely yellow shade.

Step 8
Create a new layer and use the tool Brush(Brush) by adding scattered soft touches of pink (#ffe02b1). Lower the opacity to 37% and set the blend mode overlap(Overlay). Repeat the process by painting the model's body with a blood red tint, adjusting the opacity accordingly. Also select overlap(Overlay). Group the layers and place them at the top of the document.

Step 9
Now that we've finished the background and added colors, we can start using abstract brushes and shapes. Instead of giving precise instructions on how and where to place these effects, the following steps and tricks will cover the basics from which you need to build on your work.

Step 10
Grab one of the paint splatter brushes found in the tutorial's materials. Create a new layer above the model and add a couple splashes around her back. I chose white, but you can use any color you like.

Step 11
Using the brushes from the materials folder, add more splashes and shapes around the model, placing them aesthetically. Vary the color, duplicate or rotate them, deform the brushes to fit the contours of the model's body. Make sure to create a new layer for each brush - this will give you maximum control. Also, this trick will allow you to remove any brush in the future.

Step 12
Now add a layer below the model and repeat the previous steps, experimenting with brushes. Try not to overdo it with effects - the less, the better. The main subject of the composition is the model, so make sure she doesn't drown in the effects. Don't worry about getting an exact match with my example, experiment and have fun.

Step 13
If you don't like the result, stop. Take a break, think, come back to work later and experiment until you get the desired effect. Personally, relaxing music helps me to tune in the right way. Try and make your elements smooth, as if they are really in the photo.

Step 14
Now that the color and shapes have been added, we need to create the circles of light that look like lens flares. Create a new layer above the model and set its blend mode to overlap(Overlay). Choose one of the spherical brushes, set pretty big size, then just click anywhere in the document.

Step 15
Repeat the following steps with smaller brushes. It's very simple but effective method and it's great for creating a sense of depth. Many of these effects are easy to apply, but they work great.

Step 16
You've added everything you need, and now the work looks great, but it would be nice to make the image stand out more. It may seem that some colors could be brighter, and some are not visible at all. In this case, use the panel Adjustment layers(Adjustment Layer panel) and add a layer Selective color correction(Selective Color) above all the others. It can be found on the menu Layer > New Adjustment Layer > Selective Color(Layer > New Adjustment Layer > Selective Color).

Step 17
Set the Selective Color layer so that it affects all layers below. This will allow you to easily change each color - go through the settings and adjust them to get the desired result. And now everything is ready. Save your work, brag to your friends and share it in the comments.
It was in the climate of experimentation and consumerism in the late 1950s in England and America that pop art emerged, a movement of a new generation of artists who sought inspiration in Everyday life, creating art from household goods, consumer goods and the media.
Pop art: art of the 20th century
pop art artists, or popular artists, created in a straightforward manner, using bold bright colors, used screen printing, silk-screen printing to quickly and mass-produce paintings, while downplaying the value and exclusivity of the artist's work, depersonalizing his work. The direction in art was called " pop Art" (short for "popular art" - "popular art").
This trend appeared as a response to the work of abstract expressionists, whose creations dominated American art in the postwar period, and subsequently as a whole as a counterbalance " high art". Pop artists preferred to see in the works a return to reality, daily images, wit and irony.
Popular artists sought to combine fine art traditions with elements of pop culture from television, film, cartoons, printed gloss and advertising.
At the same time, their work challenged the traditional boundaries between different media, combining elements of painting and drawing with photography and print, elements of handmade and mass production, as well as combining different objects, images and sometimes text to create new meanings. Although the peak of the popularity of pop art happened in the last century, this trend still has many followers who create paintings in a modern style.
The founders of pop art are Richard Hamilton and Eduardo Paolozzi, but now this style is primarily associated with the names of Andy Warhol, Roy Lichtenstein, James Rosenquist, Robert Rauschenberg, Claes Oldenburg and other artists.

Perhaps the most famous figure among them is Andy Warhol - American artist, director, designer, producer and one of the most conflicting personalities in the art of the 20th century. His works are famous all over the world, and some of them are among the most expensive paintings ever sold.
TOP 5 most famous works of Andy Warhol
Marilyn Monroe (1962-1967)
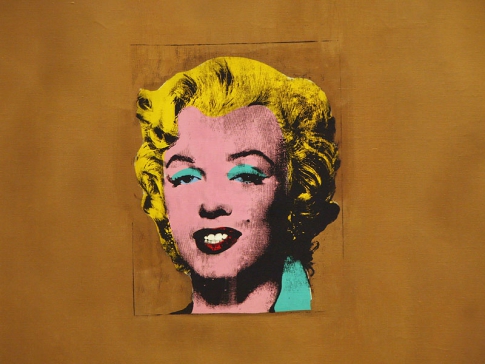
This photo of Marilyn Monroe is the most famous image among the works of Andy Warhol and pop art in general.
He created his first work called "Golden Marilyn" in 1962, when the actress committed suicide. To do this, Warhol used a black-and-white promotional photo for the film "Niagara" (1953) with the image of Marilyn, painted over the canvas with iridescent gold paint and imprinted the face of the movie star right in the center of this composition. Thus, by duplicating photography, Warhol undermines the uniqueness and authenticity of the characteristics of the traditional portrait, showing that it can be an infinitely reproducible image.
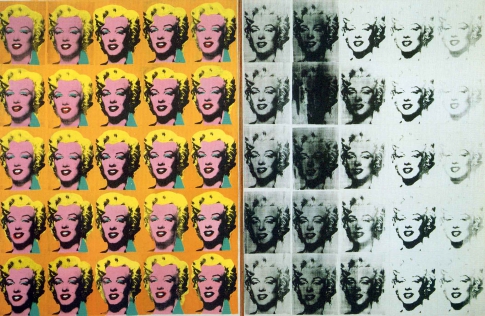
Warhol uses the same photo to create entire series of images. Each work with Marilyn was an experiment in color and shadows. Thanks to the technique of applying the image by silkscreen and the help of his assistants, Warhol was able to very quickly create such paintings in the style pop Art.
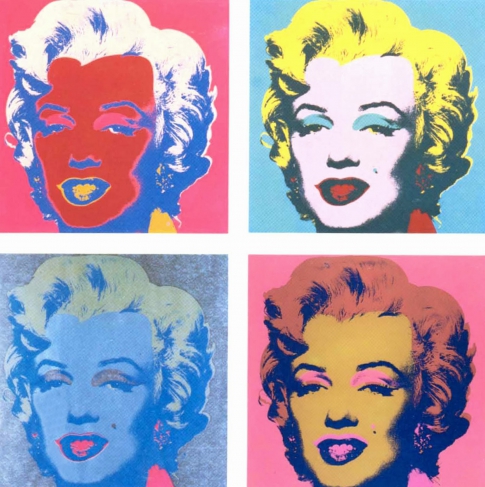
Warhol later created five portraits of Marilyn in red, blue, orange, sage and turquoise. With the first four jobs happened interesting story: at one of the Warhol exhibitions, one of the artist guests shot them with a pistol (she just asked the artist for permission to “click” the paintings, and the word “shoot” in English means not only to shoot, but also to take photographs). However, this only increased the popularity of the paintings: they were called "Shot by Marilyn", and their price increased.
The surviving fifth painting turned out to be "Turquoise Marilyn", and it is the reproductions of this work that are now most replicated.
Cans of Campbell Soup (1962)
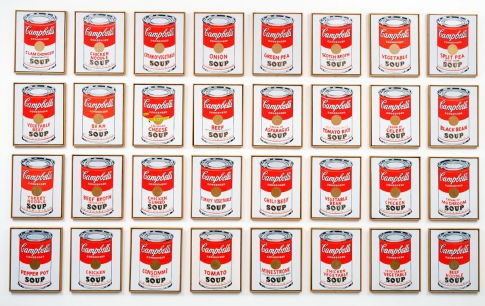
They say it's the owner art gallery and interior designer Muriel Latow pitched the idea for this pop art painting to Warhol when he said he should paint the objects that people see around him every day.

This work is an early example of Warhol's series of repetitive images representing consumer goods. The artist painted cans of soup more than once: there is a picture where the can is depicted in a single copy, a picture where six cans are presented, and there are options for images of entire rows of cans with different flavors of soup: “32 cans of Campbell soup”, “100 cans of soup” Campbell" and "200 cans of Campbell's Soup".
200 dollar bills (1962)

When Warhol asked his acquaintances what kind of pop art drawings they would like to see, one of the girls he knew asked him what he really loves the most. It was then that Warhol had the idea to draw a dollar bill - that's really the most popular and most massive object of our time. Nothing superfluous is depicted in the picture, only two hundred one-dollar bills laid out in continuous rows.
Eight Elvises (1963)
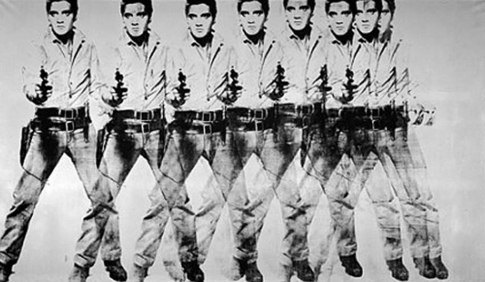
This twelve-foot monochrome pop art painting features eight identical, overlapping drawings of Elvis Presley in cowboy attire. It is unique in that it did not go through mass production like most of Warhol's work. In 2008, "Eight Elvises" was sold for one hundred million US dollars - it is still one of the most expensive paintings ever sold and is considered one of Warhol's masterpieces.
Banana (1967)

In 1965, Warhol became the manager of a famous American rock band under titled The Velvet Underground, which at that time was not yet popular. In collaboration with famous artist the band releases their debut album, featuring this pop-art illustration of a banana, Warhol's signature and the phrase "Peel slowly and see" as the cover.
How to Make a Pop Art Portrait in Photoshop
The pop art style is still very popular today: in this style, not only paint pictures, but also make up for themed parties and holidays, draw body art, and also stylize photographs. If you also want to take a photo in the style of pop art, then this is not difficult - you only need Photoshop and digital photography which you want to transform.
In order for a pop art portrait to turn out well, it is better to use a photograph where the person is shown close-up, or at least shoulder-length.
- Open your photo in the editor.

- Apply isohelia or posterization to it (“Image” - “Correction” - “Posterization”). In the pop-up window, select the number of posterization levels - 2.

- Go to "Selection" - "Color Range". You will see a window in which you will need to click on the drop-down menu and select the "By Samples" item. The cursor will turn into an eyedropper tool, with which you need to select white - just click on the white area of the document. If your photo has a multi-colored background, use the white eraser or brush in the toolbar to trace the person in the photo and paint over the background.
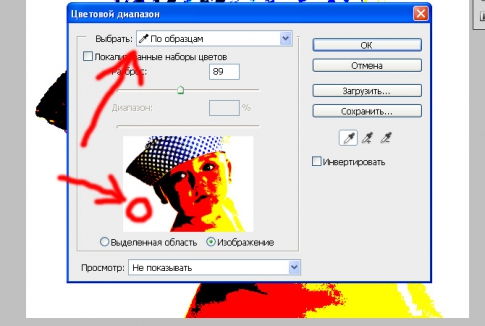
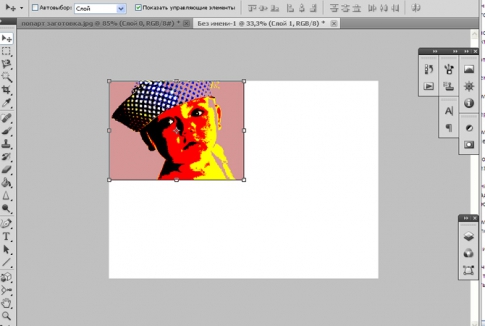
- Now find the Fill tool in the left panel. Select the color you like from the palette and click on the white background with the left mouse button. The entire associated white field of the photo will be filled with this color.

- So we got the first piece of our future collage. But we need as many as four pictures in the pop art style for it, so we create a new document (“File” - “Create”) and set the size working area. To determine it exactly, check the dimensions of the first photo - the new document should be twice as wide and twice as long.

- Go back to the first photo, go to the "Select" menu and select "All". Using the combination of buttons "Ctrl + C", copy the resulting selection. Go to the newly created document and paste the copied selection on the white box ("Ctrl + V").
- After that, copy the pop art photo and move it to the right of the first one. You just have to copy the photo again, use the fill and change the colors of the collage components so that they differ from each other.
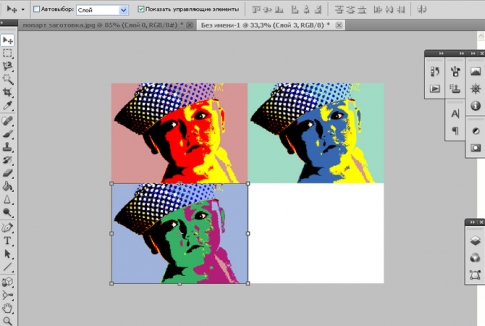
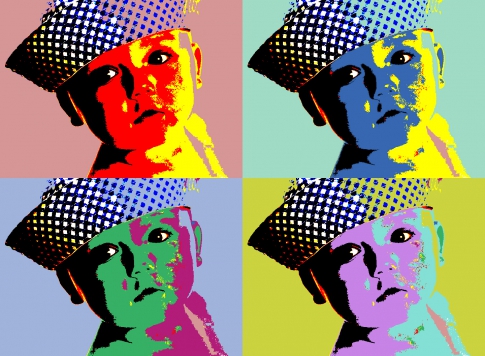
- That's all - you will get a similar collage in the style pop Art.
And how to make a picture in the style of pop art with your own hands using a stencil, paper and paints, you will learn in this video:
Take it, tell your friends!
Read also on our website:
show more
In order to make immersion in a fictional reality more natural, whether it be movies, games or books, artificial languages are being created. We decided to talk about the most famous fictional languages in modern pop culture, as well as give examples of simple phrases, in case you want to learn a couple.
This Photoshop tutorial introduce you to a very famous destination V fine arts like pop art.
Next to pop art is the name Andy Warhol, who was an artist, photographer, filmmaker, and publisher.
It was he who, in the middle of the 20th century, created unique collage paintings from completely unexpected things - from images of cans to such glamorous collages with Elvis Presley and Marilyn Monroe.
This style became incredibly popular at the time, and countless imitations of the artist's work began to appear.
Because creating pop art pictures is very easy, especially if you own Photoshop.
The technique we want to tell you about is that first a black and white stencil is made based on the original drawing. And then parts of this drawing are painted in very bright colors in different variations.
Any portrait can be turned into a pop art drawing, but a photo with clear boundaries is especially suitable for this.
It is desirable that the person in the photo looks directly into the camera lens.
1. Below is the process of cutting out a boy from his native background and placing him on a new one. It is important for us that the boy and the background are placed on different layers.
To quickly remove a monochromatic background, use the tool - Magic wand, if the background is multi-colored, then take a tool - Pen


2. Most likely you have already noticed that pop art images are famous for their very high contrast.
The following steps will remove a lot small parts, so you don't have to be too careful as you work.
Place the bright background layer directly below the working layer (with the boy).
3. To make a high-contrast image, first make sure you are on the cutout boy layer and choose from the menu Image > Adjustment > Threshold.
Move the slider so that the image contains enough shadows so that all the main shapes and features are preserved.


4. Roughly highlight each part of the image that you will color in later.
Press Alt + Ctrl + J to copy each part to a separate layer. Name each new layer. Change the blending mode of each layer to Multiply and hit OK.

5. Activate each layer in turn in the layers palette.
For each, press Ctrl + click on the layer box and go to the menu Edit > Fill .
Click on the Use line, a window will appear where you can select the Color line. Thanks to this, a color palette will appear, where you can choose a bright saturated color to your taste to paint over any part of the image.


6. In the "Layer Style" window (Layer Style appears if you double-click on the layer) select the Color Overlay style (color fill) and change there blending mode (layer blending mode) to Color. Choose a bright color and click OK.
7. When you repeat these steps for each individual section of the image, you will see that in front of you real masterpiece in pop art style.

8. Save this file in Photoshop format (.psd) and make copies of the layers where you did the coloring. In your layers panel, each area is painted over in a certain color. Now it is very easy to change the color of the area using the Hue / Saturation function (Ctrl + U).
In the end, you can combine all the options into one large image.
Such a combination various options of the same image is very characteristic of the style of the 60s Pop Art.