Snow Maiden drawing coloring book close-up. Snow Maiden
Greetings friends and guests of my blog! And I hasten to congratulate everyone on the onset of spring! And with the first spring holiday International Women's Day. On this day, all women receive gifts and flowers from men. And mothers and grandmothers still receive hand-made crafts and postcards for March 8 from the kids.
On the Internet you can find a variety of techniques for making postcards from paper and cardboard. And also from many improvised materials - fabrics, napkins, cotton pads and pasta. Some of them are quite difficult, only schoolchildren will master their implementation. But there are also very simple ones for kids. middle group kindergarten.
In this article, we will analyze the step-by-step production of postcards for March 8 with our own hands. Older students can handle these simple crafts on their own. Of course, kids need help and follow their work with scissors and glue. Choose the option that your children will not be very difficult to make.
I hope this article will be useful for teachers and educators, as well as for children who can already make congratulations to their loved ones on their own. I tried to cover all the moments of manufacturing in as much detail as possible, but, of course, no one will forbid you to apply your creative imagination.
Postcard for March 8 from paper in kindergarten
This step by step master class creating congratulations with children from 3-5 years old. A colorful, bright tulip is sure to please those for whom the guys will make it with love. There are very advanced kids who can even cut flowers and leaves out of paper themselves.
And who has not yet learned how to deftly wield scissors, let adults help them.
In fact, this is an appliqué made of colored paper and cardboard with a small element of decoration with a satin ribbon. For the manufacture of crafts, we take a sheet of colored cardboard. It can be of any color, the main thing is that the flower looks noticeable and bright on it.
Two sheets of colored paper. Green for leaves and stem. The other might be red or yellow, or orange for the tulip flower. One small sheet of white paper for the template. About 25 cm satin ribbon. Glue, pencil, ruler and scissors.
Let's start by making the base. The postcard will be rectangular with sides 21: 9 cm. On a sheet of A4 cardboard, draw one line at a distance of 9 cm from the edge. We draw the second line at a distance of 18 cm. Further, along the line 18 cm, cut it off with scissors. And along the 9 cm line, gently bend. The base is ready.
We bend a small white sheet in half and draw half a droplet on it. Cut and straighten a drop. The droplet should be sufficiently elongated as in the photo. This will be our template for the flower and petals.
On the paper that is intended for the flower, draw three droplets according to the template and carefully cut them out. These are blanks for a tulip. From green paper we make two petals and a strip of stem. The details are ready.
First, we take a strip, coat it with glue and glue the stalk in the center of the postcard. Retreat about 1-1.5 cm from the bottom edge.
For a tighter grip, you can smooth it with a napkin.
We collect a tulip from three red blanks. One will be located in the middle of the stem. And on top are two petals looking in different directions.
At the next stage, green leaves are glued at a distance slightly above the middle of the stem. Tie a bow from a piece of satin ribbon. It can also be put on glue. But it will be better to keep it on a piece of double-sided tape.
It turned out a charming tulip tied with a ribbon. Mothers and grandmothers cherish such postcards and proudly show them to all guests. Other flowers can be made according to the type of this postcard. You will find templates and stencils later in this article.
Do-it-yourself voluminous postcard
Such voluminous postcards for March 8 will be a pleasant surprise for mothers. Students can make them. primary school. It is not difficult to make it, but patience and accuracy will be required for such interesting work.
For work we need:
- Colored cardboard sheet size
- Several sheets of colored origami paper
- Scissors
- felt-tip pens
- Any decor (rhinestones, beads, sequins, etc.)
- Compass
- Piece of ribbon or ribbon
First of all, let's make flowers. It's pretty complex element work. But having learned how to make them, later you can always use this decoration in any crafts and postcards.
If you don't have a compass, you can use round shapes that you have on hand.
On a sheet of colored paper, draw a circle with a diameter of about 3 cm. The circle is drawn in the very corner to make the most economical use of the sheet. I highlighted the fatter circle, and you draw it with a simple pencil.
Now we bend the edge of the paper with a circle with an accordion twice. To the width of our circle.
We take scissors and cut off this bent part from the sheet. And we bend this strip a couple more times. It should be noted here that if the paper is ordinary, thin, then we can cut this thickness. If the paper is thicker, then determine for yourself how many times you can fold it.
Now from all these folded layers of paper we cut out the drawn circle. We get 9 even circles. These will be the flower petals.
Again we collect all the circles in an even pile and make a small incision before reaching the middle of the circle. The length of the incision is about 1 cm.
Next, on one side of the notch, lightly grease with glue and glue the two sides of the notch so that the circle becomes a convex petal. We do this with all circles. We make some more convex, others less. Let the petals be different.
When all the petals are ready, we cut out a circle with a diameter of 2 cm from the same paper. And we begin to glue our convex petals to it. One after the other from different directions. We put a drop of glue on the petal and glue it to the base mug.
All the petals are glued and a dense bud is obtained. Now cut out 4-5 more circles from the remaining paper. We leave them flat and glue them on the bottom. Now our flower has opened.
It remains to make stamens in the middle of the flower. To do this, cut out a strip of white paper 3 cm wide and 10 cm long. Fold the strip in half and randomly paint over one side with a yellow felt-tip pen.
With scissors we make cuts along the width of the strip. Not reaching the edge, so as not to cut off inadvertently. It turned out a strip of yellow "grass". This will be the center of the flower.
We twist this strip of "grass" into a roll. At the end, fix the edge with a drop of glue. Now, on the side that will be to the flower, we coat it well with glue.
It is good to use hot glue in such cases. It dries very quickly.
Press well to the middle of the bud. And even worth a little hold to stick stronger.
The flower is ready. Step by step description it got long. But in reality it all happens very quickly and easily. In this way, you can prepare a lot of colorful flowers. They can be used for other crafts as well.
Let's start making a postcard for March 8 using prepared flowers. As a basis, we will take a white sheet of A4 cardboard. It was folded in half and received a postcard.
Cardboard color can be any. Just make sure that the flowers on it stand out well.
To “package” the bouquet, we take a sheet of colored paper measuring 20:15 cm. We fold it according to the principle of an accordion.
Now we need a sheet of green paper for leaflets. Cut a strip 6 cm wide and 10 cm long from a green leaf. Bend it in half and cut it in a semicircle. From this blank we cut out the contours of the leaves such as in the photo. The first one will be large, the second one will be smaller, and so on.
From all these blanks, we begin to collect a postcard. We bandage our bouquet package, folded like an accordion, and glue it on a postcard. Here, a rope is used as a tie, you can take a ribbon or braid.
The contours of the leaves are glued to the package. They are randomly placed. But only the lower edge of the leaf is glued together. The top edge is loose.
Now it's the turn to attach flowers to the bouquet. I think three flowers will be enough for this postcard. To avoid overkill. We have other decorations too.
At the edges we decorate the card with sparkles or rhinestones. We bend inward and fix the upper edges of the leaves with glue. They also get bulky.
Now take the felt-tip pens and draw in the free places what you see fit. And also write a congratulation on the upcoming holiday inside the card.
It will be very pleasant for any woman, girl or girl to receive such a card made with soul.
Video story on how to make beautiful origami dresses
These chic dresses can decorate holiday card. See how cleverly Julia makes them. You can make them not only from plain paper. If you take paper with a colorful print for scrapbooking, then these will be fun, chintz dresses. You can also decorate them with beads, rhinestones and sequins.
Turn on your imagination and Original gifts will always surprise and delight your loved ones. And now we will make some more beautiful outfits.
We make postcards with dresses with children from 5-10 years old
These simple but cute gifts can be made with younger children. These are the simplest dresses, and how beautiful they look on a postcard. Let's make these for those whom we want to congratulate on Women's Day on March 8th.
We will need:
- Pencil
- Scissors
- colored cardboard
- colored paper
- Beads, ribbons or other decorations
To begin with, we will make a postcard blank from colored cardboard. Cut a sheet of colored cardboard across in half. Fold in the middle to make a postcard.
From a sheet of white paper we cut out a rectangle measuring 10 by 14 cm. We will glue it inside the postcard for beauty and contrast. On this side we will write congratulations.
If you need to congratulate several people, then prepare all the cards at once. Let's start making the dress. On the front side in the left upper corner measure along the ruler to the right 3 cm. and make a point.
We measure another 3 cm from it. Down and here the point should already be more noticeable. This will be the "waist" of our dress.
From this place we draw the line of the bodice of the dress up with a pencil, and the line of the skirt down. These lines are not straight, but slightly rounded.
If it doesn't work right away, erase with an elastic band and draw again.
We make a corset in the form of a neckline. The lower part of the card, where the hem of the skirt is, can also be made wavy. When everything is drawn, carefully cut out along these lines with scissors.
It remains to designate a belt at the dress. You can draw it, make it from ribbon, lace or beads. He will be the highlight of such a dress-postcard. You can stick or draw flowers or butterflies on the dress. Anything your imagination tells you to.
Dresses on postcards can be very different. They can be cut from openwork or colored napkins.
These wipes can be bought in the departments of disposable tableware. There's actually a lot of interesting things you can find for crafts.
And also very elegant postcards with dresses will be obtained from pieces of beautiful fabrics. Use beads, rhinestones or beautiful braid. Any decorations are always useful for needlework.
Video on how to make a postcard for March 8 using scrapbooking
In this video clip, the girl Asya shows three options for greeting cards made using the scrapbooking method. These ideas are simple and suitable even for those who have never done such needlework at all.
You can see for yourself how simple everything is and how cute the products turn out. Any woman will be very pleased to receive such a card.
Templates and patterns for paper cutting
To make do-it-yourself postcards for March 8, it is very convenient to use ready-made drawings and templates. I have collected for you some of the most suitable and popular schemes on the Internet.
Download the ready-made postcard scheme and you can simply color it or decorate it with appliqué.
And there is also ready step by step drawing about how to make a beautiful postcard with the number eight and decorate it with flowers and leaves. They will be voluminous, as we have already learned to do.
You can make a completely big figure eight and decorate it with flowers, drawings or fabric.
Do you already know how to cut paper very neatly and beautifully with scissors and a cutter? Then try to draw such an openwork figure. The bottom edge of it must be twisted and fixed with glue. And she can stand on the table.
You can also download these postcard templates in the form of flowers. You only need to carefully cut them out, stick colored paper on top and draw flowers. Or just paint with felt-tip pens or paints.
Here is such a simple butterfly-shaped card that will be very beautiful if you try to paint it brighter. It is made double and then folded in half.
 Such homemade gifts are always very pleasant for mothers and grandmothers. They will be very pleased to see that the children tried very hard to please them.
Do-it-yourself postcard for March 8 using quilling technique
These the smallest details give such unique beauty that you want to watch and watch without stopping. How beautifully thin, paper patterns twist. If someone owns this technique, I envy you very much. My fingers, unfortunately, are not capable of this.
In this video clip, Elena Lobanova makes a postcard with her own hands from small elements twisted from strips of paper.
The most delicate beauty! Just a work of art. I admire those who can repeat it.
I hope that this article will help you and your children make greeting cards for March 8th. May mothers and grandmothers be glad and happy on this day and always.
If you liked this collection of master classes, press the buttons of social networks and save it on your page.
Summary: DIY postcards. Do-it-yourself postcard for mom. Handmade postcard for grandma. Postcards for March 8. Do-it-yourself postcard for March 8. Handmade gift for mom. Do-it-yourself gift for mom on March 8. Handmade gift for grandma. DIY crafts for March 8. Crafts for March 8 in kindergarten. DIY paper crafts for March 8.
Do-it-yourself postcard for March 8 is a wonderful gift for any girl or woman. It is a real pleasure for children to make handmade cards for grandmothers and mothers, even with the participation of adults. The participation of adults in preparing a surprise is important in order to show the baby an example of how to do it. Welcome any manifestation of fantasy in the design of the postcard. Your ideas and creative examples will help the baby navigate and add something of their own.
1. Postcard to mom with your own hands
The child will definitely like the idea of circling his own palm, cutting out the resulting silhouette and making a postcard out of it for mom.

Separately, cut and glue a bouquet of spring flowers from colored paper. Glue your palm to the front of the postcard for March 8th. Just leave your fingers unglued! Put flowers in them, bend and only then glue. Do-it-yourself postcard for mom is ready!


From the silhouette of a child's hand, you can make another original postcard for March 8 with your own hands.

Here is another version of the postcard for March 8, decorated voluminous application from paper. Very kind, beautiful and tender card. You can view the instructions and download the postcard template on the website Krokotak.com

Volumetric postcard "Vase with flowers". It is very easy to make it. Flowers are made of colored circles of different diameters. The vase is made of a piece of rectangular paper glued to a postcard. For detailed instructions on how to make such a gift for mom or grandmother with your own hands, see.

A spectacular postcard for mom is easy and quick to make using a regular hole punch. To make this postcard for March 8 with your own hands, you will need blue and yellow paper. Link >>>>

Here is another interesting option on how to make a voluminous postcard for mom with your own hands. Flowers are made of corrugated paper and so-called. chenille wire. The card itself has two layers. For more information on how to make such a voluminous postcard as a gift for March 8, see.


3. Do-it-yourself postcard to grandmother
And the child can make this voluminous postcard together with his mother and present it to his grandmother or aunt. Detailed instructions for making a volumetric postcard by March 8 with your own hands, see the link >>>>

A postcard by March 8 with your own hands can be decorated with an original application in the form of spring flowers, made from circles folded in half. See link >>>>

Here is an example of another do-it-yourself voluminous postcard, decorated with an application in the form of flowers made from circles different size. Both the petals and the leaves of the flowers on the card are made of two circles each: one is larger, the other is smaller.


A beautiful three-dimensional flower applique is also obtained from hearts folded in half. For detailed instructions on how to make this postcard on March 8, see.


applique flowers
Here we want to give a link to the book "Flowers. A simple application (for children from 2 years old)" by the publishing house "Karapuz". In it you will find many interesting and simple ideas on how to make an application of flowers to decorate a postcard by March 8th. It is not necessary to buy the book, all the illustrations from the book are posted on the website of the Labyrinth online store.

Continuing the theme of paper flowers for beloved mothers and grandmothers, we will share with you interesting master class from the site maaam.ru Do-it-yourself postcard for March 8, decorated voluminous flower from paper. See how to make it.

This homemade postcard for March 8 is decorated with a voluminous application made of colored paper. To make one tulip flower, you need to cut out two identical tulips according to the template, bend them in half, and then glue the sides together. To add volume to the leaves of flowers, bend each leaf in half and glue only one half of the sheet to the postcard.

A paper flower can be wrapped in a paper lace napkin. It will turn out a very delicate spring bouquet. Link >>>>

A creative solution is to make a card for March 8 in the shape of a cup, inside which you can put a bouquet of paper flowers. Please note that the front side of the postcard is decorated with flowers. Vytynanka is kind of creativity, which is based on cutting out patterns from paper. For cutting, use ordinary office paper or sheets of drawing paper. You can cut with a clerical knife or a special craft knife. Also, nail scissors are often used to cut vytynanok templates.


The original application of flowers can be made from colored pencil shavings.

From paper molds for cupcakes or paper filters for coffee, you can also make flowers to decorate postcards for March 8th. In the center of the mold, the child can stick his photo.

An imprint in the form of a rose leaves a celery root on paper if it is previously painted with paint. Try to make a DIY card with your child using this non-traditional technique drawing.


Surely, you are familiar with the technique of paper weaving. Using this technique, you can create beautiful paper napkin rugs. see link

By weaving such a paper rug, you can then cut out a basket for mom or grandmother from it. Be sure to decorate the finished basket with flowers. Link >>>>

The postcard in the photo below is decorated with flower petals made from corrugated paper. How to make such an original voluminous postcard for March 8 with your own hands, see the link >>>>


Flowers can not only be cut out of paper, but also drawn with paints, pencils or felt-tip pens. Here interesting way decorate a postcard for mom on March 8 >>>> First, very easily outline the plot spot with a simple pencil. After watercolor paints on wet paper, draw multi-colored spots. When the paint is dry (you can dry the paper with a hair dryer), a black thin marker (felt-tip pen) or gel pen paint veins on the leaves, flowers, decorate and sign a postcard for mom. Another related link.

You will find a master class on making a postcard for March 8 with your own hands with a voluminous application from napkins on the Country of Masters website.

Quite interesting postcards are obtained if you use elements folded using the origami technique in them. These elegant postcards can be made by hand for a woman using an origami dress. Such dresses can become both a decorative element of a postcard and an independent decoration, for example, a gift tag.


Master class on making origami dresses see link >>>>

And here is a simpler version of a postcard for March 8, decorated with a paper dress. Here the dress was made from a book page. Separately cut out and glued the bodice of the dress. We made a skirt separately by folding thin strips of paper like an accordion.

And one more example of a do-it-yourself postcard for March 8, decorated with a paper dress. For this dress, a skirt is separately cut out and folded out of paper, and a bodice separately. Take advantage ready template dresses. See link.


Finally, the simplest version of a three-dimensional postcard for March 8, decorated with a tutu skirt. The skirt is made from a strip of paper folded like an accordion.

From plasticine flagella (sausages), a child can make an original application as a gift for his mother or grandmother for the holiday.
The basket with flowers in the photo below is also molded from plasticine sausages. It turned out a beautiful and original card for mom on March 8.

Here is an example of another interesting postcard for March 8, made of plasticine using the appliqué technique.

A handbag is an indispensable attribute of every woman, so it would be appropriate to depict it on a postcard. For example, you can make an application in the form of a colored paper bag decorated with rhinestones and sequins. Link >>>>


And also required attribute a true lady is a lady's hat. Complement your gift for your beloved mother with a small original postcard in the form of a hat. How to make this card for mom on March 8, see. It sits well on the table. Inside, congratulations. Outside - any design of your choice. You can come up with a wide variety of hat decorations: flowers from napkins, origami flowers, quilling flowers, as well as buttons, lace, ribbons, sequins.

If your mother and grandmother are big tea lovers, then for them you can make a postcard for March 8 with your own hands in the form of a cup with a tea bag.
Here is the easiest option.
Make an applique of colored paper in the form of a cup and saucer. At the same time, glue the cup to the base of the postcard not completely so that you can put a tea bag inside.

Here are two more interesting options making postcards for March 8 with your own hands, but they are also more complex.
To make a three-dimensional postcard as in the photo below, download the postcard template from the link. Print it out and let your child color it. Then you need to make cuts on both parts of the card with scissors and insert one part into the other. For detailed instructions for making this craft for March 8, see the link >>>>

And this postcard is in the form of a teapot. Inside you can put delicious tea bags and congratulations on March 8. A template for making a postcard with your own hands at the link. To make this paper craft for March 8, you will also need a beautiful ribbon.

If you want to emphasize the role of your mother or grandmother as a hostess in the house, if your mother or grandmother loves and knows how to cook deliciously, then make a postcard for March 8 with your own hands, decorated with a paper application in the form of a kitchen apron.


On the same site there is a section with do-it-yourself voluminous postcards for March 8. A card in the form of a bouquet of flowers, or a cup of coffee or a basket of flowers. All this and more can be found on the Creative Park website.


10. How to make a postcard. Postcard templates
Volumetric postcards-toys from the site www.nika-po.livejournal.com deserve special attention. These postcards will occupy the attention of the recipient for a long time, he will roll the ball through the maze or follow the spilling beads. The main element of all these voluminous postcards with a window is a plastic cap from food packaging (for example, from sour cream). For a detailed master class on how to make a postcard with your own hands, see. Here is another link to the book of the author of the site, the book is called "Entertaining Postcards".
Good afternoon dear friends! There are only a few days left until the next holiday, the sun is shining brighter on the street, which means spring has come and brought with it good mood and positive impressions and emotions. On the eve of the international women's day I want to invite you to make postcards for March 8.
We will create them mainly from paper, and of course from what is always at hand, using improvised materials. Let's be original and do all the work with our own hands beautifully and with love. So that all those to whom you will give such a charm will be delighted with what they see.
Be sure to do crafts for this holiday, and you can take ideas from this one, I advise you to see it, who has not seen it yet. You can also use a great option and give awesome and cute
It's not a secret for anyone to give or make any nice present your beloved mother needs to have some kind of superpowers. You can do the work using a sheet of cardboard and colored paper. The symbol of the eighth of March is the number 8, so draw it and stick decorations on it.
The easiest option for a preschooler or schoolchild is presented in front of you.

Want to be more extraordinary and do more serious work. Then take this idea into your mind. Use the kirigami or vytynanka technique. Decorate with quilling figurines.

At first glance, the work may seem rather complicated, but believe me, it is not. Moreover, you can cheat and do something like this, for example:

To make such beauty, you need to print the template initially, if you like such a blank, I can send it to you, or find it on the Internet yourself.

Then, using a special cutter or clerical knife, cut out the desired patterns along the lines.

Connect the two parts together using glue, you get a stylish and voluminous postcard by March 8.

You can use this technique in a different way.

Using the butterfly and flower template, make the desired work, while the drawing should be in the middle of an A4 sheet, and then insert another sheet to one of the sides.


Write your wishes or congratulations. Looks just amazing and great.

By the way, this is what happened if you combine two postcards for two holidays. We made this boat with you.

The next version of the greeting card will be like this, let's make a basket of flowers, or rather a pot.

First of all, draw the blanks, this is done with an ordinary simple pencil.

You can take the idea from here, so as not to invent and think out yourself. For the little ones, make cardboard blanks so that they circle around them.

The pot itself will be made of wallpaper ribbons, you can even take fabric.

In general, it’s already a matter of your imagination and how old your wards are. Of course, for children 3-5 years old, the simplest version of the application from ordinary colored paper is suitable, and for older children and elementary school you can suggest using a fabric, such as felt, also foamiran.

Cut out all the details and prepare for work.


Decorate with ribbons and congratulations with wishes.

I advise you to give such a card to your mother or grandmother. And who will you give?
I also saw yesterday such an idea, why don’t we make a postcard with a surprise, in my opinion this is a great idea, you open it, and there is an up and a present.
We will need:
- cardboard
- toilet paper
- paints
Stages of work:
1. Take a sheet of cardboard and fold it in half. Cut out an oval on one side.

2. Then open the sheet and draw a figure eight. And on the other half, draw the same oval, but just don’t cut it out, but stick pieces of toilet paper, paint on the head and paws, you get a turtle. You can draw any other animal. Further light movements picture weed in green watercolors or pencils, felt-tip pens.

3. Now get busy appearance. To do this, cut out eight circles from colored blue paper, one circle is orange, three green leaves, three stems and one flower in the shape of a tulip.

4. After that, fold the circles in half and glue, as shown here. Do the same with the rest of the details. It turned out to be such a creative and unusual work. At the lesson of labor for grades 3-4, I am sure this view will become a novelty, children will like such a miracle.

Even from plasticine and colored pencils with the smallest you can make such magnificence.

If you fold colored paper like an accordion, you can make butterflies.

Or dream up some more, and complete such an application.

It does look cool! If you like it, share your thoughts and comment on this post.

Great paper and cardboard ideas
Have you ever thought about the fact that in addition to cardboard and paper, you can use all sorts of things, such as a twig, and a real one. Watch this master class and you will see what can come of it.
Stages of work:
1. First of all, you need to draw your brush print on a piece of paper, then glue it onto colored cardboard. The restriction is, do not stick your fingers. Next, place the branch and also carefully glue it with tape.

2. Then make a bunch of flowers.

3. Bend your fingers as if your hand is holding a bouquet. Glue flowers and leaves to the branch. Looks cool and irresistible. I like it, how about you?

The next option will also be based on the palm, only we will plant it in a pot. Prepare all the materials on the list.
We will need:
- colored paper
- scissors
- glue stick
- pencil
- office paper

Stages of work:
1. The base for the postcard will be a strip 20 cm long and 9 cm wide. Ask the children to circle their palm and cut it out. Next, draw another vase on colored paper and cut it out.
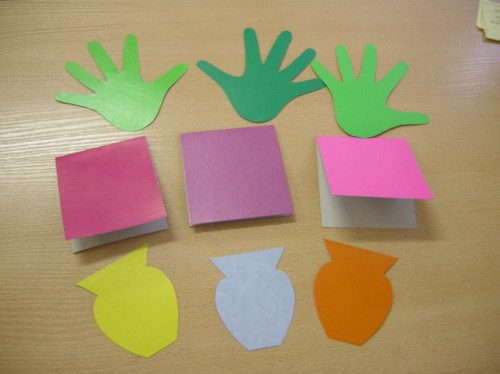
2. Prepare a bunch of blanks in advance, it is with them that you will decorate the future product.

3. Bend the strip in half, glue the vase and the handle. The hand will act as grass or greens.

4. Glue a flower on each finger.

5. That's all, you have achieved your goal.


Or here's another novelty idea, it looks wonderful, so you can arrange tulips in children's hands. Moreover, flowers can be made blooming.

You can also give a car with balloons.

Or a bouquet of wildflowers.

We give mothers and grandmothers cards with wishes for March 8
Have you ever taught poems for your native women and dedicated them to them? So this very moment has come, you can not only tell, but also present it beautifully and in an original way in the form of a small present.
We will need:
- cardboard
- colored paper
- scissors

Stages of work:
1. Cut out flower patterns with the kids.

2. Then you have to make a vase, here you also need to take a model as a basis or draw it yourself. Do not forget to fold the sheet in half, and on one side only draw and cut.

3. On the other side, you can write a poem or stick a calendar. It depends on who it is intended for, because if it is a work colleague, then it is better for them to do it with a calendar, mom or aunt with wishes, grandmother with advice, etc.
4. Then finish the job by decorating the card with flowers.

5. Inside, you can also think of something, for example, compose a verse.

6. Quite unusual and original, and most importantly accessible to everyone.

Want to please with daisies, and the middle can be made from buttons.

Or make a souvenir out of hearts, fold each heart in half. And then glue one of the sides to the sheet.

Looks just superb.

Here is a tree also from this opera.

Using , you can easily do something like the following.

Here are the stages of this work, use it to your health.


Take this unusual stencil and make a butterfly.

Unusual postcard in the style of scrapbooking
As always, there are a lot of ideas on this topic, if you look at the pictures in Yandex or Google, you can see the following. You can take this as your basis.


It certainly looks amazing.


Or make the next creative masterpiece.

We will need:
- cardboard
- two-sided colored paper
- scissors
- decorative napkins
Stages of work:
1. From an ordinary sheet of cardboard, make such a base, you can make another shape, do it at your discretion.

2. Then fold the sample like this.

3. From colored paper, cut the blanks with weed. Flowers will be collected from them.

4. Remember when you were a child, this is how bookmarks were made). Take a pencil or you can do it without using anything, the main thing is to twist in a circle, wind the paper, and then fluff the fringe.

5. Such funny balls will turn out. Make leaves out of green paper.


Or you can make such an openwork product, reminiscent of vytynanki.


Take this stencil as a basis.

Beautiful volume version of 3 d postcards
I suggest you, together with the blogger, make such a voluminous charm, it will look like it is 3 D.
You can make such a card quite tender and attractive using the trimming technique. It is quite simple, I showed you in more detail using the example of valentines. Remember, if not, then go ahead and watch.
We will need:
- stripes of colored paper
- pink, white and blue squares
- pencil
- pen stem
- scissors

Stages of work:
1. Fold a piece of white paper in half.

2. Glue rectangular red paper on one half. After the leaves and stem.

3. Place the square on the rod from the handle and glue it in this order.

4. Delicate and beautiful at the same time.

This is the option I really liked.

You can even make it with pasta.

Or using felt or foamiran.

Using colored paper, as well as a suitable background, you can make something resembling a 3D picture.

In stages, it looks something like this, first make chamomile petals.
Apply the desired background to one half of the base.

And then make out according to your style and design.

Take a closer look at this view, we also learned to do the same in the last article.


You can use satin ribbons, it looks awesome easy and pretty.

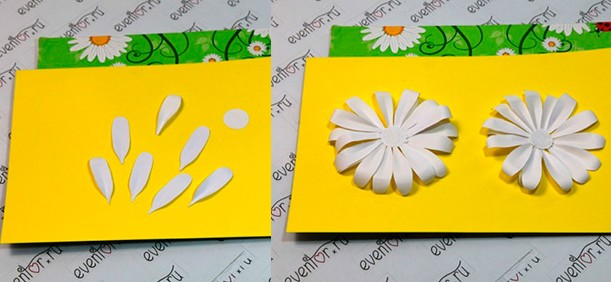
Master classes for kindergarten and elementary school
If you are still looking for templates for elementary school to make postcards, then first of all you can download them from any Internet resource, but it is better to come up with your own unique and inimitable model. After all, this does not require much imagination. Look, take sheets of cardboard.

Stages of work:
1. And from one sheet, make a vase shape.

2. Cut thin strips of colored paper with scissors.

3. Plus more mugs, that's what happens.

4. Glue each blank, I mean, glue the strip in such a way that you get a petal.

5. Then connect these petals with a paper circle. It will turn out a real flower, similar to a chamomile.

6. Make a bunch of them, then get creative.

7. Decorate cards with them and sign your congratulations with reverse side.

In the last article, I promised you to show one work, or rather her step by step instructions which you can use for kindergarten or school. How do you like such a cute and yellow mimosa branch?

1. Take a sheet of white paper for the base. Make a square out of it, you can fold it in half, depending on how you intended.

2. Cut colored paper into thin strips.

3. Then make a decoration on each strip in the form of grass. And then twist each in a spiral, that is, in a circle. Little mimosas will come out.

4. Glue them to the sheet.

5. Make twigs from green paper.

6. Twist lightly as shown here.

7. Decorate something like this so that it looks wonderfully gentle and neat.

8. In order to make a bow, fold a strip of red color into an accordion.

9. And then crumple it so that it reminds you of a bow.

10. Glue on the bouquet for completeness. Pretty cool and looks great product.
You can also use buttons to decorate, but in principle, anything.

Look, one of the students brought such interesting and unusual lilies of the valley.

You can also make calla lilies from cotton pads or napkins.

Or this option is quite nice and easy.

I also like this idea, but it is suitable for high school students to congratulate their teachers and girls on this international day.

On lessons visual arts you can use ready-made blanks that are printed on a printer, and then watercolor is taken and the background is painted over.

Choose any as a basis and create!

I took all the stories from free access the Internet.

You can search and find the right one for you.

Or use these, they are all pretty and pretty simple.

So choose.

Please your loved ones and relatives.

Also, I came across such a picture using gouache.


An interesting topic in my opinion is the iris folding technique, have you ever heard of this?
You will need to print a sample first.

Then cut along the contour of the tulip.

And then the fun begins. Apply on the back different color paper along the desired contours of the template. You can stick it with tape.

The result will amaze you with its magnificence. Isn't it beauty?

But you can put a rose like that.

This is the kind of work you can offer school students to do using plasticine.

Or you can even use disposable utensils, such as cups.

Come up with an image, and then create your masterpiece, which will be folded in half, and there are wishes inside.

Or something nicer).

On this I have all the respected friends. Write your comments and reviews, I will look forward to it. Wish you creative success and victories. Bye everyone!
Sincerely, Ekaterina Mantsurova
Women's Day, March 8, is a holiday of beloved mothers and dear grandmothers, and every child knows about it. It is very important to teach young children to show their love and care for people close and dear to him. in a great way this can be done by making a homemade greeting card, which the child can present as a sign of attention and a gift for the people dearest to him.
The greeting cards presented in our article are so simple that even a small child can handle their production if loving adults help him with this.
Children's cards for March 8
Children's card for March 8 "Flower meadow"
 Colorful and voluminous homemade greeting card from March 8. For its manufacture you need: colored paper, scissors and glue.
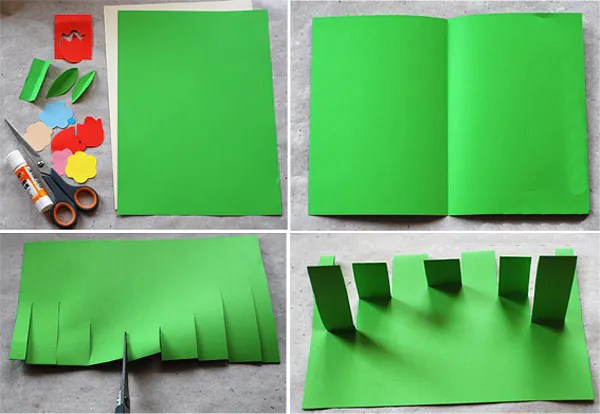 Fold a sheet of green paper in half. Make a few cuts at the fold. Now bend and straighten the resulting strips (see photo).
 Cut out flower elements from colored paper: petals and leaves. Glue the flowers to the voluminous strips.
 Try to choose the brightest colors for making flowers, then the card will turn out colorful and festive.
Children's card for March 8 "Flowers in a pot"
 To make this postcard, you will also need colored paper and a sheet of colored cardboard for the base of the future postcard.
 Invite the child to trace his palm on a sheet of colored paper (green). Then carefully cut it out. A palm of green colored paper will be the stems for future flowers. Now make multi-colored daisies from colored paper and glue on each finger. Don't forget about the flower pot.
Glue the finished composition to the front side of the homemade postcard.
Children's card for March 8 "Bouquet of tulips"
 In order to get such an original greeting card, you need to learn how to make paper tulips. Master a simple technique and you will definitely succeed (see photo).

 Now that you know how to make paper tulips, you can decorate any postcard with them.


 Another version of the children's card "Bouquet of Tulips" is to glue a child's hand to the front side of the homemade card, and then put a bouquet of cute paper tulips into it.
Children's card for March 8 "Sweet hand"
 To a small child hard to show on the front greeting card, some complex drawings, that's why we suggest you make such a cute female portrait from a child's hand. And do not forget to make the main character of the postcard a fashionable hairstyle, be sure to tie her a bright bow.
Children's card for March 8 "Mimosa branch"
 To make such a postcard, you will need: a sheet of yellow and blue colored paper, a hole punch, glue and a green marker.
On a blue sheet of colored paper, it is necessary, using a hole punch, to make a lot of neat round holes. Then glue a sheet of yellow paper on the back, so you get yellow mimosa balls.
Now add leaves and twigs with a green marker.
Children's card for March 8 "Bouquet of flowers"
 Very simple and beautiful card. Fold a sheet of green colored paper into a neat accordion. Then fold the accordion in half. Make colorful paper flowers and glue them to the fan.


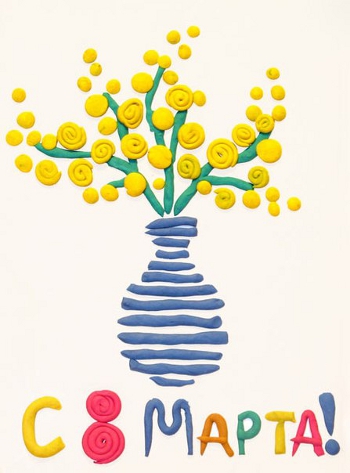
Children's card for March 8 from plasticine
 original postcards by March 8, you can succeed if you use plasticine. Draw a simple thematic drawing on the front side of the postcard, and then “decorate” it with plasticine.
 Below we offer you several templates for "decorating" plasticine.


