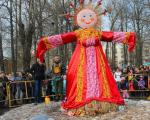
How to make a theater out of discs. Presentation for the lesson on the development of speech (middle group) on the topic: Master class "Puppet theater from disks"
Theater is a means of emotional and aesthetic education of children in kindergarten. Theatrical activity allows you to form the experience of social behavior skills due to the fact that each fairy tale or literary work for children preschool age always have a moral orientation (kindness, courage, friendship, etc.). Thanks to the theater, the child learns the world not only with his mind, but also with his heart and expresses his own attitude towards good and evil.
Theatrical activity helps the child overcome shyness, self-doubt, shyness. Theater in kindergarten will teach the child to see the beautiful in life and in people, it will give rise to the desire to bring beauty and kindness into life. Thus, the theater helps the child to develop comprehensively.
Our group room has space for a theater corner. The theater corner is equipped with aids industrial production, but we do something with our own hands.

Old discs - once seemed almost magical. To some extent, they remain magical, but in a completely different sense - now you need to pay attention to them and a little skill in order to turn them into various elements of a table puppet theater.

From the age of two, a child can retell a fairy tale or part of a dialogue known to him. He is very involved in the game and arouses his interest, at the same time the hero of the fairy tale develops his speech. The child himself speaks for a bunny, for a bug, for a mouse.

This material can be used in group work and in individual work with children on the development of speech, the formation of interest in theatrical activities of preschoolers. Children act as both storytellers and spectators.

The theater is like a sorcerer, a wizard,
With your magic wand,
And here is a child, modest and shy,
Today suddenly plays the king.
Home puppet theater is in a good way child development. In particular, the project contributes to the development of speech, imagination, fine motor skills hands. At the same time, dolls have an excellent psychotherapeutic effect, since they are able to help the child cope with his fears and feelings, as well as get the attention that is sometimes so lacking. You can make a puppet theater in a kindergarten with your own hands, and this applies not only to puppets, but also to screens and decorations.
Making dolls
Dolls can be made from completely different materials, including improvised ones. However, their size is not important. They can be finger, in the form of gloves or stationary figures.
Finger characters made of felt
Finger puppets allow you to develop fine motor skills of the child, his thinking and speech. Making miniature dolls is very easy. To do this, prepare the following tools and materials:
- felt;
- threads;
- scissors;
- pattern paper;
- pencil.
You can draw the pattern for the character yourself. To do this, it is first recommended to choose a fairy tale or story that will be staged, and then carefully consider its characters. After that, you can start making characters:

In the manufacture finger puppets it is worth immediately deciding who will wear them. If this is a child, then the holes in the dolls should be such that the characters do not fall off during the staging process.
modeling paste
A good material for making dolls can be a special paste for modeling. It can be replaced with salt dough or plasticine. The advantages of this material are that both finger and stationary puppets can be made from it. To make characters, you need to prepare:

The modeling process for a child is quite difficult, so an adult needs to demonstrate step by step how to make this or that figure. At the same time, it is still worth leaving the opportunity for the child to express his imagination. If a human figure is needed for staging, you can sculpt it as follows:
- From a piece of pasta measuring 2 * 3 cm, you need to roll up a sausage, and then form a cylinder out of it. It should resemble with its figure a nesting doll with a torso and a head. At the bottom of the cylinder, make a notch for the finger.
- Separately sculpt the handles that need to be attached to the body.
- All facial features can be done with a stack or a plasticine knife.
- You can paint the character after the paste dries and hardens.
Paper heroes of fairy tales
Paper dolls are very easy to make, but they can be disposable as they tear easily during use. The sizes of dolls depend on personal preferences. They can be worn on the finger or on the whole hand. To make a paper doll, you can cut out special templates along the contour, and then glue them in pairs so that both the back and the wrong side match the characters. There is an easier way to make paper dolls:
- From a sheet of colored paper, it is necessary to glue a small tube, for which the sheet is twisted and glued along the edge. Its dimensions depend on the type of puppet theater. The doll can be put on a finger or be stationary.
- On the resulting blanks, it is necessary to glue the elements of the face and hands, depending on the character.
Don't throw away plastic spoons.
You can also make dolls from improvised materials. Plastic spoons work great for this. For such characters, you need to prepare:

Additionally, you may need ready-made plastic eyes, as well as felt-tip pens or markers. After preparing all necessary tools you can go directly to the manufacture of dolls. For this you need:
- Glue eyes to the convex side of the spoon or draw them.
- Wrap the fabric around the handle of the spoon and tie it with a ribbon so that you get a dress. If manufactured male character, then at the junction of the handle and the convex part of the spoon, you can glue a bow tie.
- Make hair out of colored paper. To do this, cut a fringe on one side of the strip, and then glue the whole part to the convex part of the spoon.

You can use other improvised materials. For example, you can make Smeshariki from disks with your own hands or take ice cream sticks.
Socks will help
Very quickly you can make a puppet theater out of socks with your own hands. For the manufacture of such characters, you must adhere to the following instructions:

Scenery for performances
 Particular attention should be paid to decorations. The easiest way to make them is from thick cardboard. To do this, you need to draw the necessary element on the cardboard, and then cut it out along the contour. Additionally, you need to glue clothespins to the decoration, which will be used to attach decorations to the screen. It is recommended to disguise them, since fasteners must not spoil the view of the scene or attract attention. Therefore, clothespins should be disguised as part of the decoration, for example, under a flower or mushroom figurine. The number of clothespins depends on the size of the decoration itself.
Theater screen
The screen is the basis of the puppet theater in kindergarten. Her appearance depends on the type of theater. It can be just a fabric curtain, which can be used to close the hole under the table. In this case, all actions will take place at the level of the table top. You can also do Dollhouse from fabric with your own hands, patterns for which you can draw yourself. If a do-it-yourself puppet theater is made on the fingers or glove puppets are used, then a table screen will be needed. It can be made from different materials.
The plywood screen will turn out to be very light, while it will live for more than one year. For manufacturing, you need to prepare:
- plywood;
- jigsaw;
- wallpaper or fabric;
- door hinges.

- Cut out 3 blanks from the base material, that is, one central part and two sidewalls. They must be pasted over with a cloth or wallpaper.
- After all three parts are dry, they need to be connected using door hinges. This will allow you to close the screen and fold it.
In a similar way, you can make a screen out of cardboard. However, it is recommended to make it three-layer, which will significantly increase the strength of the structure. It is not necessary to connect the parts with door hinges, they can simply be sewn.
 The age of the kids who go to kindergarten makes special demands directly on the action itself. For theatrical performance it is recommended to choose simple, uncomplicated stories that are nevertheless able to teach important life things. Gradually, the repertoire can be increased, while periodically returning to already staged performances. The peculiarity of children is that they quickly get tired and stop paying attention to any subject. This means that the duration of the performance should not exceed 10-15 minutes. Additionally, you can use musical accompaniment.
Puppet show in kindergarten will help not only to reveal the talents of each child, but also to rally the team. And not only at the stage of staging fairy tales, but also in the process of making dolls. Children will definitely be delighted and will definitely not forget the emotions that they experienced at these moments.
Attention, only TODAY!
The ability to spread their creativity for the entertainment of young viewers is not given to everyone. Along with acting, the skills of decorating the stage and the characters of the play are also valued. How nice it would be to entertain the children in their usual surroundings, arranging a little theatrical magic. And the most valuable thing will be the creation of not only your own script, but also the design of a puppet theater for it with your own hands.
Materials to create
The foundation of the puppet theater is the stage on which all the action will take place. The stage and screen can be made in several ways. The simplest scene is made of fabric. The doorway is hung with a large piece of fabric, a horizontal slit is made in the fabric, into which the puppets will look out during the performance.
It is also easy to build a stage out of chairs or stools. Two chairs are placed with their backs apart, the seats are hung to the floor with a cloth, and along the far edges of the backs a fabric is stretched on a string or elastic band - the back of the stage, from under which the puppets will peek out. From stools, such a design is formed as follows: three stools in a row, two on the sides in this row. The fabric is laid in the same way.
The cardboard scene is made using boxes. You can either glue it from several boxes, or make it from one. Several boxes suggest laying out of them, like bricks, a full-fledged theater frame with a window, which is later hung with fabric and curtains. One large box should be removed from the hinged parts and two walls to get a piece of cardboard with U-shaped folds. A rectangular hole should be made in the bottom of the box, and the remaining walls should be fixed in an angular position so that the box can stand by folding and gluing at the folds of small square cylinders that will prevent the box from folding. Such a scene is easy to decorate with colored paper or wallpaper.
A puppet theater in a kindergarten requires a more decent look, so it's best to make it out of plywood.
plywood stage
To create this look puppet scene with a screen, skills in communicating with a saw and threaded screws will be required.
In general, the following materials and tools are needed:
- plywood or two sheets measuring 750 × 500 cm and 500 × 400 cm, or one sheet measuring 750 × 900 cm;
- small saw;
- 4 hinges for doors, the corresponding number of screws for them, a screwdriver or a screwdriver;
- hammer and some nails;
- fabric, elastic or lace, needle and thread.
Plywood must be drawn and sawn into the parts shown in the diagram:

If necessary, the details can be painted or wallpapered. After that, they need to be assembled by connecting with hinges for the doors. From the fabric we make two rectangular segments according to the size of the window, from which we cling to an elastic band or lace and sheathe the curtain. We nail the edges of the rope onto the screen with nails and a hammer. The screen is ready.

Theater characters
Paper puppets are most often used in finger puppet theater or mounted on skewers. Taurus for finger theater are made from fragments of paper glued into cones, and flat dolls from applique on cardboard are attached to skewers. The following are templates for paper characters of the fairy tale "Teremok":
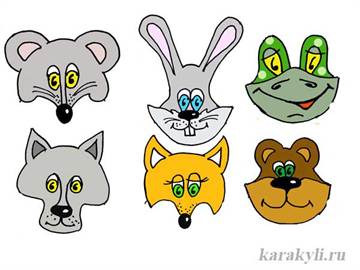

For staging with the characters of the cartoon "Smeshariki" in the puppet theater, homemade products from disks are suitable. For one smeshariki you need a disk, a plastic stopper from sweet water, plasticine, skewer, template, felt-tip pens or pencils, glue. The character templates are below:


If it is not possible to print on a color printer, you will need to colorize the templates. Next, you should glue them on the disk, which sits in a special cut on top of the cork, inside which plasticine is placed. A skewer is attached to this cork from below, and the doll is ready.
You should pay attention to the fact that it is better to glue individual parts of the templates, such as ears, horns, tails, onto cardboard, and only then onto a disk.

Dolls can also be made of fabric, without even resorting to a pattern of their parts. For sock dolls, it is better to choose bright unnecessary socks made of thick fabric. You will also need two cotton balls, thin gauze or bandage, two black beads or buttons, a knitting thread bubo, an oval piece of fabric, needles and threads.
We wrap cotton balls in gauze, twist at the end and tie with a knot or thread. On them, in the opposite side of the knot, we sew on buttons. This will make the eyes for the doll. We cut the end of the sock along the seam, where, in the turned-out state, we sew a round piece of fabric. So it turns out the body of the doll and the mouth. Above the mouth we sew eyes, the nodules of which are covered with a sewn bubo, which plays the role of hair. You can also add other decorative elements.
Actors from gloves - moving to more professional theater. For such a doll, you need a pair of gloves, scissors, buttons, a bubo or fluffy pompom, thread with a needle in the color of the gloves, embroidery thread or other contrasting gloves, cotton wool or other stuffed material. A very common doll made of gloves in the form of a hare. From one glove we make a head, cutting off such “fingers” as the little finger, ring finger and thumb. The rest will be the ears. We form the part round, sew it on the inside out, and then stuff it with cotton wool. In the second glove, leave the little finger and thumb outside, and thread the remaining three into the head detail and sew together. After that, we sew eyes on the hare, a forelock from bubo, we embroider the mouth, and the doll should turn out, as in the photo.
"Fairy tale on the table" or table theater
I. Flat theater.
Characters and scenery - pictures. Characters appear in the course of action, which creates an element of surprise, arouses the interest of children. We bought ready-made albums, cut out characters and scenery. Made a desktop screen - a box.
II. Theater from waste material.(from tea boxes, disposable cups...) Develops imagination, ability to work with various materials.


III. cone theater. This type of theater is made of cardboard. It is bright, interesting for children. Easy to manipulate.

IV. Theater made of wooden models.("The Fox and the Crane"). Very practical. Doesn't beat. Does not wrinkle, easy to store.

V. Clothespin theater. It is good because it develops fine motor skills of the fingers.

VI. Plasticine theatre.

VII. Toy theater. . Industrial-made toys (plastic, soft, rubber) or hand-made (knitted, sewn from scraps) are grouped according to fairy tales. Such a theater is very close to children, as they play with similar toys every day. It can be played not only at the table, but also lying on the carpet.

They are stable on the table and do not interfere with movement. The child completely controls the movement of the doll, accompanies the character with a word. And the ability to see the face of the figurine allows a novice artist to better master the techniques of puppetry. table theater: the child does not look at the other side of the doll, plays "for himself"; this technique helps the artists interact with each other without being distracted by the audience.
Stand theater:
1. Shadow theater. It requires a screen of translucent paper, black planar figures and a light source behind them. The image can also be obtained with the help of fingers. The display is accompanied by the corresponding sound.

2. Theater of pictures on flannelgraph. Pictures for display can be drawn by yourself (these are plots or characters from fairy tales, stories), or you can cut them out of old books that are no longer subject to restoration. They are glued onto thin cardboard, and with reverse side also stick flannel. Although today the theater on magnets is more relevant and practical.

Theater on hand.
1. Finger theater. These are dolls sewn from fabric, glued from paper or knitted from wool and thread, foam rubber. Figures can be made in the form of cones, cylinders, rings. The pattern follows the contour of the child's outstretched finger. The puppet must be put on freely on any finger of the puppeteer's hand. The character's face can be embroidered, glued or sewn on using buttons, beads, threads, ropes, pieces of wool, colored paper, textile. Such toys can be made independently by older children. You can play behind the screen or with direct contact. The presence of this type of puppet theater allows you to solve problems for the development of fine motor skills of the hand, the coordination of finger movements. At the same time, this work is the foundation for a smooth transition to learning the puppetry techniques of the puppet theater with mittens.


riding puppets
1. Theater of spoons and spatulas. The simplest and most affordable spoon puppet theater for children. It is necessary to take into account the level of development of the muscle mass of the hand, forearm, shoulder, because. the organization of the game involves the use of a floor screen. At the beginning of work with these types of puppet theater, a floor screen with a curtain of 70-80 cm is used, child artists sit on chairs.


2. Theater of paper dolls on a stick. Children cut out figurines from coloring books and glue ice cream sticks to them.

3. origami theater- figurines folded from paper fairy tale characters. For the convenience of puppeteering, we attached them to sticks.

4. Theater on discs.


5. Puppets on gapite or rod puppet. The simplest gapite is just a stick inserted into the toy - one or two. It should not be too thick and heavy, otherwise the child will not be able to comfortably take it in his hand. The gapit should not be too short, but not too long. They are very useful for the development of fine motor skills, which contributes to the development of speech in children. These dolls also develop the flexibility of the fingers, hand and wrist. Working with children younger age I use dolls on one stem. I teach to hold the doll with all fingers (in the fist). The doll moves due to the movements of the brush. Older children control puppets on two rods. To manipulate such dolls, you need to teach children to hold the sticks only with their fingertips.

Live Puppet Theater
Scarf dolls convenient in that they allow the puppeteer to move and dance freely.

Master class on making a didactic manual for the development of tactile sensations in children
Master class: Didactic manual "Tactile paths"
Chernikova Natalya Valentinovna, educator of MBDOU d / s No. 24 of the combined type "Polyanka", Kstovo, Nizhny Novgorod RegionThe master class is designed for educators, teachers working with visually impaired children, parents.
Purpose: to activate mental processes in preschool children: thinking, attention, imagination, perception.
The didactic manual is designed in such a way that it can be used for the development of speech, the coordination of visual and tactile analyzers, the development of fine motor skills of the hands, orientation in space, cognitive development.
Description: The basis of the manual is CD disks with pasted subject pictures. In the middle of the base there is a path connecting the objects. Each track is made of different materials. Children should use their fingers to feel its texture, choose right direction, come to the goal.
Target: production of a didactic manual for kindergarten DIY from CDs
Along with such sense organs as sight, smell, hearing and taste, for knowledge outside world we use our sense of touch all the time. This feeling complements our ideas about various subjects, warns of danger. the main role in touch belongs to the skin. Touch involves all types of skin sensitivity, including tactile sensitivity.
When using the manual for children, fingers and a visual analyzer will be involved.
Five brothers are inseparable
They are never bored together.
They work with a pen
Saw, spoon, axe.
(fingers)
The visual analyzer is the most important among others, because it gives a person more than 80% of all information about environment. The function of the visual analyzer is vision.
Olya looks at the cat
On fairy tale pictures.
And for this you need
Our Olya...
(eyes)
Let's get started on making the guide.
To work you need:
Scissors
Pictures depicting animals, food from the Internet, printed on a color printer
Colored self-adhesive paper
Mosaic
CD discs
Glue super - moment
Scotch
colored electrical tape
simple pencil

Step by step workflow:
1. Cut out the 2nd pictures, in this case, there will be a horse and grass. It is better to cover them with tape so that the pictures are more for a long time retained their appearance.

2. For the base you will need a CD and self-adhesive paper of any color.
Let's use the CD as a template and draw 2 circles on the wrong side of the self-adhesive paper.

3. Cut out the resulting circles.

4. Paste one of the circles on one side of the CD first. You can take the one that was used as a template.

Then to another.

5. Take red tape, try to match the color of the base.
I decided not to use tape of a different color so that the children's attention would not be scattered, so that they would not be distracted, but focused on the path. We begin to make out the edges for security purposes.


This is what the base of the manual looks like from the back.

6. Take a picture of a horse and paste it on the right. You can use double sided tape or super glue.

Glue the grass on the left. The location of the pictures is chosen in this way, because a path will be laid between them. And the horse, as it were, should get to the grass.

7. Our path will be paved with mosaics. I specially took the mosaic upside down in order to develop tactile sensitivity in children in a playful way, to do a kind of massage to the fingers.
First, you can lay out the track, how to outline how it will look, how many pieces of the mosaic will be needed. And then take one at a time and stick close to each other. It was more convenient for me to stick from left to right, as, indeed, the movement of the horse will occur in the subsequent game.

The shape of the track may depend on your imagination.

The length of the track can be any.

One blank for the game is ready.
Can you do the exercise
“Help the horse get to the grass. Feed the horse"

8. You can make several options for blanks. The color of the base can be arbitrary, the pictures are chosen at will. Tracks can be made from different material and in different directions (left, right).
Exercise "Help the mouse to get into the hole."
The track is made of a narrow satin ribbon, crocheted, glued in such a way that the surface is in the form of a pigtail.

Exercise "Help the puppy to get to the bone."
Button track.

Exercise "Help the kitten to the bowl of milk."
A path of small pistachio shells, equally matched in size.

Due to the variety of blanks, the game becomes more interesting.

Backside blanks.

If the idea comes to diversify the tracks, then you can make more blanks.
I also made paths from halves of peas, a piece of wire 30 cm long (the ends are treated with electrical tape according to the color of the wire), from yarn (a chain of air loops is connected).

Finished result
Now you can pick up a box for storing blanks for the game. It can be a box of sweets pasted over with self-adhesive paper.


Using didactic manual"Tactile paths" first you need to introduce the children to the hero in the picture, to consider the goal where he needs to get. In the course of the game, children form the concept of which of the animals, what eats, who lives where, what the chicken laid down.
Then you can offer the children such tasks, during which the children will improve the skills of precise hand actions under the control of visual analyzers:
- run your fingers along the path;
- follow the path with your eyes;
- run your fingers along the path with your eyes closed;
- determine the direction of the track (right or left).
I mentioned that the manual can be used for the development of speech, for example, with children junior group. While the child is leading his finger along the path, you can invite him to use the onomatopoeia of the animal. Exercise to pronounce on one exhalation, with different strengths of the voice.
For older preschool children (5-7 years old), you can offer to run your fingers along the path with your eyes closed and guess what materials it is made of.