How to make a black and white photo color in Photoshop in three different ways? How to make any color image black and white in photoshop.
Good day to you my dear readers. I recently looked through my childhood photos here (up to 6 years old) and how many of them were black and white. It used to be a common thing, but now there are no pure black and white cameras, but still, sometimes it’s very nice to look at a photo without color. In some cases, it is even more pleasant to look at. Don't you think so?
Many cameras have a non-color shooting function (b / w, sepia, etc.), but in this article I would like to tell you how to make a picture black and white in Photoshop. It doesn't matter what kind of picture it is. The main thing is that this function still remains and no one is going to refuse it. By the way, in my article about I just used the effect of turning a color photo into black and white. Remember?
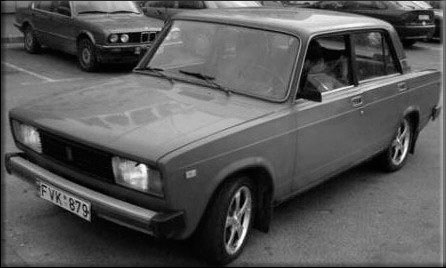
So let's get started! What do you want to convert to b/w color? Personally, I want to discolor the car that I showed you in the lesson about .

The easiest way to desaturate an image is through the Image menu. To do this, go to the menu "Image" - "Correction" - "Desaturate". After that, the photo instantly removes all the colors.

Grayscale
This method is similar to the first and it will also be easy to perform. You need to enter the "Picture" menu, then select "Mode" from the drop-down menu, and only then "Greyscale".

Voila! Your black and white image is ready.
Both methods are the easiest, but not the best. For a more subtle transformation, it is better to use other methods.
black and white
This method is convenient in that we can correct the image as we need, so the quality of the output photo will be better.
Go back to the menu "Image", then select the word familiar to us "Correction", and at the end feel free to choose "Black and White ...".

As you can see, our image has become black and white, and at the same time, various sliders with the name of the colors have appeared. With the help of them, we will correct our b / w image. Try moving different sliders in turn and you will see that the contrast and image quality change, and in certain areas. Each section has its own color.
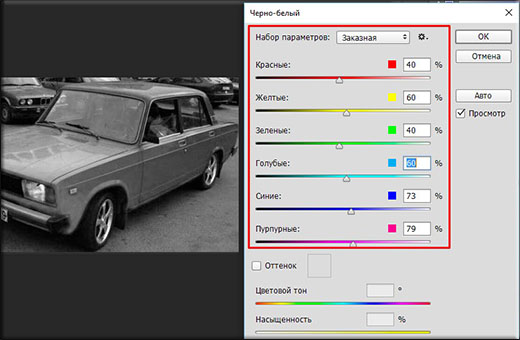
Thus adjust all the colors until the image has the best saturation and contrast. Voila.

Just do not click on "Hue", otherwise you will not get any black and white image. If you do not want b / w, but want in yellow or other colors, then please.
Adjustment layer
Most The best way creating a black and white image from a color one - create an adjustment layer. But here, too, there are several different ways of such a transformation.
Channel mixing

black and white
I'll take a quick look here, as this method is identical to the Black and White method we did above. Only here everything happens through an adjustment layer.

Well, in general, these are the ways I wanted to show you. Hope you get enough.) If there are any questions, then ask. I will gladly answer them.
In addition, I would like to recommend the wonderful photoshop video tutorials for beginners. Everything you need for a beginner is collected here, the material is presented superbly and everything is told in great detail. Each element is broken down into bones, so you will know Photoshop completely. So be sure to check it out.
Well, for today I say goodbye to you. Tomorrow will be a new day and new lesson. And sleep soundly tonight. Most importantly, do not forget to subscribe to updates of my blog articles. Good luck with your learning and everything else. Bye bye!
Greetings, readers of my blog. In touch, Timur Mustaev. I am often asked the question, how to make black and white from a color photo? Today I decided to write a detailed article on this issue. Therefore, we will consider in detail - how to make black white photo in photoshop.
Today we will look at four main methods. Each of them is unique in its own way. After reading the article to the end, you will decide which one is most convenient for you, and which method produces the most contrasting photo.
As in previous lessons, I will use Photoshop cs5 in Russian. You can do the same in the cs6 or cc version, which will not be difficult, since I will show everything in detail, attaching screenshots.
Let's start everything in order and start with the most simple method in my opinion.
I will use this photo as an example.
I will not show how to upload a photo to Photoshop, I hope you know this ( File – Open).
Method 1 - Grayscale
This method is achieved in just a few clicks Image – Mode – Grayscale(Image - Mode - Grayscale).

Here's what we get.

Agree, everything is quite simple, but to be honest, this is not what I would like from black and white photography and this method does not impress me. Let's move on to the next one.
Method 2 - Decolorize
Image – Correction – discolor(Image - Adjustments - Desaturate)

What do we get?

It doesn't differ much in quality, but still doesn't give the depth we expect from black and white photography. It's time to move on to more advanced methods.
Method 3 - Adjustment Layers
In this method, we will use adjustment layers. Why are they good and what are they for? Everything is very simple. When using them, we do not change the main image, and we can easily return to the original view, which is very good.
Let's get started, stop messing around.
Layer – New adjustment layer – Hue/Saturation(Layer – New Adjustment layer – Hue/Saturation)

After pressing, change the mode from Normal on Chroma, leave everything else unchanged, do not change anything and click OK.


Next, create another layer, in the same way Layer – New adjustment layer – Hue/Saturation do not change anything and click OK. After, we slider Saturation(Saturation) set to -100 .

At this stage, we got a regular image, as in the previous 2 methods. Now the fun begins.
Click on the circle of the first adjustment layer (we have it at number 1), and change the location of the slider color tone(Hue) as we need, we are looking for the most interesting contrast, in my case it turned out +27.

We have received the following image. It looks much more interesting, but still not what we need.

Let's improve a little more. We need to create a copy of the adjustment layer. How to do it? Everything is very simple. Click the left mouse button on the layer with the number 1 and without releasing the mouse button transfer it to the square icon at the bottom of Photoshop and release the mouse button. Thus, we get a duplicate.


Now on this layer change the blending mode from Chromaticities(Color) on overlap(Overlay), and reduce a little Opacity(opacity), about 40-60%. In my case, I set 45%.


Here's what we got. Agree that now the photo looks more contrast and more dynamic. Here, for example, you can adjust the Opacity yourself, depending on your image, experiment!

Method 4 - Channel Mixing
Now consider the last method in our arsenal. Here we will use an adjustment layer Mixing channels (Channel Mixer).
Opens the original color image. Further, Layer – New adjustment layer – Channel mixing(Layer – New Adjustment Layer – Channel mixer), press OK. In the window that appears, check the box Monochrome(Monochrome).


And now, move the color sliders, Red, Green, Blue, so that the total is 100%, this is very IMPORTANT to avoid blurring in your image.
In my case, I set:
- Red - 10%;
- Green - 10%;
- Blue - 80%.
The final stage. Create a copy of the adjustment layer, you already know how to do it, in the 3rd method we did it. In the new layer, change the mode from Ordinary(Normal) on overlap(Overlay). And change the opacity to about 20-40%. In my case, I set it to 30%.

Here's what we ended up with. How do you like the black and white image?

Now you know all the ways to get a black and white image. Agree, it's not all that difficult?
If you do not understand a lot of things, and you are completely new to Photoshop, then the video course " Photoshop from scratch in VIP 3.0 video format" for you. It tells in great detail and shows all the chips necessary for a beginner. After studying this course, you will begin to understand Photoshop and switch to "YOU" with it.

That's all for me, I will be very grateful if you share the article in in social networks. Good luck.
All the best to you, Timur Mustaev.
The question of converting a color photograph to black and white is perhaps the most popular one. There are a lot of these methods in it. Before starting to write this article, I went over the Internet and found some good reviews. Unfortunately, the very best of them are either outdated or poorly structured. What does it mean? This means that all methods for converting to black and white are dumped into one heap by type, choose any, all are good. But this is far from true. Not all of them are good, some of the methods are tailored for certain tasks, which is not taken into account by the authors of the articles.
Color Correction Layers in Photoshop
I would like this article to be as simple as possible, and at the same time as informative as possible. Therefore, I deliberately chose not to involve color grading layers in this article. Let me just say briefly that color correction layers can be created from Layers > New Adjustment Layers or from the panel Windows > Adjustments They are color correction in the form of a layer and almost completely duplicate the old color corrections familiar to us, which are in Image > Adjustments After creation, such a layer is located in the layers panel Layers. This means that it can be controlled in the same way as a regular layer. Apply a mask to it, turn it off, apply layer overlay options to it. Most importantly, the color correction layer is not applied to the photo itself. The original source of the photo remains safe and sound under a bunch of your color correction layers. And this is their main advantage. If I wanted to create a black and white photo using color correction layers, here is the easiest way.
Layers > New Adjustments Layers > Blak and Whites. Click OK. And here's how we create a black and white photo using color correction layers.
The easiest way to create a black and white photo in Photoshop
Perhaps the easiest way to create a black and white photo is as follows. Open any photo and choose from the menu Image > Adjustments > Desaturate or click Ctrl+Shift+U All. And this is the easiest way to create a black and white photo in Photoshop. Unfortunately, the easiest way has the biggest flaw: complete absence color control. We get such shades as we get, there is not the slightest possibility to somehow control the shades of color.

Black and white photos via Vibrance
Open a photo and select Image > Adjustments > Vibrance In the menu that appears, you will see 2 settings. Myself Vibrance and classic Saturation. Saturation simply and linearly removes color. And vice versa, it enhances the color glow if we want to make the photo more colorful. Vibrance more intelligent and crafty, mostly geared towards saturating rather than desaturating. Its main purpose is to increase saturation in a smart way. Vibrance protects already oversaturated colors from saturation and saturates those that are less saturated. IN reverse side same Vibrance protects oversaturated colors from complete loss of saturation.

WITH Saturation everything is very simple. It linearly reduces the saturation of the color, and linearly increases it. Desaturate, with which we discolored the photo in the previous method, no more than Saturation -100

Black and white photo via Hue/Saturation
Hue/Saturation- a truly universal black bleach for photographs, which served for these purposes to all designers long years. You will find it in Image > Adjustments > Hue/Saturation.

Slider Hue is the shade itself. Pro Saturation we have already spoken. lightness is not analogous to brightness. He adds photographs of light or plunges her into the abyss of darkness. The main purpose Hue/Saturation- work with individual shades of color and adjust them according to the three options mentioned above, that is, change the hue, saturate or decolorize, make darker or lighter. By using Hue/Saturation you can desaturate as a separate color (you can select it from the menu above the sliders) and whole line colors that you can choose directly from the photo eyedropper or customize the rainbow palette on the bottom Hue/Saturation manually.

Check mark colorize allows you to turn off multi-shade and translate the entire photo into the mainstream of one shade. Which in turn helps to achieve very specific photo effects like sepia. By the way, the menu Presets, which allows you to save preset settings, sepia is already available.
 In my example, I configured Hue/Saturation in the following way. I've selected all the hues except the red-orange and de-saturated Saturation. I also made these shades darker with lightness.
Black and white photo via Black and White
Remember at the beginning of the article I made you remove the saturation of the photo using a color correction layer black and white? Now we will talk just about him. Open a photo and select Image > Adjustments > Black and White.

When resources Hue/Saturation were exhausted, the developers gave us a new color correction. black and white sharpened for a competent translation of color to black and white and I would recommend using it. Why is he good? Firstly black and white immediately desaturates the photo, but does it differently than linear Saturation. black and white automatically desaturates the shades, but also selects the optimal illumination for them. In this sense, each slider with a color for black and white, is essentially a setting Lightness from Hue/Saturation, but for a specific shade, which allows you to manage color much more mobile and flexible.

If each of the color shades is adjusted to 50, you get a linear Saturation -100. If you press the button Auto — black and white He will try to correct the result himself, based on his idea of beauty. If you try to twist the sliders yourself, you can get an even more interesting result. Good on the menu preset There are ready-made template settings for all occasions. A tick Tint allows you to add a sepia tone. Quite another matter!

Black and white photo via Channel Mixer
From the name it is not difficult to understand that the Channel Mixer mixes channels. This means that the correction occurs at the level of channel masks. Super huh? A small theoretical digression for clarity of understanding.
The image of all TVs and monitors is made from three color channels. Red green and blue. Together, all this is called the color mode RGB. There are other modes, such as printed mode, but not about it now. Three Primary Colors Make Others primary colors. From various combinations of red, blue and green, other primary colors are obtained, that is, all the colors of the rainbow. For example, pure red and pure green make yellow. Well, then you remember, the light in the prism is decomposed into a rainbow and collected back. And the different colors of the rainbow different proportions all the other one hundred and five hundred million colors are created. The same thing happens in the monitor that emits its alluring light on us. Any image has 3 color channels. Each color channel has a mask where the lightest area is the color of the channel (red for example) and the darkest area is the absence of the channel's light (black). Everything else comes from the three channels.

Channel Mixer mixes the color at the channel mask level. That is, it mixes the channels themselves, making them brighter or darker. Through this, the whole combination of colors changes. Having opened Image > Adjustments > Channel Mixer check the box immediately monochrome. This is the same as Saturation -100 or Desaturation. Then you can flip the saturation of the channels and get similar to black and white Effect. On the menu Presets as usual ready-made templates. But the main danger lies in the value of the option Total.

Meaning Total should not exceed 100% . Why? By changing the sliders, we lighten or darken the channels. When exceeding the total allowable value in 100% we "burn" the photo in the direction of darkening or lightening. This means that in some places the photo will lose its hue, the color information will be deleted. The photo will become, in the language of photographers, overexpanded, or vice versa. That is, the photo will begin to lose hue information, and some areas of it will become either 100% white or 100% black. And this is evil.
Black and white photo via Threshold
This is where black and white really lurks. Threshold is a very ancient feature in Photoshop, it was created 15-20 years ago, and sharpened for image processing for printing old printers that can no longer be found even in the latest dump. Printers are long gone Threshold stayed and that's what he does.

Each photo can be conditionally evaluated by the degree of light and darkness. If we ignore the color saturation (Saturation -100), we get the usual black and white photo, where each pixel will be either light gray or dark gray. Slider Threshold is a kind of index. Those pixels that are light enough based on the value on the slider become white. Those that don't turn black.

Black and white photo via Gradient Map
Gradient Map- works the same as Threshold, it was just created later years 10 later and, if possible, every 100 advance. You can find it in Image > Adjustments > Gradient Map

Conditionally Gradient Map divides the photo into light areas and dark areas, and then applies a gradient to them, where the right edge of the gradient is applied to the light areas, and the left edge to the dark areas. Since the gradient can be anything, the result will be completely different. From sepia to HDR.

And this is another way to create a black and white photo in Photoshop's piggy bank.
Black and white photo via Selective Color
selective color created not to produce black and white photographs, but to correct specific color tones, but what the hell? Black and white photography can be done in it. Although with the same success you can take your camera and go reshoot in black and white.

open Image > Adjustments > Selective Color and reduce all shades to 0%. Will remain white, gray and black. So play with them.

Black and white photo via HDR Toning
Speaking of HDR toning. A black and white photo can also be obtained through this filter. Why not? True, for this you will have to merge all the layers of your work, so create a duplicate for this case.

So Image > Adjustments > HDR Toning. At the bottom of the settings window are the same Saturate And Vibrance. Bring the sliders down to -100 and play around with the rest of the settings. By the way, on the menu Presets as usual, a number of good blanks for black and white toning. Sorry, my photo doesn't match the real one. HDR effect, but as a platform for experimenting completely.

Black and white photo via Match Color
Match Color not for converting to black and white, but for combining the tonality of light and the color of two different images. Well, for example, we cut out Masha from one photo, and pasted her onto another photo next to Dasha. And the colors are different. Masha in a bathing suit on the beach, Dasha in a dimly lit room, and the photo was taken by Polaroid 10 years ago. But meanwhile, in Match Color there are tools familiar to us for discoloration and creating a tone ala sepia.

I will not even dwell on this color correction, since it is not for black and white conversion, but since we are going to the end, why not mention it?
Black and white photo via Variations
Variations Ancient Photoshop color correction for working with shades and light. You can even get a black and white photo through this dinosaur.

Open it via Image > Adjustments > Variations turn on the checkbox Saturation and click until you go crazy! The slider indicates the strength of the applied effect. You can click endlessly. Then, switch to Midtones and on the right side of the window, add or subtract light.
Black and white photo via Replace Color
Tool Replace Color dull and straight. A color is selected with a pipette. And then this color changes where necessary, including in the direction of black and white.

Select the eyedropper with a plus, it selects not one color, but several and swipe over the area you want to recolor. Change the Fuzziness parameter along the way. This option expands the color gamut. In essence, it creates a smoother and soft effect than twitchy torn. Done? Now Saturation -100 and Lightness to taste. The dish has been served.

And at this stage, I have listed all conceivable and unthinkable ways to create a black and white photo in Photoshop using color correction or color correction layers.
Hi all! With you, as usual, I, Dmitry Kostin. And today we will photoshop again. Remember how we did? Be that as it may, this is not surprising, since it is not difficult to discolor an image. But how to make a black and white photo color? Is that possible?
Of course available. Already entire films are coloring. What is there to make some image color? But it's still very interesting experience. Can you imagine? You can think of the colors you would like to see in this photo. For example, you can set the color of eyes, hair, skin, clothing and much more. This is how I colored old photos. It turned out funny)
Let me not make long introductions. Let's start coloring right now. Open any b/w photo (I chose a photo I found on the Internet).
Just look at what mode the photo is in right away. It's just possible that it is saved in the format "Greyscale", then you just won't be able to work with color.

Change the color mode to RGB. To do this, go to the top menu and select the item "Image" - "Mode". Well, if it's not the RSL, then put it.
Let's look at the first method, namely the familiar one.

Overlay options
Here is another fairly effective trick for coloring photos. The main thing here is to create a separate layer for each element. I took new photo for these needs.


By the way, this was the very first method that I learned about. When I found out about it, I liked it so much that I colored a lot of photos).
Layer mask
Well, the last way of transformation for today is with the help of a layer mask. Let's get straight to the point.

Well, in the end it turns out beautiful color photography and she looks completely different. Oops, I just screwed up a little. But you can always fix this.

I never cease to be amazed at the power of Photoshop. Indeed, in many cases the same problem can be solved in several ways, and you yourself can choose the method that suits you best. By the way, which one do you like best? Or do you have your own way of how to make a black and white photo color in Photoshop, which I have not described here? Please write in the comments.
If you want to explore the possibilities of Photoshop in the shortest possible time and learn how to work with it, then I strongly recommend that you look great video course. Everything is told in detail in it, everything is told in human language and laid out on the shelves. The material is easy to digest. So I recommend.
Well, I'm done for today. I hope you enjoyed my article. Be sure to subscribe to my blog updates, then you will always be aware of the most relevant information on the blog. I will not spam. I promise). And I wish you good luck in mastering Photoshop. Bye bye!
Sincerely, Dmitry Kostin.
Black and white photography has its own charm and mystery. Many eminent photographers use this advantage in their practice.
We are not photography monsters yet, but we can also learn how to create excellent black and white pictures. We will train on ready-made color photographs.
The method described in the tutorial is the most preferred when working with black and white photos, because it allows you to fine-tune the display of shades. In addition, this edit is non-destructive(non-destructive), that is, the original image will not be affected in any way.
So, we find a suitable photo and open it in Photoshop.


Then put an adjustment layer on the image. "Curves".

We bend the curve, as in the screenshot, thereby lightening the photo a little and “pulling out” too dark areas from the shadow.


Now you can start bleaching. In order to make a black and white image in Photoshop, we impose an adjustment layer on our photo. "Black and White".

The image will discolor and the layer settings window will open.

Here you can play with the sliders with the names of the shades. These colors are present in the original photo. The main thing is not to overdo it. Avoid overexposed, and vice versa, too dark areas, unless, of course, this is intended.

Use the sliders to darken the dark areas and lighten the light ones. Do not forget about overexposure and excessive dimming.

Result. As you can see, it was not possible to achieve normal contrast without dimming. A dark spot appeared on the hair.

Let's fix it with another layer. "Curves". Drag the marker in the direction of lightening until the dark spot disappears and the structure of the hair appears.


This effect should be left only on the hair. To do this, fill the Curves layer mask with black.
Select the mask.

The main color should be black.

Then press the keyboard shortcut ALT+DEL. The mask should change color.

The image will return to the state it was in before the adjustment layer was applied. "Curves".

Now go to the top panel and set the opacity and pressure to about 50%.
The color of the brush is white.
With our adjusted white brush, we go through the hair of the model, opening the layer with Curves. We also lighten the eyes a little, making them more expressive.

As we can see, artifacts in the form of dark spots appeared on the face of the model. The following trick will help get rid of them.
Click CTRL+ALT+SHIFT+E, thereby creating a merged copy of the layers. Then we create another copy of the layer.

Now apply the filter to the top layer "Surface Blur".


