VAZ 2114 best oil pan gasket
Actually, what is this crankcase gasket for? The "tens" engine includes many units, assemblies and systems. The crankcase is the engine housing and plays a critical role. After all, it is he who contains all the main elements of the engine inside himself and provides them with the necessary protection, allows the oil to circulate.
The crankcase includes two collapsible elements, between which the gasket is located. It is responsible for sealing the connection of the two crankcase elements, preventing oil from flowing out of the system, which, by the way, is under high pressure.
Main reasons for replacement
In fact, the replacement of the oil pan gasket for the VAZ 2110 may be required if it is damaged. There are not so many reasons:
- Impacts on the oil pan;
- Gasket deformation;
- The impact of high internal pressure, which violates the integrity of the gasket;
- The confluence of several factors at once.
Symptoms
Crankcase replacement is a complex and responsible procedure that must be carried out with strict observance of technological standards. Mistakes are strongly discouraged.
If the replacement is incorrect, the rupture may occur again, foreign particles will get inside the crankcase, sealing will be insufficient, which will lead to damage to the engine or its individual components.
It would seem that a simple gasket, but what a burden of responsibility lies on it.
To determine the need to replace the gasket, it is worth paying attention to the characteristic symptoms of a similar problem:
- Oil is flowing.
- There is a decrease in pressure in the oil system.
- The oil level drops faster than usual.
Preparation plays a big role in a successful oil pan gasket replacement. Actually, this event will not be a big deal.
- Drive the car into the pit or lift it with a lift;
- Provide high-quality light so that you can carefully inspect the condition of the pallet;
- Remove the crankcase protection if you previously installed it on your VAZ 2110;
- The oil pan needs to be cleaned as it accumulates a lot of dirt and oil. It is also recommended to clean the areas adjacent to the oil pan;
- It is easiest to detect a leak on a warm engine, but only when idling. This will increase the pressure in the oil system and will show how serious the problem is with oil leakage through the oil pan gasket.
Replacing the pan gasket
Now various kinds of sealants and additives have become quite popular, which allow you to eliminate leaks. But these are all the intrigues of marketing companies. In fact, these tools are of little use. The sealant can only give a temporary result so that you can get to the garage or service station, where you can change gasket.

Attempts to use such methods sometimes end sadly. The pressure rises, the gap becomes even larger, the oil flows out almost completely. If a similar problem catches you on the road, far from the service station, no one will envy you.
At the first sign, drive the car into the garage and replace the gasket. You can do it yourself.
Now we will tell you exactly how this is done.
- It is necessary to remove the oil pan in case of leakage or during engine repair. If you needed to repair the motor, and you have never done a gasket before, we advise you to combine these two activities.
- Also, dismantling the crankcase and installing a new gasket makes it possible to perform another useful procedure for your car - changing the oil. Combine them.
- First of all, remove the mudguards from the front wheels of the car.
- Now drain the oil. If you have changed it at least once, there should be no problems at this stage.
- Unscrew the three bolts that secure the lower clutch housing cover and remove it.
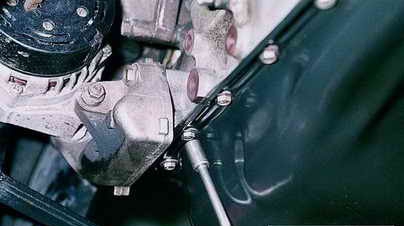
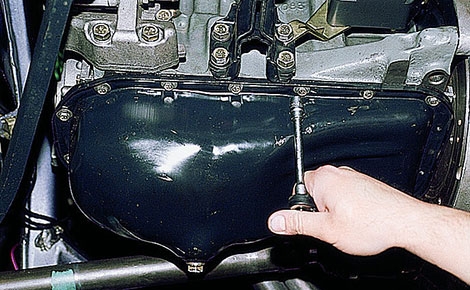
- Arm yourself with a 10 head, with which all 16 bolts responsible for securing the oil pan are unscrewed.
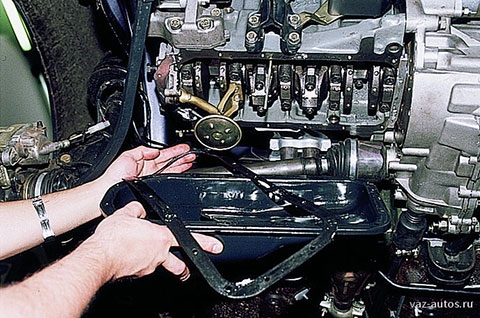
- Remove the tray. It would be desirable to clean it, as it should be washed with special means.
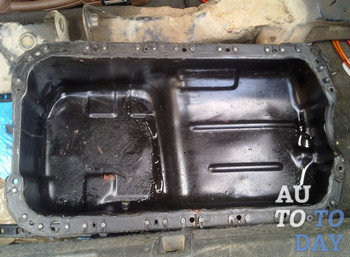
- After removing the pallet, you will find a gasket at the joints. If the machine has been in operation for a long time, its condition will not be the best. But you don't care anymore, since you plan to httpe change it.
- Remove the old gasket from the junction, clean the surface of all kinds of contaminants. The cleaner the connection is, the more securely the new gasket will sit in its rightful place.
- All joints are recommended to be strengthened with a special automotive sealant. On its own, the gasket does the job well, but it's never a bad idea to complement its degree of protection. Sealant is an affordable pleasure for every car owner.
Pay special attention to which engine oil pan gasket you buy. It must be a high quality product. Don't waste money on it. In addition, the gasket will be quite cheap, even if it is the product of a leading manufacturer of auto parts.
As you can see, the procedure replacement of the gasket of the oil pan for the domestic car VAZ 2110 is nothing complicated. Try to combine several procedures at once, since you decide to remove the pan. Let's hope that you do not have to repair the engine, the "ten" will serve faithfully for many more years.
But since you remove the crankcase and drain the oil, it will not be superfluous to replace it with a new, fresh one. The engine will only be grateful to you for this.
Replacement of the oil pan gasket is necessary in case of damage, which is usually easy to detect by the characteristic oil marks (streaks) that appear on the surface of the oil pan and engine block.
Oil pan gasket becomes unusable as a result of mechanical damage or due to natural aging of the gasket material. It is also possible to leak due to the marriage of the gasket itself or due to poor (or excessive) tightening of the crankcase cover bolts.
Replacing the oil pan gasket - step by step instructions
- First, you need to find a viewing hole or a lift, as well as prepare the most common set of tools and buy oil pan gasket for VAZ 2114.
- Tighten and engage the gear so that the car does not roll.
- Using the wrench, unscrew the crankcase guard and set it aside.
- After that, it is necessary to drain the oil from the system, to do this, warm the engine up to operating temperature, then place an empty canister under the drain hole and unscrew the drain plug.
- The crankcase pan VAZ 2114 is fastened with sixteen bolts that you need to unscrew in order to replace the pan gasket.
- The pan can now be removed using a flathead screwdriver or knife, carefully pry it off and remove it along with the gasket.

- Peel off the old oil pan gasket and wipe the gasket location. Before installing the VAZ 2114 pan gasket, check the surface; it must be dry, free of dirt and oil residue.
- Now you can install a new gasket on the pallet and screw everything together to the place of further service.
All subsequent assembly is performed in reverse order. At the end of the build, don't forget
tips for the motorist helpful information car repair and maintenance, engine running-in. Replacing the gasket of the engine crankcase pan Tips for repairing a VAZ car Tips for a motorist.Oil pan gasket (removal and installation)
It is advisable to coincide with this action to change the oil in the engine.
Need to:
wrench for unscrewing the oil drain plug (external hexagon 12);
socket wrench 13;
socket wrench 10;
ring wrench for 10 (better if it is a dodecahedron);
screwdriver;
pad;
flushing oil;
change oil;
oil filter;
rag.
We act.
We drive it into a pit or a lift, or we hang out the front end.
We remove the standard crankcase protection with a 13 socket wrench (do not lose the spacers on the rear two bolts).
We wash the pan from dirt and oil and a little higher.
We warm up the engine and turn it off.
Open the filler neck.
Drain the oil from the hot engine by unscrewing the drain plug.
With a 10 socket wrench, we unscrew all the bolts securing the pallet that will be accessible (four bolts turned out to be inaccessible with the socket wrench: 2 above the beam and 2 near the resonator collector).
With a spanner wrench for 10, we unscrew 4 inaccessible bolts, holding the key (it will jump off because the pallet has a shoulder) with a screwdriver or other improvised tool (do not lose the washers!).
It is advisable not to tear the old gasket, but to remove it whole in order to determine the cause of the leak. To do this, with a screwdriver or fingers, if it is no longer hot, we release the gasket.
We sink it from one side into the pallet, taking out the other edge through the bottom.
We evaluate the condition of the gasket, if everything is fine and it siphons from old age and damage, then
We take a new gasket and lubricate it with flushing oil.
We clean the surfaces of the pan and engine in contact with the gasket and lubricate them with flushing oil.
We put on the gasket through the bottom, just as we removed the old one (do not tear!).
We bait (do not tighten!) The bolts, making sure that the ribbed side of the washer is directed towards the bolt head. It is better to bait diagonally, that is, front - back, left side, right side, etc. At the same time, we make sure that the holes in the gasket coincide with the holes in the pan.
When all the bolts are baited on 1-2 threads, turn them until they touch the pallet (do not tighten!). We make sure that the gasket lay flat, there are no distortions or folds anywhere.
Now let's start tightening. This must be done strictly diagonally to avoid distortion and damage to the gasket. The first circle through two bolts, then through one, and, finally, each bolt. During the entire operation, we monitor how the gasket lays down (evenly and without wrinkles), otherwise everything is anew with a new gasket.
We screw the drain plug.
Pour flushing oil and wipe dry all traces of oil in the area under study and close the filler neck.
We flush the engine at the MINIMUM speed, do not waste time, check for leaks.
If there is a leak, tighten ALL bolts to avoid distortion
We unscrew the filler neck, drain the flushing oil, remove the oil filter.
We take out the gasket from the new filter, lubricate it with new oil on both sides, put the gasket in place, pour a little oil into the filter and twist the filter with HANDS.
We screw the drain plug.
We fill in the prepared fresh oil, close the filler neck and wipe dry the entire area under study.
We start the engine. In several stages, we check whether there is a leak: 1500 revolutions, 2000, 3000, 4000 for 30 seconds - 1 minute. If there is a leak, then on a hot engine it will still be possible to tighten the filter and tighten the bolts, if the leak is not fixed, then you need to think
We put in place the standard crankcase protection, do not forget to put in place the spacers from the two rear bolts.
We drive the engine under load and keep the places of a possible leak dry and clean so that leaks can be localized.
|
Restoration of glass heating filaments |
|
Flushing the Zero Resistance Filter |
|
Nozzle cleaning Nozzle cleaning |
|
Throttle assembly cleaning Throttle assembly cleaning |
|
Engine flush Engine flush |
|
Engine break-in after repair |
The oil pan gasket plays a very important role in the operation of the entire fuel system and the car engine as well. After all, it is inside the crankcase that the engine and many other important components and assemblies of the car are located. Thanks to the reliability of this "shell", the engine is under constant protection, and engine oil can circulate freely throughout the fuel system. But the crankcase itself consists of two elements that can be detached from each other. It is between these elements that the engine gasket is located, the main task of which is to ensure tightness and act as an obstacle to oil, which is under high pressure and can leak. But this gasket is not always reliable, since it can wear out heavily during engine operation. How to change it, we will tell you below.
1. When you need to replace the oil pan gasket of an automobile engine: get acquainted with the main signs of its wear.
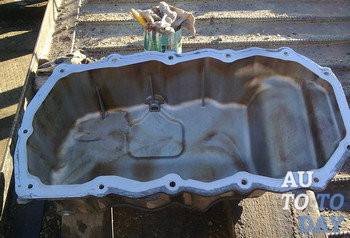
So, crankcase is the bottom of the cylinder block of an automobile engine. The oil pan is its lower part. In addition to acting as a protective block, the crankcase and its sump ensure the preservation of the lubricant of this entire system, that is, they serve as a kind of reservoir. In its shape, the oil pan is somewhat reminiscent of a small bath, the bottom of which can have a very complex configuration. It depends on the size and design of the car engine and how it is placed in the engine compartment. In essence, the shape of the oil pan "fits" to the shape of the engine to provide it with reliable protection from impact. external factors and eliminating the likelihood of contact between the engine and moving elements of the suspension and transmission.
But the main function assigned to the crankcase is the collection of engine oil, which circulates throughout the engine system. That is, if an excess is formed in the system, in which this moment the system does not need it, it is collected in the oil pan. If the operating conditions of the car again require an increase in the amount of oil in the system, the oil intake starts it back into further circulation.
 In addition, all negative impurities and abrasive particles, which are formed in the system as a result of metal elements rubbing against each other, usually settle to the bottom of the crankcase. For this reason, the oil intake is not located at the very bottom of the sump, but slightly above it, so as not to capture metal particles and other debris that have settled on the bottom along with the oil. Thus, the oil pan plays the role of a kind of filter for the oil line of the car. In some cases, magnets are even attached to it to specifically attract and hold metal chips at the bottom. All debris can be removed by simply removing the pan from the engine.
At the bottom of the pan there is always a hole with a plug, which is designed so that oil can be drained from the crankcase from time to time. IN winter time as a plug, a special removable heater can be inserted into this hole, thanks to which the oil will be heated.
As for the features of attaching the pan to the crankcase, it is carried out thanks to the fixing bolts and a special sealing gasket. This gasket is either rubber or cork. In some cases, an ordinary sealant can act as such a gasket. The need to replace this gasket may arise for various reasons. Often this is its damage, which can be formed in connection with:
- accidentally inflicted blows on the bottom of the oil pan;
Deformation of the gasket itself, which could occur due to a strong temperature difference, exposure to a hazardous chemical environment;
The impact on the pan and its gasket is very high internal pressure, which is formed inside the crankcase;
Simultaneous combination of several of the above circumstances.
 As you yourself could see, the car owner is not always able to ensure the integrity of the gasket. Often, only proper and gentle operation of the engine helps to prolong its life. However, rough roads still bring a lot of trouble to modern car owners and their cars. But how to understand that the car needs to replace the gasket of the oil pan?
Typical signs of a gasket failure and rupture are as follows:
- the presence of traces of oil leakage on the pallet;
Noticeable pressure drop in the oil system;
Very intense drop in oil level.
In this case, it is necessary to immediately begin to replace the pan gasket. However, first of all, it is very important to determine for what reasons it has ceased to properly perform the functions assigned to it. If this is just wear and tear caused by long-term operation, then there is only a need to replace the gasket. If the leak was formed due to a breakdown of the oil pan, along with the replacement of the gasket, it is imperative to repair the crankcase.
It is also worth noting that, when starting to replace the pallet gasket, it is very important to understand the complexity and responsibility of the task. During its implementation, it is necessary to strictly comply with all technological standards, otherwise the gasket may break again, sealing will be lost, and dirt from the outside will get inside the crankcase. As a result of this, both the engine itself and its main elements can fail.
2. Preparatory stage before removing and installing the oil pan seal.
 Preparation for replacing the oil pan gasket plays a very important role, despite the apparent simplicity of this process. In order to correctly carry out the task, it is necessary to follow the following instructions:
1. To perform work, the car must be driven into a pit or slightly raised with a conventional jack. Thanks to this, you will gain access to the pallet and be able to freely perform the necessary manipulations.
2. Bring the best quality light under the bottom of the car. This will give you the opportunity to carefully inspect the pallet and determine what condition it is in, if there are any damages on it. The same applies to the lining of the pallet.
3. On some cars, additional protection is also installed on top of the crankcase, which in this situation must be removed immediately.
4. Using a regular rag and soapy water, thoroughly wash the oil pan, because during driving, a lot of dirt usually accumulates on it, and if the gasket also leaks, then oil streaks. It will not be superfluous to clean those parts that are around the crankcase - thanks to this, it will be much easier and more pleasant for you to work.
5. It is also necessary to determine exactly where there is a leak and a hole in the oil pan. The easiest way to do this is to start the engine at Idling. Then the oil under pressure will seep very intensively through the hole formed.
You should also take care in advance of the tools that you will need to carry out the process of replacing the gasket. In particular, you will need to have on hand:
- a key with which the oil drain plug installed on the oil pan is unscrewed (this is a 12 hexagon);
Two socket wrenches: one for 10 and the other for 13;
Cap dodecahedron for 10;
Regular screwdriver;
flushing oil;
Clean oil for replacement;
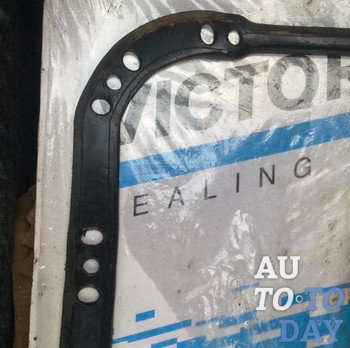
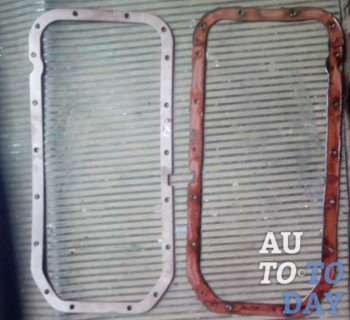
![]() Besides, preparatory stage includes preparing a new gasket for the car's oil pan. Fortunately, today it will not be difficult to purchase it, the main thing is to clearly name the model of your car to the store seller. But still, the best thing is to first remove the old gasket and select a new one according to its type. After that, you can remove the pan gasket and then replace it with a new one.
Besides, preparatory stage includes preparing a new gasket for the car's oil pan. Fortunately, today it will not be difficult to purchase it, the main thing is to clearly name the model of your car to the store seller. But still, the best thing is to first remove the old gasket and select a new one according to its type. After that, you can remove the pan gasket and then replace it with a new one.
3. How is the oil pan gasket removed from an automobile engine?
So, the car must stand in the pit and be prepared to perform the removal of the gasket. If there is no pit, then with the help of a jack it is necessary to slightly raise the front part - where the engine is installed. After that, in order, we perform the following list of actions:
1. Using a socket wrench for 13, we remove the regular crankcase protection. It is very important to keep the stands, which are located on the two rear bolts.
2. We warm up the engine a little at idle.
3. Open the crankcase filler neck. Gradually unscrewing the drain plug, which is located on the sump, drain all the oil from the crankcase until the engine has had time to cool.
4. We use a socket wrench for 10 and remove all the bolts with which the oil pan is attached. True, when using a socket wrench, you most likely will not be able to unscrew all the bolts. Often there are four more bolts left - two above the beam and two directly near the resonator collector.
5. Using a spanner wrench for 10, we are trying to complete the work we have begun and unscrew the remaining four bolts. To prevent the ring wrench from jumping off during operation, it must be held. The most important thing is not to lose the puck.
6. Now we have full access to the gasket. If the oil pan is still hot, then remove the gasket with a screwdriver - just carefully pry it off and tear it off the pan body. If the crankcase has cooled down, this can be done with your fingers.
 The most important thing to take care of when removing the pan gasket is to preserve its integrity as much as possible, not to pull it out or tear it off the pan by force. Thanks to this, you will be able to determine exactly where the leak occurred and for what reason. After that, the pan and crankcase should be completely repaired (if necessary) and you can proceed to the next step.
4. Installation of the seal: we complete the process of replacing the gasket of the oil pan.
Before installing a new gasket on the pallet, it must be lubricated with flushing oil. The same must be done with those sections of the pallet and the car engine that were in contact with the gasket. However, they must first be cleaned, since the remnants of the old gasket that had time to stick to the metal parts could remain on their surface. After that, the direct installation of the seal is carried out:
1. We put on a new gasket through the bottom of the crankcase. In fact, we do the same as when removing it. However, be very careful not to tear the new oil pan seal.
2. We bait, but do not yet fully tighten all the crankcase mounting bolts. In this case, it is very important that the ribbed side of the washer must be directed towards the bolt head. It is very important to bait the bolts diagonally: if you have screwed a bolt on the left side, then you need to switch to the right side, etc. It is important that all the holes that are on the gasket line up perfectly with the holes on the oil pan.
3. After all the bolts are baited, you can begin to wrap them. You need to do this until their head touches the pallet, but still do not rush to tighten the bolts all the way.
4. We check how the gasket lay down. It is very important that it does not form distortions and folds, otherwise it will have to be installed again.
 5.
After making sure that the gasket lay flat, you can tighten the bolts until they stop. Again, it is recommended to do this diagonally. We make the first circle, skipping two bolts, then one, and then we twist everything. At the same time, we still continue to monitor how the gasket lay down.
5.
After making sure that the gasket lay flat, you can tighten the bolts until they stop. Again, it is recommended to do this diagonally. We make the first circle, skipping two bolts, then one, and then we twist everything. At the same time, we still continue to monitor how the gasket lay down.
6. We twist the plug in the drain hole.
7. Pour flushing oil into the system. We also wipe off all traces of oil leakage and our work. We screw the filler neck with a stopper.
8. We start the engine at minimum speed in order to flush the oil system. While this process is being carried out, we again look at the oil pan, make sure that no smudges have formed on it.
9. If it suddenly turned out that the gasket nevertheless leaked, we try again to go through all the bolts and tighten them as tightly as possible, excluding even the slightest possibility of distortion.
10. We unscrew the drain plug and drain the used flushing oil. You also need to remove the old oil filter.
11. We take a new oil filter and remove the gasket from it to lubricate it with new engine oil. The gasket must be lubricated on both sides. After that, we install it back into the filter, pour a little oil into it and twist it into place of the old one. Screw the drain plug back on.
12. Pour new engine oil into the oil system, tighten the filler cap. After that, you need to carefully wipe all the elements so that they do not leave oil stains.
 13.
We start the car engine and check the oil pan for leaks. This must be done in several stages: first, we start the engine at idle, gradually increasing the number of revolutions - 1500, 2000, 3000, 4000. First, you need to increase the number of revolutions every 30 seconds, then every minute. If a leak appears, again try to tighten the fixing nuts and tighten the gasket as much as possible. If this does not help, you will have to repeat everything again and with a new gasket.
13.
We start the car engine and check the oil pan for leaks. This must be done in several stages: first, we start the engine at idle, gradually increasing the number of revolutions - 1500, 2000, 3000, 4000. First, you need to increase the number of revolutions every 30 seconds, then every minute. If a leak appears, again try to tighten the fixing nuts and tighten the gasket as much as possible. If this does not help, you will have to repeat everything again and with a new gasket.
14. If everything is in order and there is no leak, you can screw the standard crankcase protection back on. In no case should you forget about the stands for the two rear bolts. The oil pan gasket can now be tested in real motion. At first, it is important to keep the pan in a perfectly dry and clean condition, so that in case of a leak, you can immediately notice it. If everything is in order, just enjoy a comfortable ride in your car.
Subscribe to our feeds
Not so long ago I ran into a problem, the engine from the side of the radiator began to be covered with something oily. It was impossible to tell where it was coming from. Therefore, I washed the engine with chemicals designed to wash the engine and Karcher. Having traveled for a couple of days, I drove the car into a pit, removed the engine protection, since you can’t really look from under the hood. And I saw streaks in the crankcase area, namely in the area of the oil pan gasket. So I found out that the gasket had become unusable. In this article I will tell you how to replace the gasket of the oil pan VAZ 2110.
I want to say right away that such a repair will require a flyover or a pit.
- We remove the engine protection.
- Drain the oil. If you have recently done an oil change and do not want to spend money again (this happened to me, I change the oil every 10 thousand, and after the change and before problems with the gasket I drove 7 thousand km), then drain it into a clean bowl. I took a six-liter eggplant from under the water.
- Now you need to unscrew all the bolts securing the pallet - there are 16 of them. Be careful not to lose the shaped washers under the bolts.
- Remove the tray.

- Remove the old gasket.
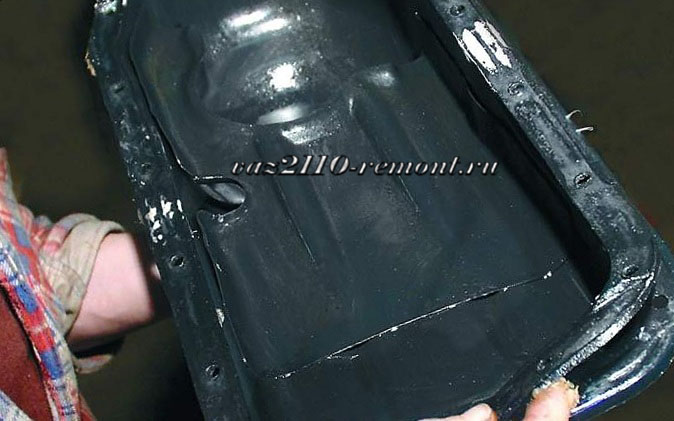
6. Install a new one, having previously well smeared the places of its landing with a sealant.
7. Install the oil pan VAZ 2110 in place.
8. Reinstall 16 bolts. It is better to twist from the center to the edges of the pallet, so the gasket will sit better.
9. Fill in the oil drained before repair. Or if you decide to change the oil in one fell swoop, then follow the instructions described.
10. Install motor protection.


