How to replace the oil seal and bearings on the LG washing machine. Replacing the drum bearing in the LG washing machine, video. Replacing a bearing in a front loading machine
If there are malfunctions in household appliances, some types of repairs can be carried out independently. For example, to replace a bearing in a washing machine. It is only necessary to diagnose the device and prepare for repair, if necessary.
To understand whether a part needs to be replaced or not, you need to turn on the machine and check for:
- hum during the spin procedure (why does the washer not wring out the laundry?);
- noise other than the characteristic sounds of the device when the drum starts to rotate;
- wear of the drive belt of the washing machine engine;
- a large gap when rocking the washing machine drum by hand.
Not a single manufacturer is insured against such malfunctions, and a bearing malfunction can be, both in units from LG, Ardo, Ariston, and from Atlant, Bosch, Candy, Zanussi, Hansa, etc.
Preparation for repair
To know how to replace a bearing in a washing machine, you need to prepare. The quality and speed of the work performed will depend on this. You need to start by preparing the tools.
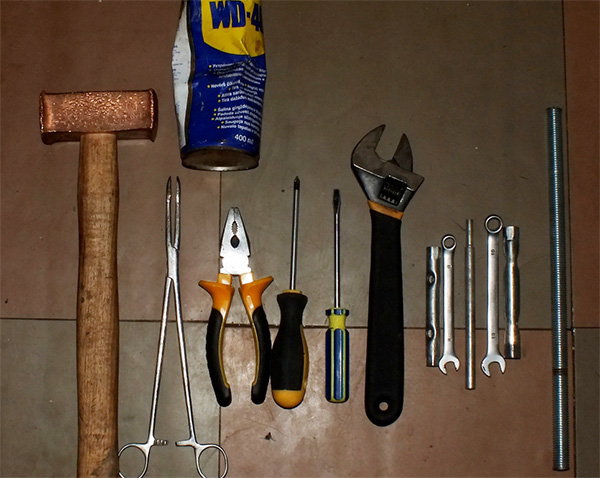
You will need:
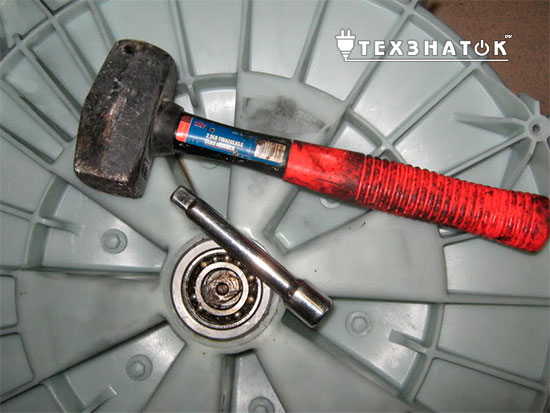
- hammer (preferably with a bronze striker);
- aerosol WD-40;
- pliers;
- several screwdrivers of various sizes and shapes;
- adjustable or pipe wrench;
- open-end wrenches;
- ratchet heads;
- silicone sealant.
After the tool is prepared, proceed to the next stage - the selection and purchase of the necessary spare parts. Nowadays, finding parts to replace the oil seal and drum bearings with any of the existing models is easy - there are many online stores, specialized warehouse stores. The main thing is to understand how to replace the bearing on the machine and what exactly is needed for this. The bottom line is that different spare parts are installed on different models, so before buying parts, for example, for an Indesit washing machine, you need to clarify the sizes, referring to the manufacturer's recommendations.
In the process of disassembling the machine, memorize or shoot on a smartphone camera how and in what form the wires are connected to the heating element, how fasteners and connectors look when assembled. This will be needed when reassembling the device, so that later everything will work again as before.
The next step in preparing for a do-it-yourself repair is to prepare the site. The ideal option to replace the bearing in the washing machine there will be a spacious room: a garage or a workshop. If this is not possible, repairs can be made in the apartment, freeing up space in one of the rooms.
Features of the repair of washing machines with different ways of loading clothes
There are different washing machines produced in many countries by well-known manufacturers: LG, Ardo, Ariston, Atlant, Bosh, Zanussi, Candy, Hansa, Hotpoint, etc. They all differ from each other in design, components, appearance etc. Main hallmark washing machines is considered a way to load laundry. Loading can be vertical and frontal. Bearing replacement in both cases will be different.
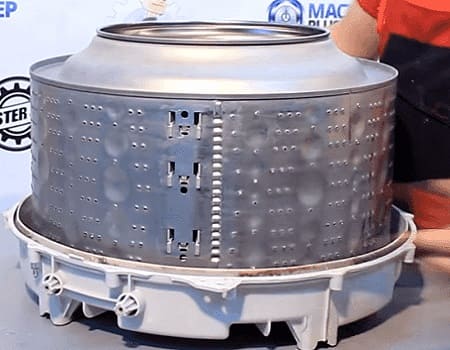
The drum in a vertical type machine is located on two bearings. This ensures stable and stable operation of the system. Bearings in such systems fail a second time, there are certain prerequisites for this. This is often water entering the bearing through a failed seal. Gradually clogged with dirt, the bearing fails.
Bearings are located on the body of the unit on the outside of the tank. First of all, electrical communications are turned off: power, sensors, heater. After that, the side plates are removed, under which the subject of repair is located. Start the replacement with the bearing located on the side where there is no pulley.
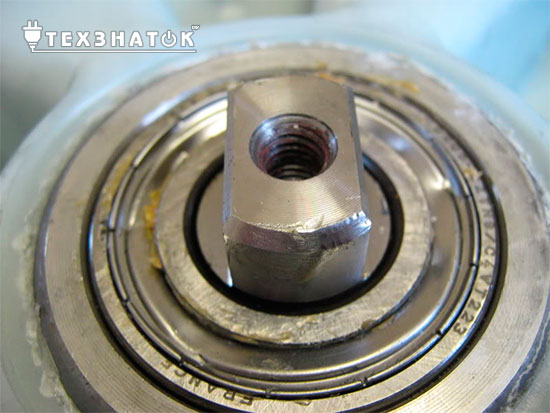
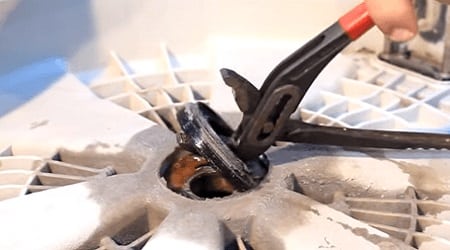
Then the caliper is removed. The thread here is standard - right-handed and unscrewed against the clock. After the part is removed, the seal seat is cleaned of dirt. When installing a new bearing, it is important not to misalign the seal, as this will cause fluid to leak and quickly break the bearing.
Replacing the caliper on the engine side begins by removing the belt and pulley from the drum. Next is the ground block. The caliper here has a left-hand thread, which is unscrewed in the course of the watch. The seat and the shaft surface are also thoroughly cleaned. New oil seal is installed in place, after which the caliper is twisted. Assembly is carried out in the reverse order.
Replacing a bearing in a front loading machine
Automatic with a collapsible tank
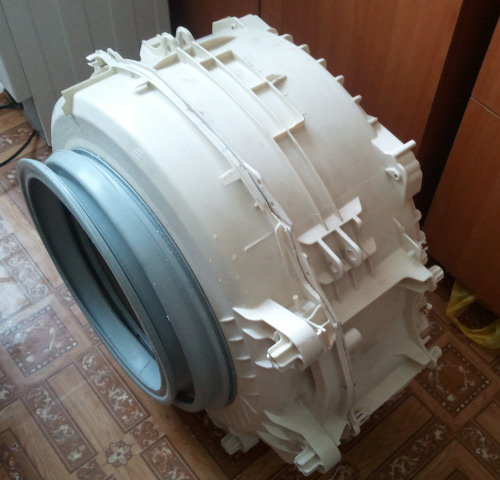
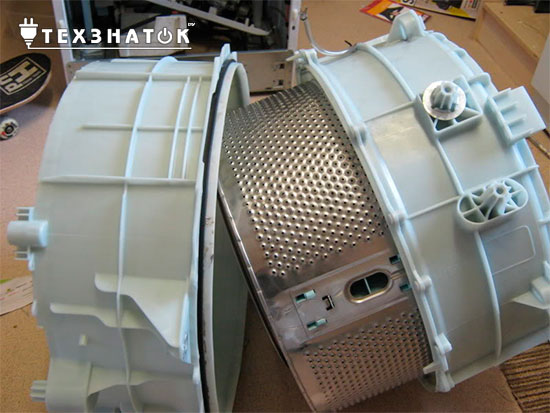
Repairing a side loading unit is a bit more difficult than the previous repair. Since the design of such machines is almost identical, the replacement of the drum bearing and oil seal on the LG side-loading washing machine will be considered. By the way, it is this manufacturer that manufactures direct-drive washing machines. The noise level in them is really lower, but they fail in the same way. But at least repairing the washing machine with your own hands will turn out in the same way as models from other manufacturers.
Tank dismantling. The bearing in LG is installed in the rear wall of the tank and for its proper replacement, the tank itself will have to be dismantled.
For this you need:
- remove the back and top protective covers;
- remove the drive belt from the pulley;
- remove the pulley, having previously wedged it with a wooden insert;
- remove the spacer and counterweights;
- turn off and disconnect the heater;
- remove the tank clamp;
- unscrew the bolts holding the bearing cup in the tank cap.

In the process of unscrewing the bolts, difficulties may arise due to the oxidation of the latter. To eliminate the problem, the bolts are treated with a WD-40 spray and after 30 - 40 minutes they are easily unscrewed. Next, the tank is disassembled, followed by the dismantling of the drum. All of the above operations are also relevant for repairing a washing machine. Indesit.
Zanussi. The drum, which is mostly easy to remove, is knocked out from the outside in these machines. In order to repair the washing machines of this manufacturer and not damage the threaded connections with the shaft, a stud (bolt) with the corresponding thread is screwed into the latter until it stops. Knock out the part carefully, without haste.
Candy. The machines of this company also have features. The body of the drum is connected not with self-tapping screws, as in most models, but with plastic latches. In this case, the shaft is knocked out with a hammer and a special guide. The remaining steps for the repair of such a device are identical to those above. The seals are removed from the inside with a screwdriver.
After disassembling the drum, they begin to dismantle the faulty bearing. If there are two, start disassembly from the outside. In the absence of a puller at hand, you can use improvised means - a bolt with a washer matched in size, an emphasis and a nut. The same actions are carried out with regard to internal bearings.
The drum bearing is pressed in in reverse order. The seat is pre-cleaned and lubricated. Installation is carried out with the same tools as disassembly. It is not recommended to hammer the bearing, since even a small misalignment can cause a broken seat in the future.
After installing the drum on the washing machine, the shaft is installed with the help of a stop, a bolt and a nut with a washer. All subsequent activities are carried out in reverse order.
With non-separable tank
Main representatives: Indesit and Ariston washing machines. The difference from the rest is a one-piece polycarbonate tank. In order to gain access to faulty bearings, the tank must be sawn with a conventional hacksaw. To reduce the thickness of the cut, the blade is tapped with a hammer to reduce the setting of the teeth.

Further, the steps for replacing the seal and bearing of a machine with a non-separable tank are the same as in front-loading machines: LG, Ardo, Atlant, Bosch, Candy and others. The assembly is carried out in the reverse order, and the tank is twisted with self-tapping screws along the pre-marked holes. The halves of the tank at the points of contact are coated with sealant before assembly.
Video clip on replacing the oil seal and bearing in the drum
To feel more confident, watch the video with detailed description how the replacement is made.
Such a repair of the machine is not too complicated and it is quite possible to cope with it on your own. First study the information and instructions for the typewriter you have chosen, watch the video and everything should work out.
In contact with
Author: elremont from 24-01-2014Hi, I'm Matt, today we'll show you how to fix your car. Before working on the machine, unplug it from the mains to completely eliminate the possibility of electric shock. Also make sure you turn off the hot and cold water supply. In this video we will show you how to replace bearings and oil seal on LG washing machine. This will be a difficult and rather lengthy repair. You can buy bearings and an oil seal in online stores. When you open the packages, you will have a new bearing and seal in your hands. They can be purchased separately. The oil seal and bearing may be different on your machine, but this video shows general principle their replacements. Bearings and stuffing box are located at the rear of the tank. The main reason for replacement is the wear of the bearings, when you hear them grinding, or when you see a leak in the back of the tank, then this is a damaged oil seal.
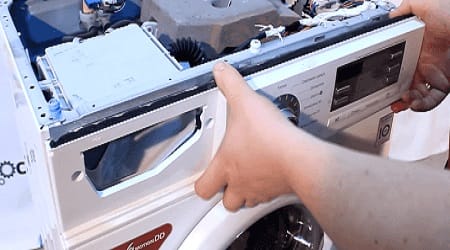
Let's start by removing the top panel. Unscrew the screws from the bottom that hold the panel. Once we remove these screws, we can remove the top panel. Now we can pull the top panel back. It must be moved back 3-4 centimeters to remove it from the limiters. If you slide it too far, you won't be able to lift it because the panel will hit the stops on the other side. Thus, we simply move the panel back a little. Next, take out the detergent dispenser tray, press down on the latch in the center to get it out. Now we can unscrew the 2 cross screws... Then we have to disconnect these connectors, for this we have to unscrew these little holders and disconnect the wires... Then we can pull out the wires and disconnect the connectors. All you have to do is find the latch, push it down, and unplug the connector. Now we can detach the front control panel. It has latches that go along the entire length. Thus, we wring them out, and draw out the panel. Once you've squeezed them all out, you can lift the panel up a bit and tilt it, thread those disconnected panel power wires through the hole, and then you can remove the panel.
Now we can open the door and remove the clamp that holds the cuff. There is a spring on the clamp located below, it can be lifted. Take a small flat screwdriver and carefully pry the clamp so as not to damage the cuff. As soon as you grab the clamp, it must be pulled out of the groove around the door to release the cuff. Now that we have removed the clamp, we can detach the sunroof collar from the front panel and tuck in, and then we can get to the back. door lock and disconnect the wire connector from it. Press the latch and disconnect the connector. After disconnecting the connector, we close the car door, take a small flat screwdriver and open this little service cover... It opens right away, nothing holding it.
We get access to the parts under the cover. Right here is the drain hose. If you are going to work on the pump or hoses inside the machine, you need to pull out this hose, place a dish on the floor under it and drain the water from the machine into it. It won't drain all the water completely, but it will make the job a lot less messy. After you have drained as much water as you can, put the hose plug back in. Take a Phillips screwdriver to unscrew the screw on the panel. After removing the screw, we can pull out this little panel by sliding the drain plug through it. Now we can remove the cross screw that holds the front panel. Now we can unscrew the 4 screws on the top holding the panel. To unscrew them, use a Phillips screwdriver. While loosening the last screw, hold the panel on the machine. If nothing holds her, then she may fall. All screws are out, we can lift the front panel and remove it from the machine.
There are a few various options this cuff. This one has one hose attached at the top, some have a hose at the bottom, either way they all need to be disconnected. We have to disconnect this hose at the top which is attached to the cuff through a small white tube. Take a screwdriver and, after you have loosened the hose, tighten it. The cuff on the tank is attached with the same clamp as in the front. We use our flat screwdriver, pull the clamp by the spring and remove the clamp. After you have done this, you can remove the cuff from the machine. After removing the cuff, we can remove these upper and lower tank counterweights. Their mount can be unscrewed with a 10 head, we will remove them to make it easier to get the tank.
The screws are out, we can remove the top counterweight... And put it aside. The upper counterweight is removed, remove the lower one. After removing the screws, you can remove it and set it aside. At the top of the tank, we need to remove some hoses. With our Phillips screwdriver loosen their fastening to remove them. Hold the clamp nut if necessary. Now that you have loosened the clamps, we can disconnect the hose from the tank. To disconnect the hose, simply pull it off. The third hose has a clamp on the other side so we have to twist and loosen it. You can't see what we're doing. Again, when unscrewing the clamp from the other side, hold the nut. After you have loosened the clamp, you can disconnect the hose from the tank. In addition, the thermistor must be disconnected at the bottom of the tank. All you have to do is press the latch on the connector and remove it. Then we can take our wire cutters and bite through the zip tie that connects the wire harness. And now we can remove the wires from the heating element and the ground contact. The ground wire is fastened with a 10 nut. Using our 10 head, unscrew it. We have to remove this service panel. It is secured with 4 Phillips screws that must be removed to remove the panel. Once these screws are out, we can remove the panel. On the back of the machine, we have to remove everything that is attached to the tank, so we take our Phillips screwdriver and remove the clip from the nozzle that holds it to the tank. The clamp is loose, we can disconnect the pipe from the tank. Now we unscrew the screws that hold the pressure test chamber. Remove these 3 cross screws so we can disconnect the wires from the tank and remove the motor rotor. We unscrew the bolt under the head by 16, which holds the rotor. Remember to hold the rotor otherwise you won't be able to unscrew the bolt. And if you still can't unscrew it, have a helper hold the drum from the inside. After unscrewing the bolt, we can remove the rotor assembly. Now we will take our 10mm head and remove all the bolts that hold this stator assembly. When unscrewing the last bolt, hold the stator with your hand so that the stator does not fall and is not damaged. When all the bolts are out, take the stator and tilt it down. Disconnect these two connectors. Press out the connector latches, and then disconnect the connector. From this side, you just need to press the latch, and then disconnect the connector. Now we can remove the pins that hold the shock absorbers. They have two stoppers. All pins are removed in the same way. We take the 13 head and put it on the pin in such a way as to compress the fixing antennae, and then we can pull the pins towards ourselves using pliers. After pulling out the pin, we can detach the shock absorber from the tank and lower it down. On the other side, we do exactly the same. Once you remove the pin, you can take out the shock absorber and rotate it to the side. While removing the rear pin, we found that the head wouldn't fit between the tank and the pin. We have found that a 12mm ring wrench works well for depressing the latch. Use the wrench and then you can pull the pin out with pliers from the other side. The same goes for the front shock absorber. Disconnect it from the tank and put it aside. Now that we have everything disconnected from the tank, we can disconnect the springs. There are two, one on each side. They have a small plug to keep them from coming off. To remove, use a small flat screwdriver... And then you can lift the spring to get it out of the hole on the frame, and you can lower it down and remove the spring from the tank... And hang it back on the frame so you don't mix up the springs later . On the other side, everything is done in exactly the same way. On this side of the tank, remove the spring in exactly the same way, as soon as you remove the spring, hang it on the frame. Now we have everything disconnected from the tank, we can lift it up and put it on the floor. It is quite heavy, so it will be better if you call an assistant.
Now that we've got the tank out of the washer, let's place it on some wooden blocks so we can walk around and unscrew all the bolts with our 10mm head. Once all the tank bolts are out, you can split the tank in half. It should separate fairly easily, but you may need to use a screwdriver to pry them apart. There is a separate video about the seal, but whenever you take the tank apart, it is a good idea to replace the seal so that there are no leaks when you put the tank back together. When you remove the front half of the tank, make sure it is free from impact cracks and there are no holes in the tank. If there are cracks or holes, then the front half of the tank may need to be replaced as well. We removed the top half of the tank and you can get the drum. If it does not come out, then it may be that the bearing is stuck there. It is necessary to turn the tank over again and knock out the drum. Place the plastic part of the tank on wooden blocks so that you can hit the drum shaft. Before attempting to knock out the drum, spray the seat with any penetrating lubricant like WD-40... and let it soak for a minute.
After applying the penetrating lubricant, take a piece of wood and put it on the end of the shaft to protect it, and then hit it with a hammer. It turned out, we can lift the second half of the tank... here is our drum, we see that the shaft is rusty and the problem is that the cross beams are cracked and the aluminum is falling apart. Therefore, when you get your drum and see this situation, you will have to replace the drum cross. If everything is just dirty, then you can clean the shaft with a wire brush to prepare it for further work. Now that we know the cross is broken, we'll move the drum aside and place the outer tank on the bars. Now we have the tank back on the bars, you can take a flat screwdriver and just pull the old stuffing box out of the tank. You don't have to worry about keeping it intact... We'll clean up the dirt around the bearings and we'll pour our penetrating lubricant on them. We will grease the edges of the bearing, according to the seats, so that it is easier to knock it out. On the other side of the bearing, I will do the same. It is important to remove residual oil after removing the bearings because the oil can cause the tank material to weaken. We soaked everything with penetrating lubricant. We will hit the lower bearing with a punch through the upper one, knocking out the lower one first. Now that we've knocked out the bearing from the underside, we can flip the tank over and have a look. When this bearing is removed from us, we can knock out another bearing from the other side. We have both bearings removed, you can use a nylon or brass brush to clean the seat. Do not use steel brushes as this may damage the tank material. Here are the old bearings and seals next to the new ones. If you already have them - great, if not - buy them in the online store. Before we put the bearings in the tank, we will take some liquid soap and put a very thin layer on the seats to make it easier to put the bearings in their place. Well, we put a new bearing, install it in place and upset it with a hammer. If you have a rubber or brass mallet, you can use that. In this video we are using a metal hammer. Be especially careful if using a metal mallet. Tap the edges of the bearing carefully to avoid damaging the bearing or tank. Make sure you hammer it in line with that metal surface. Now we have this bearing in place, we can turn the tank over and put the inner bearing. On the other hand, it's the same. We will install it evenly and flat and besiege it with a hammer ... After the bearing is placed, with gentle blows with a drift, we upset it to the end. If you have a brass mallet you can use that, or even a piece of wood. In this video we are using a metal hammer. Make sure you hit only the outer race of the bearing lightly so as not to damage the bearing or the tank. If the bearing has sat down to the end, we can put the oil seal, after lubricating it from the inside with a special grease. To make the seal easier to install, apply a thin layer of soap around it. Don't overdo it, just a little. If everything is ready, we can take and press the oil seal ... If the oil seal is flush along the entire edge, we can put the car back together.
Now we can install the drum in the back half of the outer tank. We will lower it slowly down so that when lowering the shaft, the oil seal will not be damaged. Okay, let's put the drum down into the tank. Make sure the shaft is right over the center of the hole... And then slowly lower it down, you can probably feel it stop and then go down some more to the stuffing box. Okay, the drum is in place, we can put the front half of the tank back. When you lower the front half of the tank onto the back half, make sure the heating element is inserted down into its bracket and properly positioned. Now we will turn all the bolts back in a circle, then twist them in a circle, and then tighten them again in a circle.
To tighten them we use our 10mm socket with extension. Now in a circle we will tighten all the bolts completely ... Now, the tank is assembled back, we will remove it from the bars and install the tank back into the car. It is quite heavy, you may need an assistant. Install it very carefully in the frame so that you can hang it on the springs and then install the shock absorbers. Let's go to the side of the car, take the spring and hook it to the tank ... And then lift it up and insert the spring into the groove. Now that the spring is hooked, we can put its retainer back. We will do the same on the other side, we will hook the spring to the tank.... Call a helper if necessary, remember that the tank is quite heavy. Okay, now that the spring is on the tank, we can lift the tank and hook the spring onto the frame. Now that the spring is hooked, we can put its retainer back.
Okay, now we can put in the dampers. First of all, we will put the rear. All you have to do is pull it back out and stretch the shock until it aligns with the hole on the tank so the pin can be inserted. You need to make sure that you insert the pin so that the antennae of the retainer come out on the back side. Now we are on the front right side of the car. We will shake the tank and pull out the shock absorber so that the holes line up and the pin can be inserted. Check that the pin is fully inserted and the latches come out on the other side. We put the shock absorber on the left side in the same way ... shake the tank and lift the shock absorber up into place. After aligning the holes, you can install the pin, making sure it is fully inserted and the latches come out the other side. From above we will restore three hoses, we will simply pull this large rubber hose over the tube and, using our Phillips screwdriver, tighten the clamp. The little hose we are going to connect is an air hose, so all we have to do is press down until it sits in place... And the third hose is put on in the same way as the first. We just push it down and tighten the clamp. We can get to the clamp with our Phillips screwdriver and tighten it... If the clamp nut starts to turn, you can hold it with your other hand. At the bottom front of the tank, we will connect the electrical connectors to the heater and the thermistor. Red was on the left, yellow was on the right, we put the ground wire under the housing nut and tighten it. For tightening, we use our 10 socket. To connect the thermistor, we just plug in the connector and make sure it clicks into place... And then we take the zip tie and reconnect the wiring harness to the tank. After tightening the tie, you can cut the ends with wire cutters. Now we are at the back of the car, we will attach the tank-pump connection. All you have to do is line it up and push it up onto the tank tube. Now we can use our Phillips screwdriver to tighten the screw. If the clamp nut is spinning, you must hold it with your hand. Now we have the clamp fixed, we can put back the screws that hold the pressure chamber in place... Now we can connect the stator. We'll just plug in the electrical connectors and make sure they snap into place. Once we have them connected, we can turn the stator up... We'll put on one bolt to hold it in place while we connect the ground wire and stuff. Okay, first we'll install the little tie that holds the wire harness to the metal base. .. next we can restore our ground wire... And then we can install this wire holder to the bottom of the tank. Now everything is connected, we can install all the stator bolts and tighten them. Now let's take the head by 10 and tighten them all in a circle ... Install the rotor back, process the threaded connection of the bolt with a thread lock before putting it back ... And then, using our head by 17, we tighten the bolt. Remember that if the rotor starts spinning, you can have an assistant hold the drum inside the tank so you can tighten the bolt tight enough. Now you can put the back panel back in place. All you have to do is align the tabs at the bottom, insert them, curve the panel a bit. to insert tabs at the top. And then we can tighten the 4 screws with a Phillips screwdriver. Now we can put back the lower and upper counterweight. Install the bottom one first. to install, press it into place ... then we can start the screws and tighten them with a 10 head. The top one is put in the same way. We will step on the front of the tank to line up the holes and put it on. After installing the counterweight, make sure it sits flat. We can put the screws in and tighten the head to 10. Okay, now we can put the sunroof collar back on. Make sure that little pointer is right at 12 o'clock and then we can tuck the cuff around the tank. There isn't enough finger sensitivity to install the cuff while wearing gloves, so we took them off to put the cuff on and show you how to do it. Make sure that the cuff is seated in the groove to fit the clamp ring. The cuff is tucked into the groove in a circle, we can put a collar and fill it around the entire perimeter. Align it, the spring should be in the 3 o'clock position. And then we grab the ring with pliers and fill the spring to stretch the clamp and put it in.
After installing the rear cuff clamp, we can connect the hoses. Not all hoses will be on your car... Make sure they fit well and tight. We move on and put the front panel. We put it on 3 ledges ... check that the hoses are not pinched. And then we can tilt it and fix it with 4 screws. Next, put the cover back on. First, screw back the little screw that holds the front panel... Now put the decorative cover on, pull out the drain hose and thread it through the hole so that the cover is in place... And then screw the screw... Take this little drain hose and put it in the latch... And then we can replace the drain filter cover... and close it. Now on the side, behind the door seal, find the electrical connector and plug it back into the door lock. Tuck in the sunroof collar on the front panel... go around and make sure the gasket is in this groove so that when we put in the spring clip it will hold the collar in place. Now we'll take the spring clamp and make sure the spring is down at 6 o'clock. Once we have tucked most of the yoke around, we will very gently stretch the spring with the pliers and tuck the yoke with the spring into the groove. Pay attention to the fact that when you pull back the clamp, you do not pull the cuff out of the groove. Everything is ready, we can close the door. We put the front console back, thread the wires through the hole in the back of the panel and pull them out to the end. Then we can turn the panel up and lock it in place. All wires are stretched, we can connect all the electrical connectors of the panel. All you have to do is push them in until they click and make sure they are locked into place. And tuck the harnesses onto the holders... The console is connected, you can tighten the screws that hold the detergent dispenser... Now we can insert the detergent dispenser tray. All you need to do is align it and then press the tab and slide the tray all the way in. Now let's place the top panel. Make sure the tabs fit into these small cutouts and lower the panel down and push it forward to lock it in place. Now we can tighten the screws that hold the top panel in place. Now that you have finished repairing the machine, plug it back into the socket, turn on the water supply and start the spin cycle. Thanks for joining us. For other successful repairs, watch the repair video on our website.
Repair of complex household appliances, which includes a washing machine, is best left to professionals and carried out in a special workshop. However, if you have some knowledge and feel the strength to cope with a breakdown yourself, for example, replacing a bearing, then for this you should carefully and carefully perform all the steps during dismantling and installation. So, how to replace the bearing in the washing machine?
I wouldn't do it myself
I personally wouldn't do it. For me, it is best to call a master who understands this. And for people who themselves repair all houses, a very useful article and very useful in fact.
Repair of complex household appliances, which includes a washing machine, is best left to professionals and carried out in a special workshop. However, if you have some knowledge and feel the strength to cope with a breakdown yourself, for example, replacing a bearing, then for this you should carefully and carefully perform all the steps during dismantling and installation. So, how to replace a bearing in a washing machine?
You will need:
Screwdrivers: regular and curly;
pliers;
Keys for 17 and 19;
Socket heads for 7, 8, 10, 13;
Hexagon for 6;
Hammer;
The collar of a candle car key or the like.
Instruction:
1 Disconnect the washing machine from the mains and water supply. Prepare workplace. It must have good lighting. Remove the top cover by unscrewing the two screws and pulling it towards you. Remove the back cover. Set her aside. Remove the drive belt. Expand the machine and remove the rubber casing from the front wall by opening the clamp lock with a screwdriver and removing it.
2 Turn the back of the washing machine towards you. Carefully disconnect all wires of the electric motor and heating element, remove the terminal. Remove the connector from the motor by releasing the retaining latch. Disconnect the pipes from the drum casing, loosening the clamps with screwdrivers and a head by 7. Pull the upper one up with a little effort, unscrewing the self-tapping screw that secures the level sensor to the casing. Remove the temperature sensor by pushing it out through the hole in the pipe. Disconnect the shock absorbers using two keys 17 and 19 as levers. Do not forget to drown the tongue on the bushing.
3 Remove the drum from the springs. Since it is quite heavy, then use outside help. Take the head on 13 and disconnect the front counterweight. Pry it up carefully with a screwdriver. Unscrew the motor mount and remove it by sliding it forward.
4 Take a 6 hexagon and unscrew the pulley. Remove the rear counterweight. Using a screwdriver, which is used as a lever, carefully remove the counterweight from the guides. Remove the heater. Remove the seal with a screwdriver. Remove retaining ring with pliers. Take a hammer and tap the bearing through the knob of a car's spark plug wrench or similar, tapping evenly and lightly on the perimeter of the bearing. Assemble the machine in reverse order. Lubricate the new bearing before installation with a special heat-resistant grease.
Replacing Bearings In Washing Machines
The most time-consuming repair is the replacement of bearings. I recommend leaving this job to the professionals. If you are confident in your abilities and your hands “grow from where they need to”, then this page will help you make such repairs yourself.
All washing machines are designed differently. Therefore, the replacement of bearings quite often requires full parsing cars. Since you have to remove the tank along with the drum from the frame. This must be done on almost all machines with plastic tanks. The exceptions are the old INDESIT, ARISTON where the rear part is removed, pulled with an iron clamp.
In order to remove the tank from the machine, it is necessary to remove either the front or the back. Of course, it will not work to consider all the cars. Well, I'll try to describe some. Companies such as: BOSCH, BEKO, DAEWOO, HANSA, LG, SAMSUNG, SIEMENS, new ZANUSSI models are disassembled from the front.
ARDO, ELEKTROLUX, ZANUSSI are dismantled from the back. There are still some cars in which the frame is not collapsible and the tank has to be pulled out through the top. There are such ZANUSSI with asynchronous motors, which are extremely inconvenient for repair.
To remove the tank, you need to completely disconnect all pipes. Disconnect all wiring. If the washing machine has an adjustable mechanical thermostat. Then it is easily removed from the tank with a screwdriver. Some "craftsmen" manage to bite the copper tube, being afraid to get the thermostat out of the rubber seal. Then they try to solder it. After such a repair, the thermostat must be replaced.
If you do not have experience in disassembling a washing machine, then try to remember everything, but it is better to write it down or take a picture. Anything related to other things. So that there are no questions during assembly.
To make it easier to lift the tank, it is necessary to remove from it, if possible, all the loads, as well as the engine. If the tank is removed from the back, then do not forget to remove the cuffs from the frame of the washing machine.
On last step you have to disconnect the shock absorbers and remove the tank from the springs. It is better to always leave shock absorbers on the frame, but this does not work on all machines. If you took out the tank along with the shock absorbers, then make sure not to break them. Since sometimes it is not possible to remove the loads, and the tanks are quite heavy.
To get to the bearings, you need to split the tank and separate the back. Parts of the tanks are connected in different ways: with bolts, metal brackets, plastic latches.
The most difficult disassembly is the tanks of BOSCH washing machines. These tanks around the perimeter are connected by latches. To disassemble them, it is necessary to drive wedges under each latch. Only then can the parts be separated from each other. The rest of the tanks are pretty easy to take apart.
Next, the pulley is unscrewed and the drum is knocked out of the tank. Quite often, the drum is not so easy to knock out. Therefore, it is necessary to use copper hammers or tighten bolts or nuts so as not to damage the threads. 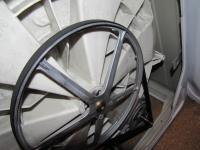
When bearing repairs are put off and washed by machine until the belt flies. Bearings fall apart and the inner ring remains on the shaft, and the outer ring in the tank. Turning it on a grinding machine will help remove the remnants of the bearing from the shaft. The ring is turned on both sides so that it can be turned with an adjustable wrench. The rust is then treated with WD-40. After that, the ring is scrolled and removed.
The rest of the bearing is knocked out of the tank using a specially sharpened tool. You can also remove the ring using the same disassembled bearing. If the inner ring is inserted, evenly distributing some of the balls. The resulting bearing is squeezed out by a press, or knocked out.
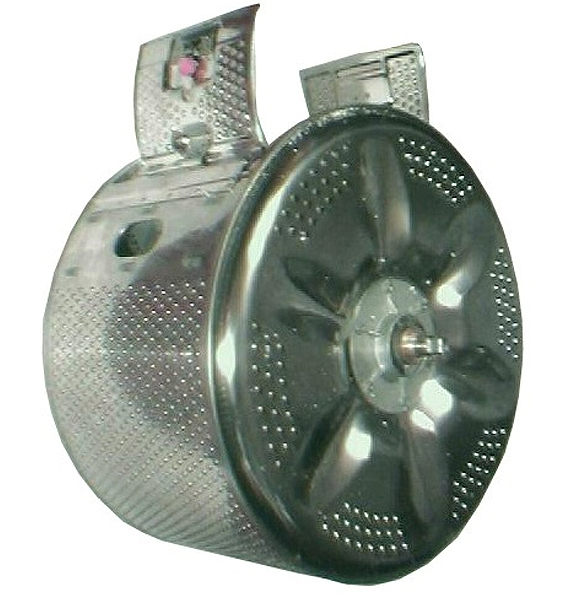
When it is strongly tightened with repairs, the drum can be damaged. If the ring along which the stuffing box slides is badly broken or the shaft itself is worn out, then there is no point in changing the bearings. It is necessary to change the drum or best case crosspiece together with the shaft.
Repairing bearings on machines with stainless steel tanks or enamelled tanks is much easier. Since the tank does not need to be pulled out of the frame. Typically, the bearings of such machines are pressed into crosspieces or in the back cover of the tank, which is easily removed. Well, there are fewer and fewer cars like this.
In machines with vertical loading, the bearings are pressed into special calipers and are changed as an assembly. Tanks are rarely disassembled, especially plastic ones.
Non-separable tanks deserve special attention. Bearings on such tanks can be changed by cutting the tank. Then connect the parts using a soldering station. But this is a laborious process that requires certain skills.
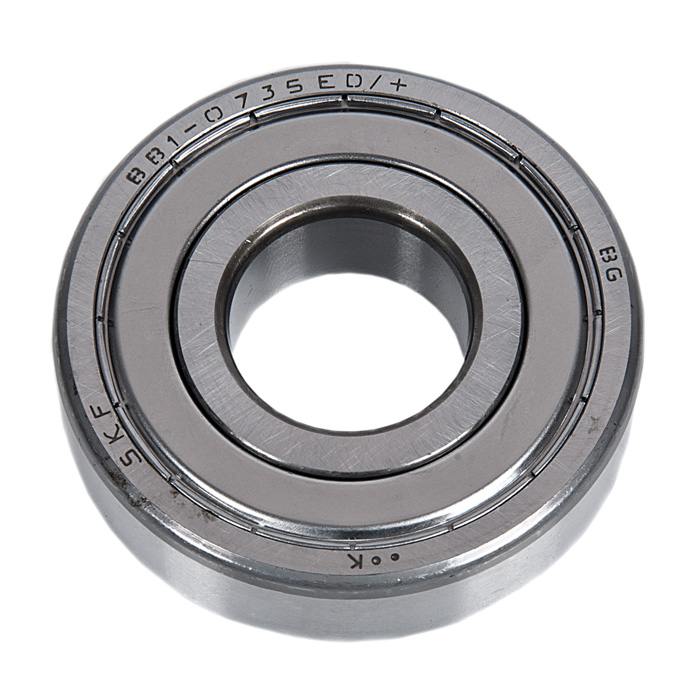
I would like to note some nuances. In order for the machine to work for a long time after repair, everything must be thoroughly cleaned. Especially the ring on which the gland slides. To prevent abrasion of the stuffing box, it is necessary to use special lubricants that are not washed off with water. Example KLUBER TA-15. It is desirable to change bearings for high-quality ones. An example is SKF bearings.
Sometimes one double bearing is used on narrow machines. It can be pressed into both the tank cap and the cross. To remove it, you must first remove the retaining ring, which is necessarily present in this configuration. Such bearings are replaced only with original ones, wheel bearings are not suitable.
The bolts that secure the pulleys of washing machines are usually secured with thread lockers. Therefore, it is quite difficult to unscrew them. To facilitate unscrewing, you need to use a quality tool. Sometimes heating with a building hair dryer or an impact screwdriver helps. When assembling the machine back, also use thread lockers, otherwise the pulley will unscrew.
We repair the washing machine with our own hands without the help of professionals
Washing machines Indesit is one of the few equipment of this type that does not require the global dismantling of the sheathing and interior. It is enough initially to remove the back, as well as the top cover of the unit. Starting to replace the bearings, the drive belt is first removed from the motor itself and from the drum pulley of the washing machine.
The second stage of self-repair of Indesit units is the need to block the drum pulley. For this purpose, you can use a simple wooden block, which will allow you to unscrew the screw that fixes the drum pulley. When removing the pulley, you need to be very careful, because the pulley can easily break. After the pulley is removed, it is necessary to remove the spacer bar, counterweight, which will allow you to later remove the tank cover and clamp. 
After the work with the spacer bar and counterweight is over, it is required to release the heating element from the wires, unscrew the fastening of the bearing assembly from the tank cover of the unit, remove the grounding bar, loosen the tightening screw of the clamp. Then remove the clamp itself, as well as the seal along with the tank cap. At the same time, it is worth remembering that the screws located on the fastening of the bearing assembly are quite difficult to unscrew. Therefore, they often have to be "cut off". If we talk about dismantling the tank lid, then here you should make sure not to break the wire going to the temperature sensor.
After the tank cap is removed. You can proceed directly to work with the bearing assembly. For these purposes, the tank is initially removed, and after that the bearing assembly. To get the bearing itself out of the bearing assembly, the oil seal is first removed, after which you can use a hammer and a metal rod to knock out the bearings.
After the bearings are knocked out, you can change them for new parts. After that, all mechanisms are assembled in the reverse order. Of course, it cannot be said that do-it-yourself repair of the Indesit washing machine in terms of replacing bearings is difficult, but it is quite time-consuming.
Major mistakes in self-repair Indesit can lead to another repair.
Do-it-yourself repair of Indesit washers should be done as carefully as possible, because you can make several serious mistakes, which, as a result, will negatively affect the operation of the washing unit. If bearings and drum seals are being replaced, then the first thing you should pay attention to is lubrication. Without lubrication, bearings will quickly fail. 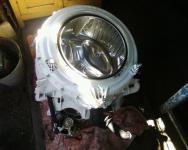
The second nuance that can be encountered when replacing bearings is the incorrect installation of oil seals.
At correct installation The gland spring ring must be fully inserted into the bearing assembly.
If all the rules for installing bearings are followed, then self-repair of Indesit washing machines can be considered successful.
Replacement of bearings in non-separable washing tanks (SMA).
In this article, we will consider the replacement of bearings in washing machines of the Ariston and Indesit brands with loading linen from the side through the door (front loading), and more specifically, in those that use a non-separable polycarbonate tank. IN Lately the installation of non-separable tanks also takes place on SMAs of other brands, so everything written is true for them as well. But first, two warnings:
1) Never try to delay the operation of replacing bearings, postponing it "for later." This can lead to the fact that the replacement itself may become meaningless, since the remnants of worn bearings and the remains of the stuffing box can damage the brass bushing located on the axis of the drum cross, which will require replacing it (the entire cross) as well, and this will cost much more. It is also not uncommon for water flowing out from under worn bearings to enter the power terminals of the engine and the heating element, which are energized at 220v. This leads to short circuits and failure of the electronic module of the washing machine, and in this case it makes no sense, since it will be cheaper to buy new car than repair this one.
2) Try to follow the given instructions exactly and not to show excessive “amateur activity”, which can turn into even more problems. You should not introduce another malfunction into the car in addition to the existing one. Believe me, not every master agrees to take on it after such a “repair”.
But if you are determined and confident in your abilities - go ahead, get down to business.
Before proceeding to self replacement bearings, you need to make sure that the problem lies precisely in them. With the normal quality of the machine, the first 5-7 years of operation, such a problem should not arise. Bearings wear out especially quickly if water and powder get on them, washing out the lubricant. Bearing problems are very easy to identify both by touch and by ear. If the washing machine squeezes out things with atypical noise, vibrates - most likely water has got into the bearings. If the upper and lower parts of the drum slightly “walk” when pressed, then the balls have already worn out significantly. At the last stage of bearing wear, the drum simply jams, and the machine starts to leak. 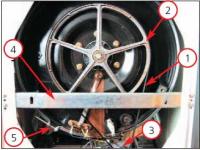
Typically, the Achilles' heel of a washing machine drum is the oil seals. Over time, their elasticity decreases, they cease to be tight and do a poor job of protecting bearings from water. As a rule, oil seals are changed along with bearings for a washing machine. These two parts are too interconnected to change them separately. If the oil seal is not changed in time, it can cut a groove on the bushing. In this case, replacing the bearings of the washing machine drum will not help - you will have to change the drum itself.
Many models and manufacturers have their own features for replacing bearings in washing machines. Miscellaneous materials tanks also have their own characteristics. However, we will consider a general-average option for replacing bearings in washing machines.
If you are changing the bearings of a washing machine for the first time in your life, be sure to do it together and it is desirable that the second assistant has a certain physical strength, and not only can support you morally. So step one...
Washing machine disassembly
Disconnect the drain and fill hoses, remove the plug from the socket. Move the washing machine to the middle, so that nothing prevents you from poking around comfortably in it. Get ready to record or photograph your actions in order to assemble everything back according to the same scheme. Drain the remaining water into the basin and proceed to disassembly.
Remove the top cover
Remove back wall
Use a screwdriver to remove the cuff retainer on the front panel
Unscrew with a screwdriver and remove the control panel
Remove the hose from the pressure switch
Open the filler pipe
Remove the detergent hopper
Remove the air tube
After this operation, for greater convenience, the machine will need to be put on its side. Then.
Remove the belt
Remove the engine
Turn off the heating element and sensors
Remove the drain pipe
Loosen the bolt on the pulley, remove the pulley
Unscrew shock absorbers
Unscrew everything from the tank that is screwed to it
Disconnect everything from the tank that is connected to it
Put the washing machine and unscrew-disconnect everything that is above the tank
Check if there is anything else attached to the tank and unhook if so.
Together, pull out the tank and put it next to the machine
Washing machine bearing replacement
Unroll and disassemble the tank
Remove the drum from it (the container in which the laundry is placed)
Remove the gland
Now you have access to the bearings. Or rather, what is left of them. Fill the bearings with kerosene or WD-40 and wait 10-30 minutes. Using a special puller, or a universal sledgehammer, carefully knock the bearings out of the hub. Carefully scrape debris and limescale from the bearing seats. You can sand them down a bit. Now, using a puller or sledgehammer, carefully install the new bearings. Thoroughly lubricate the oil seal with special grease and install it in place. In this case, the stuffing box snap ring must be inside the bearing assembly. The repaired bearing block is installed on the drum axle. For fidelity, sealant can be applied around its perimeter. After that, you connect everything that you unscrewed or disconnected in the reverse order.
Tips: Do not rush to use brute force if something does not work out. The screws in the washing machine, and even more so in the tank, can turn sour. In this case, it makes sense to lubricate them with WD-40 even before disassembly begins. If the screws break, they will have to be carefully drilled out. If you do not have the skills to dismantle and mount bearings, you can contact the nearest car service. There should be no problems with this operation. However, independent outside help, in theory, does not imply.
The algorithm for diagnosing breakdowns of Indesit washing machines in terms of the performance of drum bearings is very simple.
Replacing the drum bearings of the Indesit washing machineDrum bearings in the Indesit washing machine fail somewhat more often than any other parts. Why is this happening? The main reason is the overload of the machine with linen, as well as washing without interruptions.
AND self-diagnosis Indesit machines here are quite simple. After all, problems with bearings “pour out” into noises, knocks and rattles that are uncharacteristic for any automatic washing unit, not only during the washing process of the machine, but also during the spin cycle. At the same time, it is worth remembering that along with the bearings, the seals also fail.
Moreover, it is the seals that wear out first, and only then the bearings. Yes, the machine will work for some time even with such a breakdown. But this is all for the time being.
If the seals and bearings of the drum are not replaced in a timely manner, then there is a high probability that the machine will start to leak, and as a result, it may be necessary to replace the drum itself, which is quite expensive and not profitable at the same time.
But self-repair of Indesit machines when the drum bearings wear out is quite possible.
The main thing is to know where to start and how to finish.
Tools and fixtures
Tools and fixtures that you will need to carry out the operation to replace the bearings in the washing machine.
a set of flat and figured screwdrivers of different diameters;
adjustable wrenches, two, small and medium;
a set of socket heads of different diameters and a T-shaped handle for them;
a set of powerful socket heads and a handle for them (car set);
middle hammer; 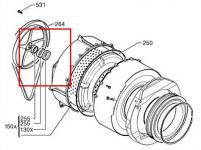
pliers, side cutters, a set of “star” keys (sold in car dealerships);
steel pin 20-25 cm long and 10-15 mm in diameter;
a hacksaw for metal and several interchangeable blades for it;
grinder with a disk for metal, an electric drill with drills of different diameters;
SHRUS grease and WD-40 fluid, sold in car dealerships;
silicone (transparent) sealant with good water resistance;
cross pliers;
awl, thin marker;
packing of self-tapping screws 15-20mm long.
Washing machine. Like any complex mechanism, it tends to break. Of course, any part can fail, but usually parts that carry a strong physical load are most susceptible to breakdowns, for example, it may be necessary to repair or replace the bearings of a washing machine. It is very easy to determine what exactly the bearing is out of order. If during the operation of the washing machine there are strange knocks and noise, as well as increased vibration, it is most likely that the bearing needs to be replaced.
If you have the skills to repair household appliances, then the bearing can be replaced by yourself. And we will show you how to do it right.
Required tool
What tool is needed to replace the bearing? This primarily depends on the characteristics of the device of your unit. Since the internal structure of different types of machines can vary greatly, we advise you to stock up on the following tool:
- open-end wrenches, sizes 12 to 19;
- a set of socket wrenches of the same size;
- a set of imbus (hex) keys;
- rubber hammer;
- normal hammer;
- flat and Phillips screwdrivers (preferably different sizes);
- Adjustable wrench;
- lubricant LITOL-24;
- a knockout for a bearing or an ordinary blunt chisel;
- spare oil seal and washing machine drum bearing.
Also, during the repair process, you may need electrical tape, sealant, rags. In the absence of a rubber one, you can use a regular hammer and a small wooden block, this will help us avoid shock damage and flaring when removing the shaft.
Work order
The most important rule when making repairs, since you will have to disassemble the washing machine almost completely, is to write down in detail, or even better, photograph the sequence of the disassembly process so that there are no problems with assembly later and “extra” parts do not appear. If you have a washing machine with a front loading chamber, your steps will be as follows:
- Disconnect the machine from communications (water, electricity, drain).
- Unscrew and remove the back and top panel, the order depends on the design features of your machine.
- Dismantle the dispenser.
- After that, unscrewing the fixing screws, you need to remove the control unit.
- Open the loading hatch and remove the cuff clamp, after which we carefully fill the cuff inward.
- Then you can remove the lock.
- After that, removing all remaining fasteners, remove the front wall.
- Next, remove everything that prevents the loosening of the clamp.
- The next step is to remove the counterweight.
- After removing the counterweight, the crucial moment follows - the removal of the heating element. When dismantling the heating element, pay special attention to the order of connecting the wires (it is better to take a photo, in extreme cases, write it down on paper).
- After that, it is necessary to remove everything that connects the drum tank to the body (pipes, wires, drive belt) and unscrew the engine.
- Then we take out the engine and now you can take out the drum tank and start replacing the bearings on the washing machine.
The drum tank, for the convenience of further work with it, is best transferred to a solid table, so it will be more convenient for you to replace the bearing.
Direct disassembly of the tank and replacement of the bearing
Now we will describe step by step directly the process of disassembling the drum and how the bearing is replaced. If you have coped with disassembling the washing machine, then disassembling the drum and replacing the bearing will not be difficult for you. The main thing is to carry out all the work very carefully and carefully remember the entire disassembly process.
- Free up space around the drum so that nothing gets in your way.
- In order to avoid damage, it is best to remove the rubber cuff, having previously canceled its location on the drum tank with a marker.
- After that, we turn the drum tank up with a pulley, for the convenience of dismantling it. We unscrew the bolt securing the pulley to the shaft and remove the pulley.
- Then you need to drown the shaft, for this we need a rubber hammer, if you do not have one, you can perform this operation with a simple hammer. In order not to damage the shaft, it is best to knock it out through a wooden block.
- Having released the shaft, it is necessary to unwind the drum tank itself, and then carefully separate it into two halves. Now we can freely replace the bearings in the washing machine.
- First you need to carefully remove dirt and wipe all the working parts of the washing machine. Then inspect the removed parts for additional damage.
- If you are convinced that everything is in order, use a knockout or a blunt chisel to knock out the bearing.
- Remove old seals.
- Lubricate the bearing seat with LITOL-24.
- Then we install the seals and with the help of a hammer and a punch, we press the bearing into the socket.
That's all. We were able to change the bearing in the washing machine ourselves. After that, we just have to reproduce all the actions we have done in reverse order. Pay special attention to the drum tank assembly. In order to exclude leakage, the installation must be carried out very carefully and when connecting two parts of the tank, it is imperative to cover the junction with a sealant before connecting.
The bearing in a top-loading washing machine is replaced in a similar way, taking into account its design features.
There are washing machines with non-separable tanks, their repair is best done in specialized workshops.
Since replacing the bearing in them is an order of magnitude more complicated repair, requiring skills in cutting and soldering the tank. Therefore, it is better to entrust a professional to change the bearing in such difficult case, how
How to understand that it is necessary to replace the bearing in the washing machine? In the process of washing clothes, it begins to make noise, knock, creak. And over time, these unpleasant sounds will only intensify. If the bearing is not replaced in time, then it will be much more difficult to do it later. Also, if you do not change the bearing in a timely manner, the washing machine may completely break down, and will no longer be repairable. The best option is to immediately replace it with a new one if a bearing failure is detected.
Replacing the bearing yourself will not be very easy and not at all fast. Therefore, before changing it, you need to decide whether you can do all the necessary work with your own hands? If such work is not within your power, then it is better to call the master. Bearing replacement, including the cost of a new part, will cost you about a third of the cost of a new washing machine. Of course, there are different prices for household appliances and their repair today, and therefore the cost of repair given by us is conditional.
So, if you still decide to do the repair yourself, then let's take a closer look at how to do it.
Preparation for repair
Stage one - disassembly of the washing machine
First you need to remove the cover of the device. This is done quite simply. You should unscrew the two bolts on the rear side panel of the cover and simply lift it by sliding it back a little.
Next, you need to pull out the detergent tray. Pull the tray towards you and press the special latch, while pulling the powder receptacle towards you. These actions should release the tray, and it will easily come out of the slots. In some models, there is no such button, then you just need to pull the tray, pressing it down a little.
To remove the upper dashboard, you need to carefully inspect it. Find out where in your model the bolts for this panel are located, and unscrew them all. If the panel does not come off easily after this, then you missed one or more bolts. After the panel cover is unscrewed and easily comes out, disconnect all wires from the sockets and completely remove the element. Don't forget to take pictures of all parts during disassembly. The next step is to remove the bottom panel. The process shouldn't be difficult. Using a flathead screwdriver, press the tabs that hold the bar in place and it will release easily.
Stage two - remove the cuff of the hatch
The cuff is a special rubber gasket that connects the hatch opening and the laundry drum. It is fastened very simply with the help of a spring and a clamp. To release the cuff and gain access to the removal of the entire front panel, you need to find the clamp. It can be detected visually. To remove it, use a flat screwdriver to pry off the spring and pull out the clamp. After that, carefully detach the cuff from the hatch hole and place it in the drum. Now the part we need is completely free, you can start dismantling it.
Step three - remove the front panel
Having snapped the hatch of the washing machine, you need to unscrew the bolts that hold the panel. After that, you need to carefully remove it from the hook. Don't pull hard. The panel is connected by wire to the hatch lock. Don't damage it. As soon as you were able to push this part towards you, disconnect the wire, only then you can fully remove the front wall and free access to the rest of the device.

Stage four - remove the tank
First you need to get rid of the inner top panel. First of all, you need to inspect the back of the machine and find the screws that secure the water supply valve. Having unscrewed these fasteners, you can begin to twist the bolts on the panel. Do not rush to remove it, because you still need to carefully disconnect all the wires and pipes. When everything is disconnected, you can remove the panel itself.
Next, we proceed to disconnect the drain pipe. It connects to the tank of the washing machine with a clamp. Unscrew the clamp and disconnect the drain pipe.
After that, we proceed to disconnect the heating element. In different models, it can be located in front or behind the structure. If your tubular electric heater (TEH) is at the back, you will need to remove the back wall. Carefully disconnect all leads going to the heating element. Do not forget to photograph the initial state before this. At this stage, the wiring must be disconnected completely. Please note that in some places it can be attached to parts of the machine using different fasteners. After disconnecting all the wires, we pull them out.

We get rid of contradictions. This must be done so that the tank is not too heavy. Unscrew them carefully. Then disconnect the water level sensor. Shock absorbers can be detached. Armed with a wrench, unscrew the bolts holding these parts. For these jobs, it is best to use a nozzle with an extension cord.
Keep in mind that the tank itself is lightweight, so you don't have to use much effort to remove it. Put one hand into the tank and lift it up. With the other hand, release the container from the springs on which it is attached. After that, it can be pulled out.
The final step is to remove the belt, unscrew the engine and shock absorbers. The fully emptied reservoir can be dismantled to replace the bearing.
Stage five - disassemble the tank
After the tank is released, you may notice that it consists of two halves. These halves are fastened together along the entire perimeter of the connection. Fasteners depend on the brand and model of the washing machine, these can be bolts or special latches. You need to separate the halves. We act depending on the type of fasteners. Having removed the front part, you can often observe the presence of debris and dirty deposits. Before assembly, it is desirable to get rid of dirt. On the back half you will see a drum. It is he who is our goal.
This stage is the most responsible and requires increased attention and caution. We need to carefully detach the drum. First of all, remove the pulley. Just unscrew the fasteners holding this part and remove the pulley from the axle. After removing the pulley, screw the unscrewed bolt back. At the same time, we spare no effort so as not to spoil the shaft during further work.
We take a hammer. At this stage, do not be zealous, proceed with caution. We are trying to gradually knock out the shaft. If these manipulations are in vain and the shaft remains in place, it is better to replace the bolt in order to avoid damage to it. We keep knocking. As soon as the shaft is level with the top of the bolt, we remove the bolt, and pull out the drum.
We proceed to a visual inspection of the bushing and shaft. Often, with untimely repairs, these spare parts can wear out so much that you have to replace the cross. In order to assess the condition of the shaft, it should be wiped with a dry, clean cloth. After that, carefully inspect it from all sides for the presence of development. To be completely sure of the integrity of the shaft, put a new bearing on it, and determine if there is any play. If you still notice a flaw, change the shaft with the cross without hesitation.
Next, inspect the bushing. It is located on the shaft and is intended for dressing the stuffing box. The bushing should also not show signs of strong wear and mechanical damage. If you find strongly pronounced transverse grooves, such a part will no longer be able to perform its functions. An oil seal put on such a sleeve will not be able to protect the bearing from water, and the repair will need to be done again.
Stage six - replacement of bearings
To remove the bearings, you need to remove the oil seal. It pulls out very easily. Use a flathead screwdriver to pry out the oil seal and pry it out. Next, we take a metal pin in our hands. With its help, we will knock out these elements. Putting the pin to the bearing, hit it with a hammer. Then we strike opposite, the strikes should be in the form of a cross, on the four sides of the spare part. With this simple technique, you can knock out both bearings.
With these manipulations, keep in mind that the smaller bearing must be knocked out from the inside, and the larger one from the outside of the tank. Also, when performing these works, exercise maximum care so as not to damage the product. It is best to knock out, resting the part on one knee.
At the end of this stage, pay attention to the back wall and the places where the bearings sit. These areas should be free of dirt or debris. They should not just be cleaned, they should be polished to a shine. Only in this case you for a long time don't have to repair the car again.
Well, now it's time to unpack the new bearings. We take the one that is smaller and hammer it into place of the filmed one. We also apply a metal pin to opposite sides, and hammer it with light blows of a hammer. In order to determine whether the element has sat down in its place, carefully listen to the sound at the next impact. When the part is in place as expected, the sound will be more sonorous.
We carry out a similar operation to change the large bearing. Next, we move on to installing a new oil seal. It must be treated with lubricant, only after that the oil seal can be placed in place. Experts advise using special lubricants designed for washing machines. However, such lubricants are not always available commercially. If you have not found a lubricant, you can use brand 24 lithol. This material is freely sold in automotive stores.
Stage seven - final
Now you can be congratulated, the main part of the work is completed. You have replaced the necessary element, it's time to return everything to its place. First of all, it is recommended to lubricate and install the sleeve in its place. Next, connect the halves of the container. In order for the tank not to lose its tightness after assembly, it is better to change the sealing ring. If you do not have one, treat the joined edges with silicone sealant and connect the container.
For many of us today, a washing machine is an integral part of housekeeping. The machine does a significant part of the work for us, giving us comfort and extra minutes of rest. However, in order for your machine not to fail at the most inopportune moment, it is recommended to carry out timely regular service maintenance. This will guarantee the long and trouble-free operation of your machine.


