Make a roof rack UAZ hunter. Video about the correct installation of the roof rack on the car. Main design requirements
Quite often, car owners are faced with a problem when there is not enough space in the cabin to carry large or oversized cargo. In this case, additional space is needed where various things, luggage, etc. can be folded. Today, the market offers many trunks that allow you to place a large amount of cargo on the roof of the car. However, there is one significant drawback - the cost, which not all drivers can afford. The way out of the situation can be a do-it-yourself car roof rack, which is done quite simply. All that is required of you is to purchase materials, acquire essential tool and get started. Such a device has many advantages:
- Creation of an additional place for the transportation of the necessary cargo.
- Protection of the roof of the car from damage.
- Basis for installation additional equipment(antenna, lights, etc.).
Moreover, for off-road lovers, a car roof rack is indispensable. It allows you to fix and transport various equipment (shovels, etc.). At the same time, it is impossible not to note the disadvantages of such a design. First of all, aerodynamics suffer from the installation of the trunk, which is the reason for an increase in fuel consumption by 1-2 liters. In some cases, calculation errors can cause increased controllability and the appearance of extraneous noise.
Materials used
Depending on the climate and conditions of use, it is necessary to choose the material for the manufacture of the trunk. Metal is considered the most suitable option. The main condition when choosing a material is the minimum weight, but at the same time it must be quite strong. If the structure is too heavy, then this will create a serious load on the roof of the car. Preference should be given to the following options:
- Aluminum.
- Stainless steel.
- profile pipe.
Aluminum is perfect for a roof rack, and for several reasons. Its main advantage is that it is lightweight. In addition, it does not rust and is resistant to corrosion. Finally, it is very easy to work with and can be formed into any shape that fits your car.
If the price of aluminum does not suit you, or for another reason you do not want to choose this material, then a profile pipe can become an alternative. As a rule, such a trunk is placed on domestic cars (SUVs such as Niva, Patriot, etc.). Finally, stainless steel is the most affordable option. The advantage of this material is that the steel is very flexible and strong. But there is also a minus - the weight of such a design will be much more than that of a trunk made of aluminum or a profile tube.
Manufacturing procedure
 Regardless of the material chosen, making a roof rack for your car can be quite simple and fast. All stages, as a rule, are standard and include the following actions:
- Calculating dimensions and creating a layout.
- Creation of the frame and its strengthening.
- Installation of load-bearing panels and work on the appearance.
- Creation of boards.
- Installation of the structure on the trunk.
Let's take a closer look at each of the stages. First you need to measure the width and length of the roof, then draw a sketch and calculate the number required material and his weight. Welding of the structure must begin from the outer perimeter, and then fix the load-bearing strips. A prerequisite is the reinforcement of the luggage compartment with longitudinal crosspieces.
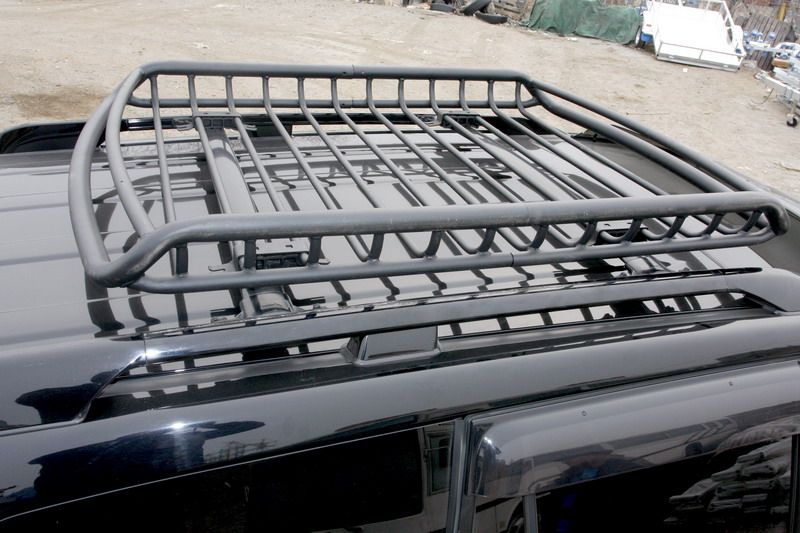
Go ahead. The resulting frame must be securely strengthened and fixed using a profile pipe or metal plates. This will give the trunk for the car reliability and integrity. In addition, it is necessary to pay attention to the appearance of the structure and make it attractive, suitable for the overall style. To do this, you can install a special arc from the profile, which will improve aerodynamics and streamlining. The installation of the arc must be carried out in the front, bending the edges and fixing by welding. By the way, it is also desirable to fix the jumpers to the arc.
After the arc is installed, you need to add the sides. The roof rack is ready and now you can start installing it. It is advisable to treat the structure with primer and paint, which will increase its durability and resistance to external influence.
Majority cars and even relatively roomy crossovers or jeeps cannot boast of too spacious trunk. As a rule, you can put only the most necessary things in it, and half the space is occupied by either a spare wheel or a set of tools, a jack and a tow rope. Installation additional trunk on the roof of the car significantly increases the usable volume, without causing damage to the appearance of the car. On the contrary, branded trunks look very stylish. However, they are quite expensive. But with a certain amount of dexterity and possession of certain skills, it is quite possible to make and install a trunk on the roof rails of a car with your own hands. How to do this and what is required for this will be discussed in this article.
The main purpose of the roof rack
It is quite obvious that the main function of this element, located on the roof, is to accommodate various items necessary for travel or everyday trips. 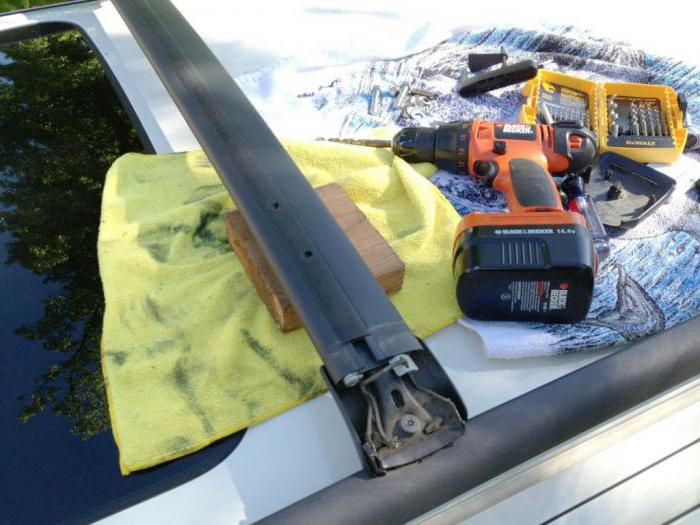 Unlike a regular compartment, a roof rack made with your own hands, or made in the factory, allows you to carry not only additional cargo. With the help of such a simple device as roof rails, with or without a wardrobe trunk attached to them, you can transport long objects (for example, skis) or bulky goods (bicycles, furniture, and so on).
Installing the trunk on the regular roof rails of the car
In cases where the car was originally equipped with longitudinal or transverse special external beams, installing the trunk on the roof rails with your own hands is quite simple. If we are talking about a factory-made design, then, as a rule, all the necessary fasteners and detailed instructions for installation. All that may be needed in these cases is an appropriate one and a screwdriver. 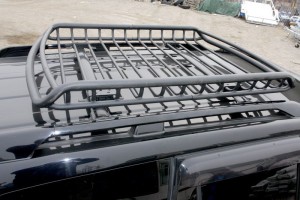 In addition, often a load or a special wardrobe trunk is attached to the rails without the need to use any tool at all - simply with the help of belts.
However, even if you make a roof rack with your own hands, the installation process will also not require any special equipment or tools. Since already in the manufacturing process it is necessary to provide for the presence of fastening structures.
Advantages of self-production
Many motorists tend not to buy this important car accessory, but to make it with their own hands. This solution provides the car owner with a number of obvious advantages:
- Possibility of choosing the optimal parameters. By making a car roof rack on its own, the car owner can choose its optimal physical dimensions that meet certain needs and requirements, as well as its geometric shape. This is important both from the point of view of maintaining the aerodynamic properties of the car, and from the point of view of the ability of the element to perform certain specific tasks. The photos of such structures speak quite eloquently about what variety a do-it-yourself roof rack can have.
- Substantial financial savings. As mentioned above, branded branded roof rails and wardrobe trunks for them are quite expensive. At self-manufacturing case, the car owner can choose cheaper materials and not use any expensive technology.
- Ideal compatibility of a luggage carrier with the concrete car. Who, if not the owner, best knows the features of his car? It is with their consideration that you can independently make such a trunk that will have ideal characteristics area or volume, as well as carrying capacity. And at the same time to have an aesthetic appearance that is fully consistent with the tastes of its owner.
Thus, the desire to make a trunk for roof rails with your own hands is understandable.  Moreover, this is a rather fascinating creative process.
The main requirements for them
In addition to the capacity parameters of the overroof element, it must comply with certain standards. They primarily concern the following aspects:
- Geometric dimensions. As a rule, the area of the trunk is dictated by a similar parameter of the roof of a particular car model. But many car owners manage to extend its edges beyond the perimeter of the roof. At the same time, it is very important to understand that such a solution can significantly change the position of the center of gravity of the machine and the characteristics of its stability.
- Strength. Even taking into account the fact that the trunk is based on metal structures, its carrying capacity is usually limited to 100-120 kg of load. An increase in this parameter is fraught with deformation of the car body, loss of the values of the machine's power characteristics and a decrease in the safety of operation and movement.
How to make your own roof rails
In those car models where standard roof rails are not provided for by factory assembly technology, you can install them on your own. This will require the following set of materials, tools and equipment:
- A set of special sidewalls that can be purchased at almost any auto parts store. The set of sidewalls consists of two pieces, so it is best to buy two of these sets.
- Metal profiled pipe. The selection of round pipes is quite common mistake. The rectangular profile provides much higher load stability. It is best to choose a pipe with a cross section of 15x15 mm and a wall thickness of 2 mm.
- Portable welding machine with necessary consumables.
- Roulette.
- Grid with cells 4x4 cm.
With such an arsenal, you can safely get to work.
Determining the dimensions of the trunk
The first step is to measure the length and width of the roof. The geometric dimensions of the future structure will largely depend on these indicators. It goes without saying that a do-it-yourself trunk for roof rails ("UAZ Patriot") made will be much larger than for example. Based on the measurement results, a profiled pipe is cut for the longitudinal and transverse trunk rails.
Cutting and welding
Crossbars for roof rails are sold in specialized automotive stores. 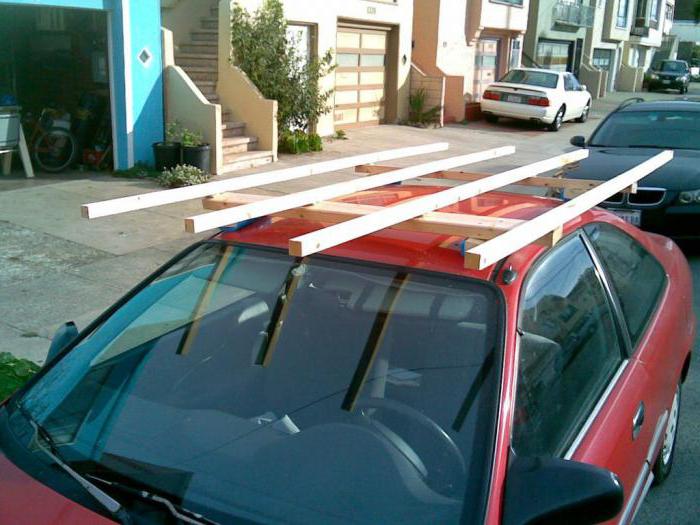 If it is not possible to find the crossbars of the desired length, they will need to be cut. A set of crossbars, as well as sidewalls, consists of two products. For weight distribution on 8 reference points It's best to buy two sets.
The crossbars are attached to the frame, consisting of the same and repeating the perimeter of the roof of a particular car, by welding. Thus, a lower base is obtained, which a do-it-yourself roof rack should have (VAZ-2111 or any other model).
After that, the upper platform is performed in exactly the same way. It is very important that both designs exactly match each other in size. It is most expedient to fasten the two halves of the trunk together using the same welding. It is important to clean the welds immediately after the metal has cooled.
Assembly of the structure
Now it remains only to fix the homemade structure on the roof of the car. ![]() For this, special cross members are used, which, in turn, are attached to the car body with bolts and nuts. It is best to use 4 of these crossbars - then the design will be strong, reliable and safe. It is by no means superfluous to use rubber, polyurethane or plastic gaskets at the points of attachment and junction of the trunk elements to the car body.
For this, special cross members are used, which, in turn, are attached to the car body with bolts and nuts. It is best to use 4 of these crossbars - then the design will be strong, reliable and safe. It is by no means superfluous to use rubber, polyurethane or plastic gaskets at the points of attachment and junction of the trunk elements to the car body.
Finishing work
After fixing the homemade element, it must be painted. 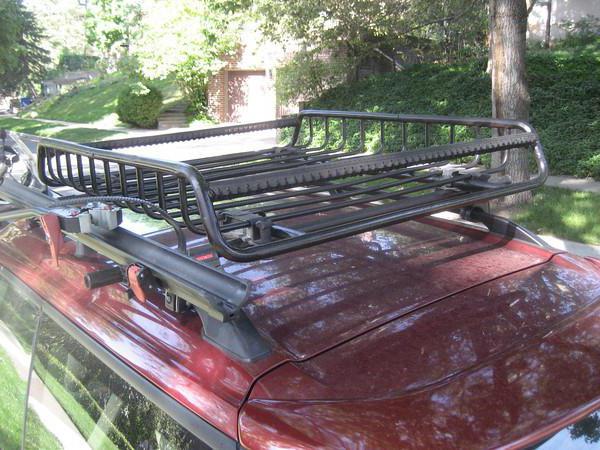 This is necessary not only to make the roof rack look more aesthetically pleasing, but also to extend its service life. At the bottom of the lower part of the device, it is best to lay a grid with a mesh width of approximately 4x4 cm. This will make it easy to get rid of snow in winter and fallen leaves in autumn.
Thus, creating a trunk on rails on your own is a rather laborious, but not so difficult process. In return, it provides a solution to many problems. For example, a do-it-yourself expedition roof rack for roof rails allows you to take everything you need with you on long journeys and tourist trips without any problems. 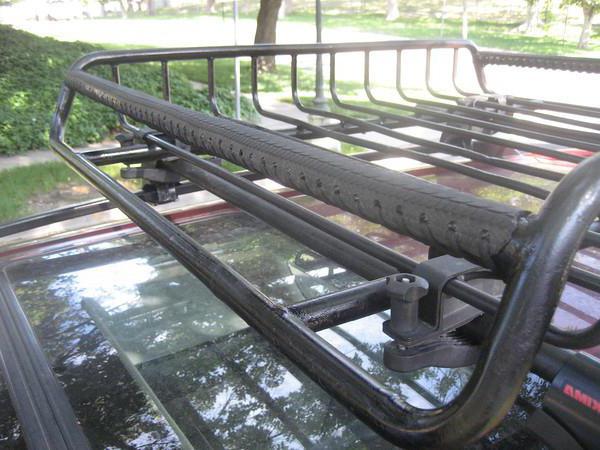 A self-made element allows you to transport bicycles, skis, building materials, large and oversized cargo without the need for additional security measures.
It is unlikely that any of the motorists will not refuse an additional luggage compartment, especially if it is possible to place large-sized and inconvenient things for transportation inside the car on it. Various overhead structures, numerous options for which are presented on the shelves in stores, do an excellent job with this problem. Everything suits, except for the numbers indicated on the price tag. Therefore, many car owners are thinking about whether it is possible to make an expedition trunk with their own hands. One of the solutions to the problem is described in this article.
Algorithm for the process of manufacturing a removable structure.
1. Preparatory work
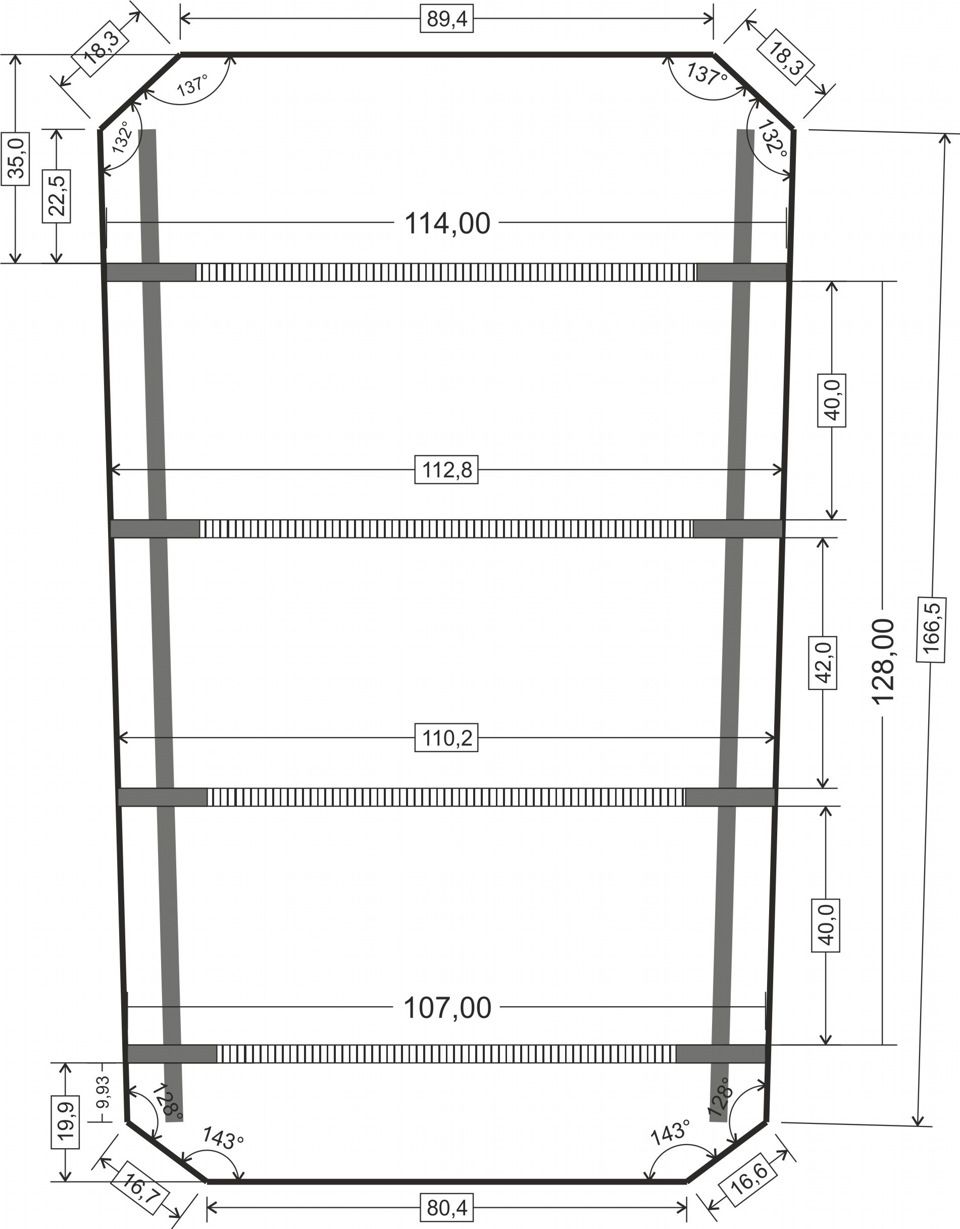
Depending on the model of the machine, measure the size of the roof and determine the location of future supports. After determining the parameters, you need to decide on the future design. You should immediately consider the attachment points to the roof of the car, calculate the weight of the frame and components. At the end of preparation, the drawing of the platform is compared with the data given in the technical specifications for the vehicle.
As an example, the calculation of a do-it-yourself expedition trunk for Niva is given. Overall size of the platform: 1500 x 1230 mm.
2. Manufacturing of the supporting frame
 Racks are cut from the pond according to the dimensions of width and length. A rectangle is welded from them. In front and behind (opposite the opposite points of attachment of the structure to the rails), ponds are fixed in the middle of the frame.
To prevent deflection of the platform under load, 2-3 more stiffening ribs made of profile metal are added to the free inner plane - at equal distances. At this stage of work, a lattice frame with a number of parallel jumpers is obtained.
Continue strengthening the frame structure with small sections of the profile pipe. They are cut in advance in such a way that cells close to a square shape are formed inside.
3. Improving the aerodynamic qualities of the structure
In order to create conditions for better sliding of air flows, an additional structure in the form of a trapezoid is welded to the front of the do-it-yourself expedition trunk.
Base size geometric figure equal to the width of the manufactured platform. The smaller part of the trapezoid is chosen arbitrarily. Recommended angles of inclination of faces: 30-45 degrees.
At each of the two fold points, sectors are selected using a grinder (or other separating tool). This should be done in such a way that a jumper of 5-7 mm remains until the end of the profile. Further, the structure is heated and bent in such a way that a trapezoid is obtained. The places of contact of the material in the corners are treated with electric gas welding and firmly connected to the platform. To strengthen the frame, 2-3 short jumpers are installed from the side of the trapezoid.
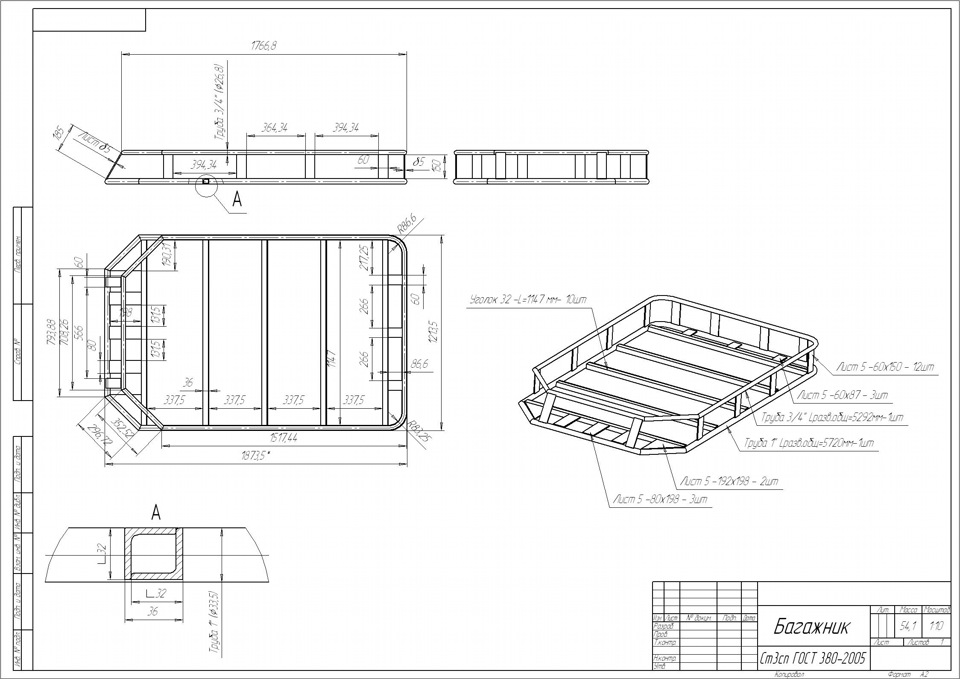
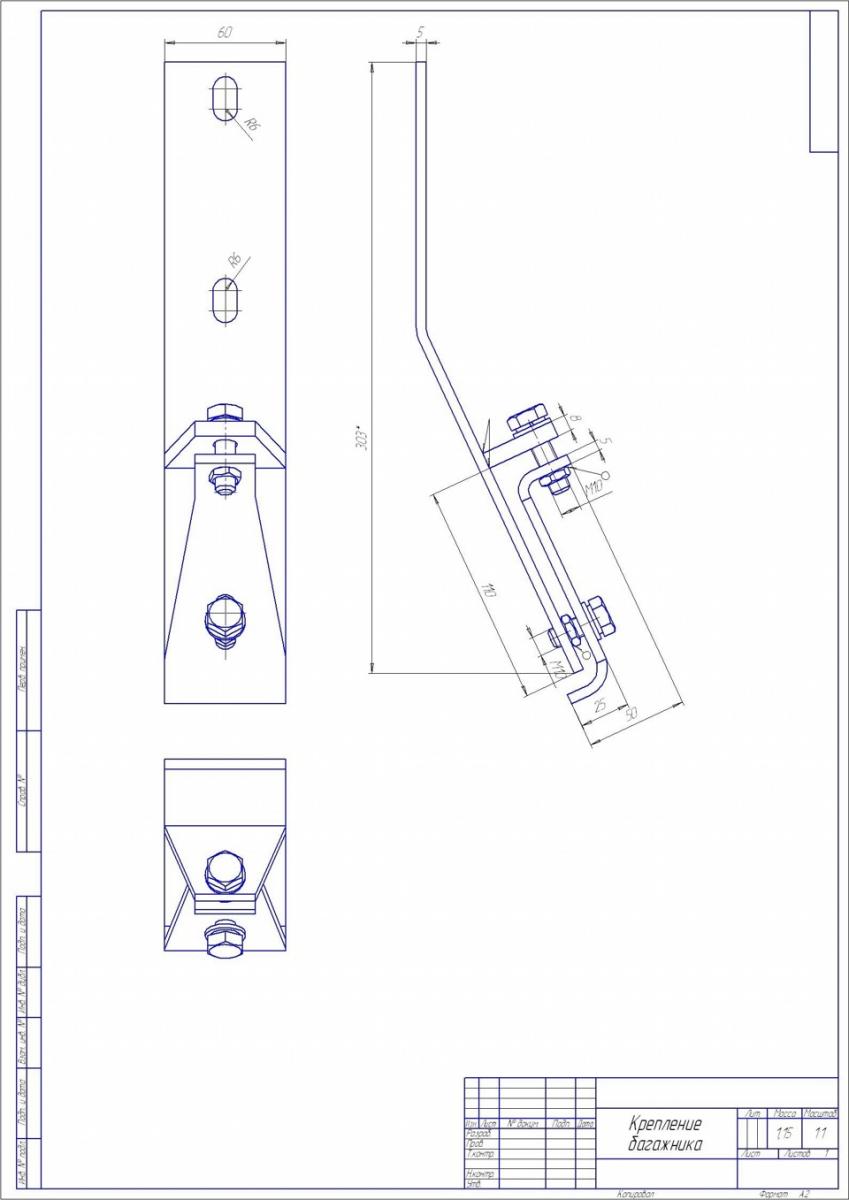
Drawings of the expeditionary trunk and mounts.
4. Manufacture of boards and fastening to the main frame
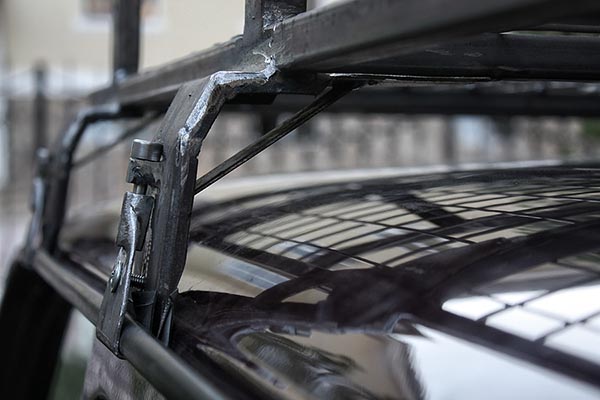
Holes are drilled in the places marked for the supports. In order to prevent cases of weakening of the structure, they are strengthened with bushings. They are threaded into drilled grooves and firmly welded at the docking points with a metal base.
To fix the studs in the profile, drill 2 grooves with a diameter of 8 mm. A pin is inserted into each and the diameter is processed by electric welding. The liner is cut to the required length and secured by threading.
Two side rails, having the shape of a trapezoid, are made according to the same principle as described in paragraph No. 3. The wider part of the structure is the side that is attached to the platform. It is necessary to ensure that the angle of inclination of the trapezoid at the right and left sidewalls was the same.
Manufacture of the front and rear crossbars of the supports. In order to make jumpers at both ends of the crossbar, segments of studs are welded to the structure. In the place where the sidewall supports come off - at the obtuse angle of the trapezoid - a sleeve is attached. The ends of the studs are threaded into bushings and additionally processed by welding.
If you want to supplement the design with fasteners for hijack, fog lights, shovels, antennas and other goods that are so necessary on the road, you can buy ready-made elements (or make them according to your own projects), and then mount them on the frame.
5. Giving a presentable appearance to a do-it-yourself expedition trunk
The platform is cleaned of scale, burrs are removed, degreased, primed. Withstand at least a day, so that the composition dries out, and then the surface is covered with a layer of paint or enamel.
This completes the manufacture of a removable expeditionary trunk with your own hands. The structure remains to be fixed on the roof of the car by means of roof rails.
Do not be afraid to try: to make an expedition trunk with your own hands is within the power of everyone!
Many drivers are faced with the problem that it is not always possible to carry everything they need due to the limited space of the car. Moreover, if it is a large and oversized cargo, then it is generally impossible to place it in the cabin. The way out of the situation can be a roof rack with your own hands.
To date, there are a large number of different ready-made options in stores, but their cost is quite high. If you do not want to spend extra money and are willing to devote a little of your time and effort, then making a roof rack can be quite simple. This will require a certain set of tools and materials, and we will describe the process of constructing the structure and its features in our article. Thus, you can completely solve the problem of lack of space for transporting things or goods.
Pros and cons of a roof rack
The roof rack has a lot of advantages. The most basic thing that emerges from its tasks is the creation of additional space for the transportation of some goods and things. In addition, the trunk can protect the car from damage to its upper part, and also serve as the basis for installing additional lights or an antenna. For off-road riders, the trunk can come in handy for securing a shovel and other tools. All in all, this is a very useful tool.
Of course, there are also significant downsides. Firstly, the structure on the roof impairs aerodynamics slightly, which in turn leads to an increase in fuel consumption of up to 1 liter. Secondly, if even minor errors were made in the calculations or in the manufacture, then the sound insulation may deteriorate, and in some cases the controllability.
Trunk material
First of all, after you decide to make your own trunk for your car, you will need to choose the source material. As a rule, metal is considered the best option. However, in this case, it is necessary to find a material that will have a small weight, but at the same time have the highest strength.
These requirements are perfect for:
- Aluminum;
- Profile tube;
- Stainless steel.
Aluminum is probably the most suitable option for several reasons. First, it is very lightweight. Secondly, it is resistant to external influences and does not lend itself to the negative effects of corrosion. Thirdly, it is very easy to work with it and form the necessary structures.
An alternative to aluminum is a profile tube with a thin wall. In most cases, domestic-made SUVs (UAZ Patriot, Lada Niva 4 × 4) are equipped with a roof rack made of this material. The cheapest option for a car is a stainless steel trunk. The sheets are very strong yet flexible. However, a significant disadvantage of this type of material is its weight - it is much larger than that of a profile tube or aluminum.
Structural measurements
When you have decided on the type of material that you will use for the trunk, then you need to move on to performing measurements and calculations. Thus, you can clearly determine the weight of the future product, approximate price and, of course, how much and what you need when building a trunk for a car.
 It is necessary first of all to determine such indicators as the length and width of the entire roof. Moreover, you can even create a project in the form of a plan and drawings, which will include:
- Carrier panel (direct trunk, or rather its bottom);
- frame;
- Jumpers (special amplifiers for the structure);
- Board.
In addition, one can come up with various additional details at your discretion. For example, it may be a special pad on the front of the trunk, which will prevent the occurrence of strong resistance to oncoming air.
Manufacturing process
So, the materials have been bought, the plan and the project have been made, which means that half of the way has been completed. Now you need to proceed to the most important thing - the direct construction of the trunk for the car. So, the process of its construction is carried out in the following way:
- We cut the metal into the necessary segments according to pre-prepared schemes using a grinder;
- Using a welding machine, we form the perimeter of the future structure, taking into account the dimensions of your car;
- To strengthen and increase the reliability of the product, it is necessary to additionally weld longitudinal jumpers, which can still be fastened together (you will get a kind of lattice - the bottom of the trunk);
- We weld an arc to the front of the structure, which will serve to improve aerodynamic performance and reduce air resistance, as well as to create a more attractive appearance;
- We create boards by cutting small metal plates 6 centimeters high (as a rule, they are made removable, that is, they are installed on the thread, holes are drilled and bushings are placed, and not welded to the main structure);
- We weld the racks and the top rails so that the shape of the trunk blends harmoniously with the car, and does not look like a metal box.
That's all, the roof rack for the car is ready. However, the work does not end there, as it still needs to be painted and installed. Before painting, treat the surface with a primer and leave it for a while to dry. After that, you can apply paint. It is advisable to use a regular spray can, as it allows you to achieve good durability and does not create streaks.
When it comes to attaching a roof rack, there are several options and it all depends on your car. For example, on some machines there are special recesses that will serve as a mounting point, which is very convenient. Other models do not have special places, so you have to drill the roof and install the structure using special fasteners. By the way, if your car has roof rails, they can serve as the basis for installing the product, since its weight is small. Today, there are many different types of mounts on the market that will allow you to avoid the process of creating holes in the car roof.
H We are often asked what is the cheapest roof rack solution? Since we only trade in new products, the answer is naturally Boxes from the Iago Company and PT Group or starter models from Atlant or Thule. There is another solution to this issue - a do-it-yourself car roof rack!
But let's make a reservation right away that such a solution has many pitfalls, the main one of which, of course, is your safety. The main value of the top solutions among car trunks is the convenience and use and safety. Few people think about how much load is placed on the trunk of a car while driving at high speed and what can happen to the load if suddenly the fasteners or the design of the trunk itself fail. On the Internet you can find many videos showing what happens even with factory roof racks and roof boxes not to mention the creations collected in his own garage. Below we offer you to get acquainted with a series of videos, which show the "crash tests" of popular autoboxes, roof racks and mounts on the roof and towbar.
As you can see, these are not jokes at all, the consequences can be very serious - ranging from damage to the cargo and ending up with injuries to the driver or passengers. This ends the introductory note and move on to the main topic.
What are the types of roof racks with your own hands?
Let's first define what a roof rack is, as many people confuse 4 completely different accessories for a car, calling it a roof rack. These four auto accessories include the following items: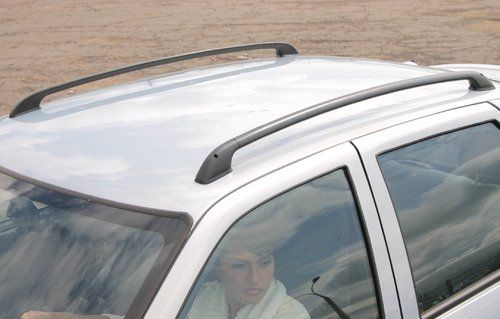
- cargo baskets
- Luggage systems (cross and supports)
- Car roof boxes
- Mounts (ski, for bicycles and for boats)
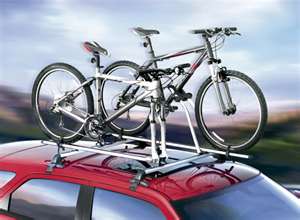
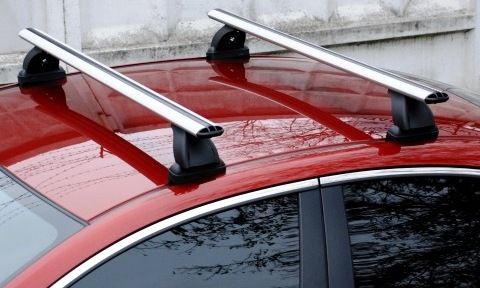
All of the above accessories different people are called roof racks, which on the one hand is true, but on the other hand is misleading both others and sellers. From our point of view, it is luggage systems (crossbars and supports) that should be called a roof rack, and roof rails, bike and ski bindings, as well as autoboxes and baskets should be singled out in separate clusters.
Do-it-yourself luggage systems in the form in which they exist today are quite difficult to reproduce at home, as this is a complex mechanism consisting of dozens of component parts, all of whose components have their own task and are aimed at enhancing reliability, durability and ease of use. That is why we can say for sure - to create a full-fledged luggage system with your own hands impossible!
But in addition to complex trunks, there are simpler analogues, for example - car roof rack on roof rails, an auto accessory that is installed on the integrated or high roof rails of your car. Modern models look like this:
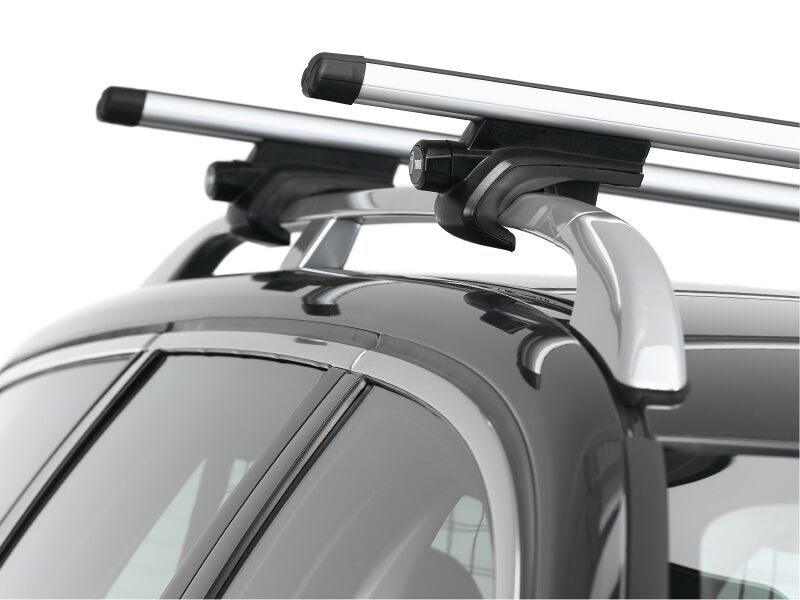
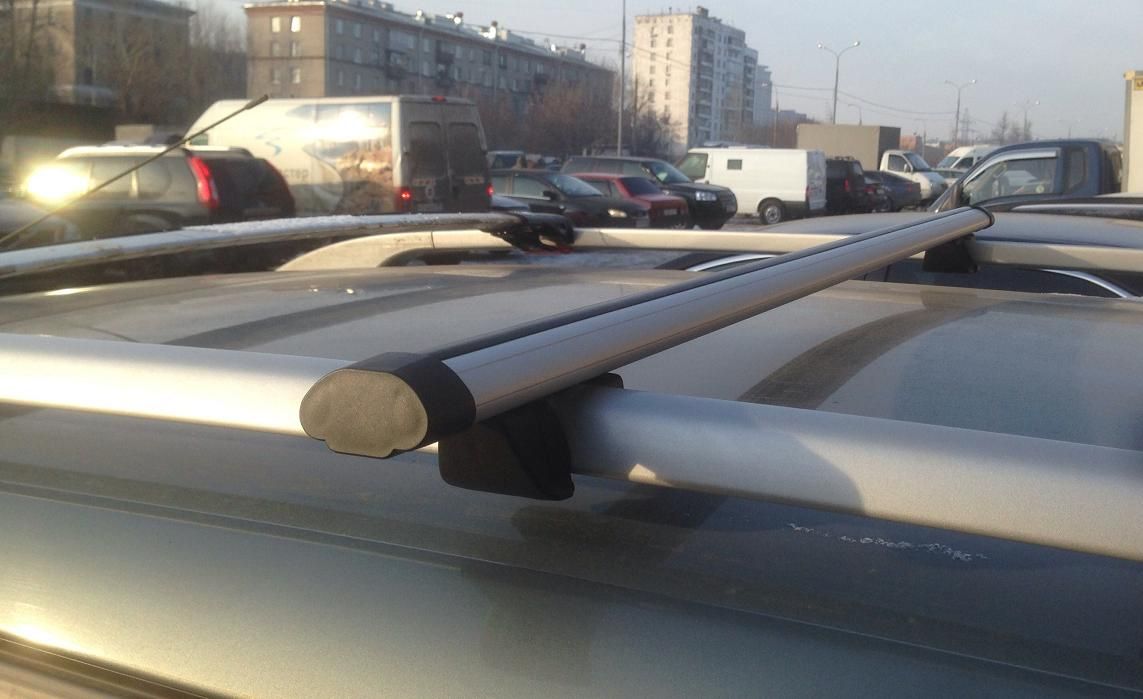
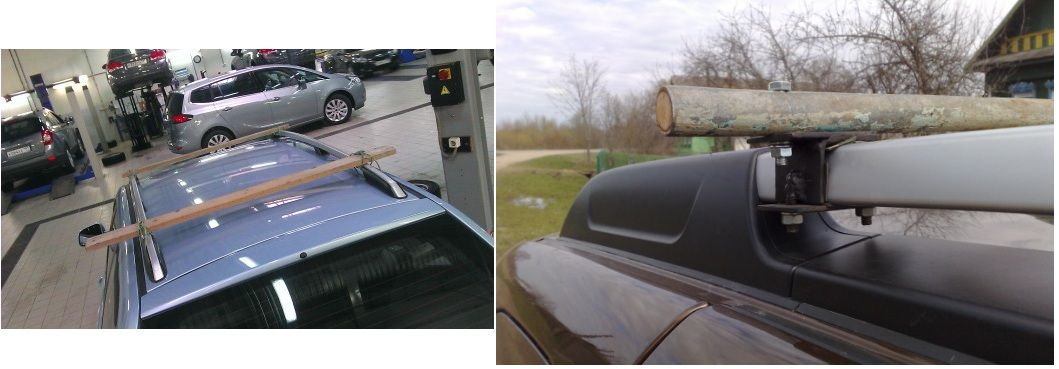
This is the simplest and most budget option that will suit you only if you are going to transport a not very heavy load over a short distance. The next on the list we have such a type of trunk as a cargo basket, which also come in two types - wooden and metal.
How to make a car roof rack with your own hands?
Let's take a closer look at what two implementations of a homemade roof rack are.- Homemade metal luggage basket for roof rails
- Homemade wooden basket on the roof of the car
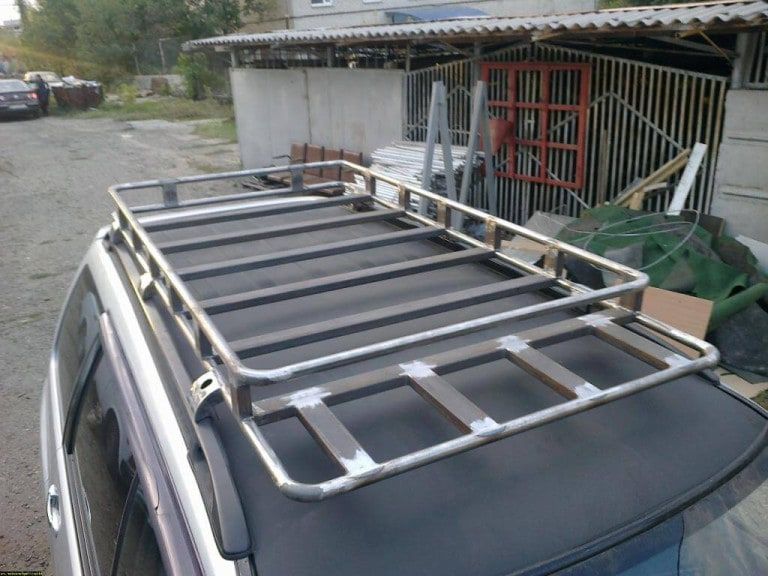
A difficult to implement, but quite reliable option is to make your own luggage basket from stainless steel or any other suitable material. Also, for implementation, drawings or the ability to take measurements yourself are required, as well as the appropriate tool - a welding machine, or something else that can fasten the basket nodes into a solid structure.
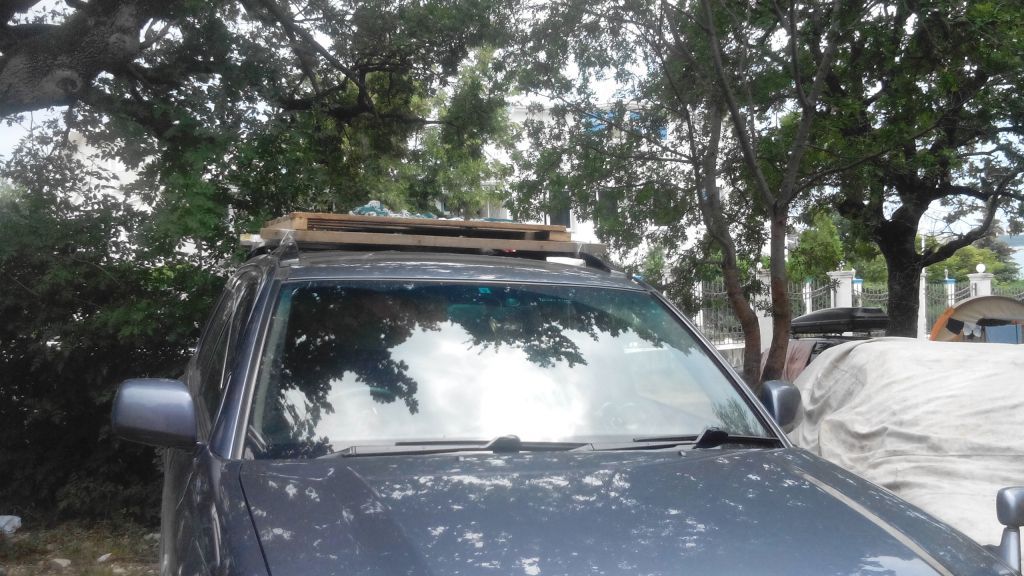
A wooden basket on the roof is a much simpler option - since it is much easier to handle and fasten the boards than metal, and also much cheaper. The trunk is assembled from boards and attached to the roof rails with bundles, clamps or wire. This option carries much more risks due to its extreme unreliability. Use at your own risk!

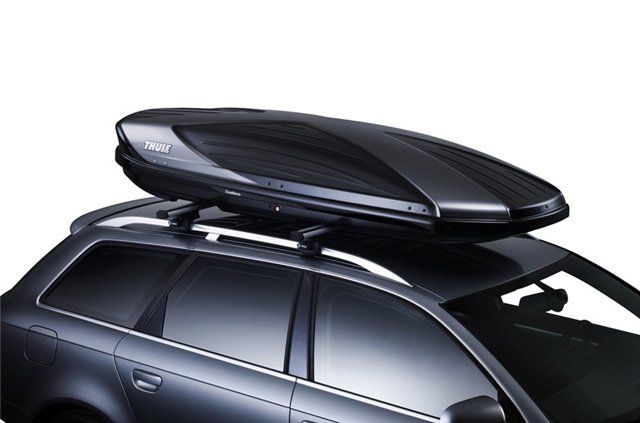
But let's leave the topic of baskets and return to autoboxes, yet the vast majority of people still believe that a roof rack is exactly an autobox 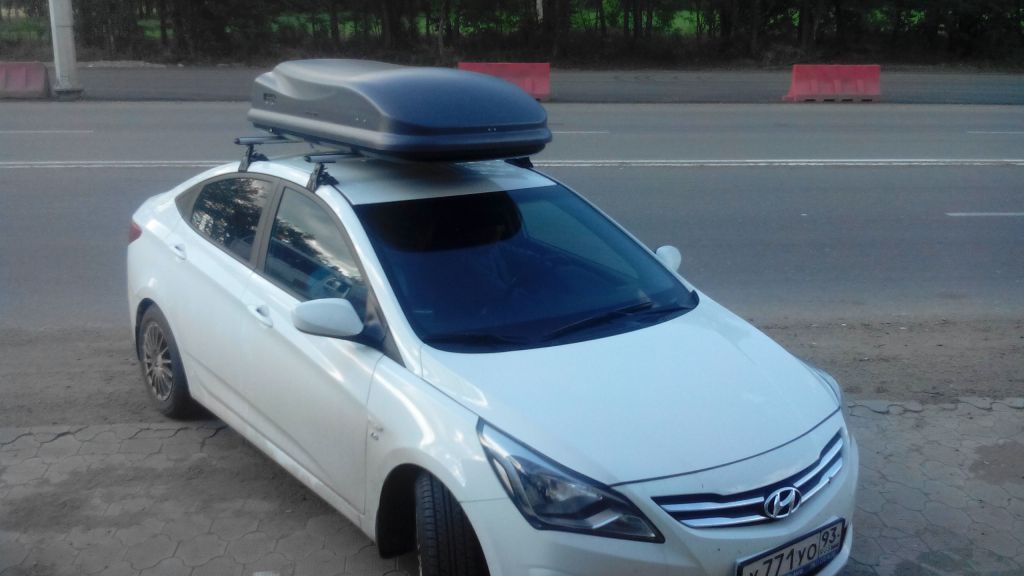

![]()
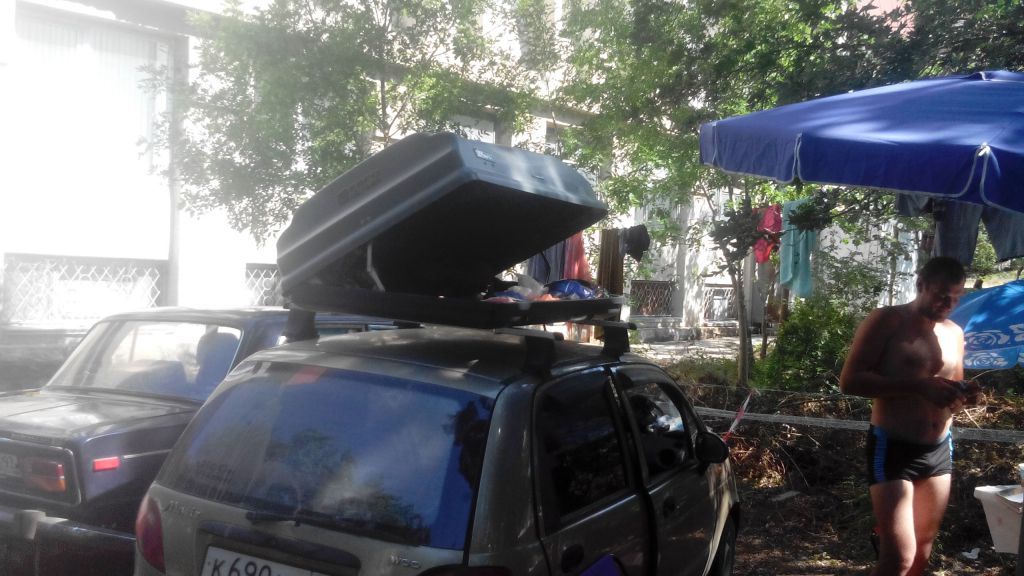
But this is not so, this auto accessory is called a luggage box and is a separate niche in which there are many varieties and characteristics that you can talk about. Also, although at first glance, the autobox looks simple, but in reality it is also a very high-tech device that uses the entire spectrum modern technologies. But even in this area, Russian ingenuity was able to prove itself: 
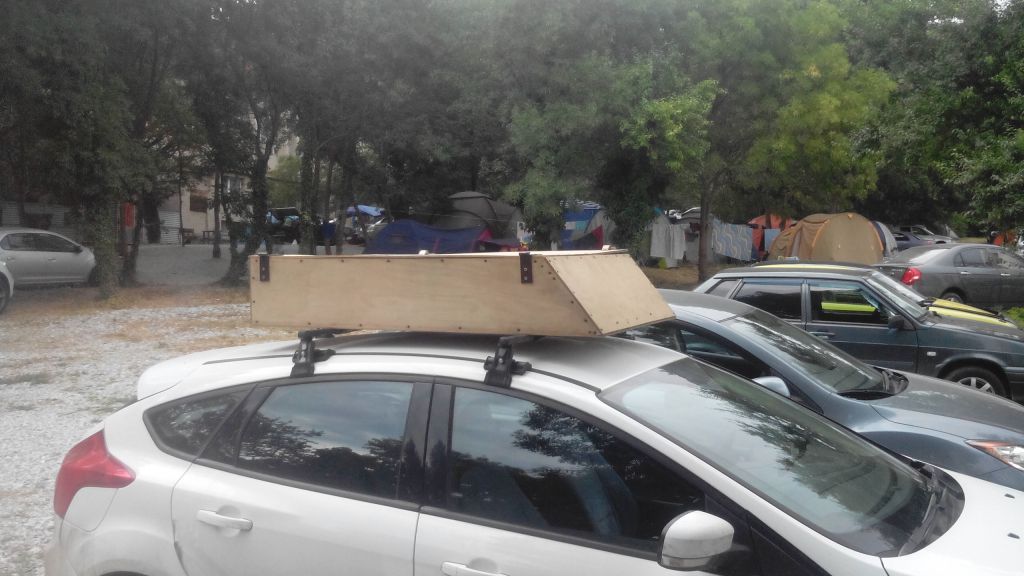
How do you like this miracle? Wooden, self-made autobox on the roof of the car - Cheap and cheerful! Made of plywood and nails, the design looks quite interesting, but not very reliable. Unfortunately, we do not yet have drawings of a miracle, but as soon as we find it, we will definitely post it in the same article.
Also on the network, there is a very interesting video, the preview of which you could already see at the beginning of the article:
Looks very interesting! But don't forget the crash test videos that you might have seen at the very beginning. If a factory product is torn apart when overloaded, what will happen to such a "cupboard" located on the roof of your car?
Which is better - a roof rack with your own hands or a factory roof rack?
We at the Senator store still believe that it is worth stopping at a reliable factory roof rack. With it, you can be sure that the cargo fixed to the roof will not go anywhere and your car will not be damaged if something suddenly falls off or unscrews. Also, when using do-it-yourself roof racks, you will not be able to get the ease and convenience that ready-made, factory solutions provide. But the final choice is of course yours.If you decide to stay on a European or European roof rack Russian production then welcome to our . There you can choose a luggage system for your car, exactly for your needs and at a very attractive price!


