Pencil sketches of animals and people. Tips for drawing quick sketches from life by Brenda Hoddinott How to start sketching
The biggest problems appear when we need to create an accurate sketch in a small amount of time ( moving person, animal). Therefore, it is worth showing the most important thing and not thinking a lot in the process of work. People are built almost all the same, and animals too. And we need to depict only the main points and discard unnecessary details.
Of course, we are much more interesting movement figure or body, her dynamism, rather than the image on her blouse. Otherwise, we would draw her herself. That's why the basis of the sketches is the line of motion, with which everything practically begins and to which all our work with a drawing strives.
When we sketch, draw small parts it’s not worth it, you just need to quickly set the movement and the proportional ratio of the body, its characteristic silhouette. This is how the capacity for holistic vision develops.
Drawing according to the scheme- so that we can quickly show the object, we need to know why and how it was made, where and why there is something in it. Therefore, we need to disassemble the object into its main components.
Animal sketches

Exercise
I offer you an exercise. Take the image of our hero in any position, build according to the system:
1. Main axis
2. Axis of movement of the object (here it should be noted that reference point and the center of gravity should be level with the c-axis - unless of course the figure is standing), in most cases - the leg and spine.
3. We make a three-dimensional, linear-spatial construction of the body. We outline the skeleton, arms, legs with lines with circles - we build elms, draw volume with circles in the places we need.
Human outline


Sketch types
There are 2 types of sketches: tonal and linear. If you will be drawing linear sketches, you need to stick to only one type. Practice shows that this is very inconvenient. Sometimes it is better to combine: first depict a person with a blot, and then with a line. And often nature needs a combination of these two types.
The technique in these types of sketches is different from each other, and they require different materials. Linear sketches are more typical of conveying the movement of an object with several lines. Such sketches can be drawn with pencils, helium pens, felt-tip pens (as you like) and everything that you can draw a line with.


And with tone, everything is much more complicated. The background contrast generates an edge that replaces the line. And there are a lot more materials. Suitable soft material such as: charcoal, chalk, markers, ink, pastel and even a brush. I liked drawing a sketch with ink even more than with other materials.


What steps are needed to properly sketch?
1. We teach, analyze nature, choose the angle, pose.
2. We come up with the ratio of our sketches on paper. All layouts that we will depict on a sheet should always either look in our direction or look in the center. You need to start work from the top left corner of the paper.

3. Sketch of a person. The entire body shape must be outlined sequentially: first place for the head and its size, then extend the line to the heels. With just one line, we outline the shape of a person in motion. Then we refine the contour of the model and mark the legs. In our drawing, we will apply a full fill, this is not at all necessary, it is just useful to show the drawing in two tones.


4. Sketches of animals. The shape of the body as a whole is outlined in the following order: first the torso and then the legs. Then, with one line or a blot, we draw the movement of the entire body. Next, refine the contour of the body and the location of the legs. The head is drawn at the very end. To set the head size - extend the line of the ridge from the shoulder blade to the end of the nose. It is possible not to draw a closed contour line, but in other cases it may disappear completely.

Careful mastering of all the lessons of this course will help you take the first steps in studying human anatomy and proportions, teach draw people from life and from your imagination, in various poses and in motion, naked and in clothes.
The first lesson is a preparation for the actual study of the figure, and also lays the foundation for the structure of further work. Practical exercise at the end of the lesson will be of particular value to you as an artist when creating a model of a person and in preparing preliminary sketches, sketches, thinking of ideas, suggestions, actions and poses where the figure is to be drawn without the use of models or copying. I highly recommend give him the most close attention , and by no means skip it.
We draw a person from nature
In order to draw something well from memory or from your imagination, you must first build up a stock of basic knowledge on the subject. It is best to start drawing from nature. By constantly observing those around you, you can easily and quickly learn a lot of information about proportions, shape and structure, and in the process you will also develop your drawing skills. No amount of information gleaned from textbooks on drawing a person cannot serve as a substitute for this valuable exercise.
You must learn information not only about the shape and structure of the body, but also gain a deep knowledge of how people stand, sit, and move if you want them to be convincing on paper. For this reason, you must always use a sketchbook.
sketchbook
Just like a writer needs notebook For short notes thoughts, and an athlete must exercise regularly to be in great shape, the artist needs an album or sketchbook to constantly hone your skills and visual memory. Your sketchbook should always be with you, so choose the optimal size for yourself and carry it in your bag or backpack with with a simple pencil. It is not necessary to buy an expensive sketchbook, because. you will have to do a lot of sketches and notes, and you will not even notice how quickly it will end. Buy something simpler so you don't have to worry about the cost. Sketchbook catalog from web-paint.
The best place to start probably at home. Your family members are ideal sitters because they are easily available and often don't do much. vigorous activity such as reading or watching TV.
 In order to keep your "models" ready to pose, it's best not to spend too much time on each drawing. Each sketch must be done no more than 10 minutes. It has great importance, because At this stage, quantity is important, not quality. You will quickly learn how to capture the essence of a pose or character in a few strokes and your work will be very realistic.
After doing a few sketches in a familiar environment, you will soon feel confident enough to take your sketchbook outside. Find a suitable secluded spot for yourself where no one will disturb you and try to make some sketches.
You should get into the habit of drawing all the time. Whenever you have a free minute, take out a sketchbook and sketch the people around you: standing at the bus stop, sitting in a cafe or at work is a good opportunity to sketch people nearby. A pencil or ballpoint pen is ideal as a tool.
 Use only one side of the paper. There are three reasons for this. First, cheap paper shows through, so the lines you draw on one side can affect the quality of your work on the other. Secondly, even if you use paper good quality, the pencil drawings on the back pages will rub off the roughness and spoil each other. The third reason for using only one side is that in due course you can take apart your sketchbook page by page and compare one work with another to check your progress.
At first, you will have no more than a tilt of the head or a turn of the shoulders before the subject starts to move. This is normal: everything you do contributes to the growth of your knowledge of the human figure. These details may not seem very valuable, but they are. If you are able to portray an untidy look young man hunched over in front of a bus stop or a tired old woman burdened with shopping, your work will have authenticity, because the essence of character lies precisely in the subtlety of such details. You will be surprised how easy it is to notice and how it will be appreciated by everyone who sees your work.
 Your sketchbook should serve as your personal document. In fact, many artists also take notes in it and add comments to sketches, thereby increasing their usefulness later, especially if the sketch is to be used as the basis for a finished drawing.
Do not strive for neat, well-groomed drawings, artistically arranged on the page. Your album is not for that. Now your goal — capture character and the position of the selected object within a few minutes. Pick someone who is likely to stay in the same position for a while longer and get to work. Do not be shy. Do not try to make attractive lines, this exercise is to quickly capture the moment. Your sketches should be a real pleasure to see and sketch the life around you, as well as help you develop a sharp eye and a confident stroke.
If you've never tried sketching, you might think it's hard work, but it's not. This is the most enjoyable and most rewarding activity. It relaxes and invigorates, and is also a means of improving drawing skills.
 Always keep a sketchbook with you, wherever you are. This is so important that I won't get tired of repeating it. Draw people waiting on a train platform, or people sitting on a park bench, or your family members watching TV. In bars, restaurants, cafes and on the street you can see people of various sizes and builds. Mark them in your scrapbook and you will never regret it. Sketching is not only fun, it's also the best way expand your knowledge and abilities. If you want to create living realistic works, this should become a habit. Sometimes it is worth including the background and surrounding details in the sketch. It could be surrounding trees or buildings. When you start drawing from your head, this experience will be very valuable.
 As we progress through the course, we will periodically return to this topic, drawing sketches from life. Without this exercise, your powers of observation and your drawings from memory will gradually deteriorate until they are little more than a series of clichés.
Practical task
Make at least 20-30 sketches different people in different environments. I do not recommend going to next lesson until you complete this task. This exercise should become your regular daily workout.
The article used materials from the book Ron Tiner "Figure Drawing without a model".
Video lesson of drawing with markers "Tangerine mood" Video lesson of drawing with markers "Tangerine mood". Artist-teacher: Irina Shelmenko Irina is an artist, illustrator and sketcher. Graduated with honors from the Moscow State University for the Humanities "Artistic and graphic" faculty. owns various materials such as watercolor, acrylic, oil, pastel, etc. But now her favorite material is alcohol markers. Currently draws and leads projects in the direction of sketching and illustration. In this video lesson on drawing with markers, Irina invites you to learn how to draw with markers, clean a few tangerines with her and draw a winter New Year illustration with them! ✔ Draw with alcohol markers; ✔ Work with the form and depict and see a glare, light, semitone, own shadow, reflex, drop shadow; ✔ Achieve realism in the subject; ✔ Draw from nature and work with nature; ✔ Compose a composition and reference for a sketch illustration. ✔ Detail the image ✔ Draw citrus peel texture and leaf texture ✔ How to draw with alcohol markers ✔ How to draw from nature ✔ How to create compositional sketches future work✔ How to make your illustration/painting realistic ✔ How to draw citrus peel texture and leaf texture ✔ How to make gradients with markers The result of the video lesson will be winter new year illustration with tangerines - a great idea for any New Year's card! Duration of the video lesson: 2 hours 13 minutes For comfortable learning, make sure you have the following art materials: ✔ MARKERS Alcohol markers from any manufacturer. Irina uses Copic alcohol markers in the following colors: - Copic Y11, Y13, Y15, Y18, Y35, Y23 (yellow) - Copic YR12 (orange) - Copic E11, E43 (beige-brown) - Copic G20, G24, BG99, G94, YG93 (green) - Copic W2, W5, W7 (taupe) - Copic C0, C2, N2, N4, C6 (grey) ✔ LINERS AND pens - Liner 0.1 mm and 0.5 mm, black, waterproof - White gel pen - White watercolor pencil - White pastel pencil - Dark brown colored pencil You can use any other similar media. ✔ SKETCHBOOK FOR MARKERS You can use any marker paper or a sketchbook with special marker paper.?supply=548||a]Doodle&Sketch Sketchbook[||a||], size 14x28 cm, with 200g paper. ✔ PENCIL AND ERASER Any. The video tutorial on drawing with markers will be interesting for both beginner and advanced illustrators. You can find all video lessons from ArtProfessor Irina Shelmenko on her personal page below.
Gather the right materials. As with any art form, it's hard to sketch with poor quality (or inappropriate) materials. Everything you need can be easily found in local art and craft stores. Spend some money and collect everything you need, including:
- Pencils H. These are the most hard pencils, which are used to sketch thin, straight, non-feathered lines. They are mainly used in architectural and business sketches. Assemble an assortment of 6H, 4H and 2H pencils (6 is the hardest, 2 is the softest).
- Pencils B. These are the most soft pencils, which are used to create smudging and feathering lines and for applying shadows. They are preferred by most artists. Assemble an assortment of 6B, 4B and 2B pencils (6 is the softest, 2 is the hardest).
- Paper for drawing with a pencil. Pencil sketching on regular printer paper is possible, but the paper is very thin and does not hold the pencil very well. Use special art paper that has texture and is best for sketching and also looks good when finished.
Select a drawing object. For beginners, it is easiest to draw from life or from an image than to use your imagination to create your drawing. Find a picture of something you like, or look for an object or person you want to draw. Take a few minutes to study the subject before you start sketching. Pay attention to the following things:
- Find a light source. Determining the main light source will allow you to understand where the sketch should be the lightest and where the darkest.
- Pay attention to movement. Whether it's the movement of a live model or movement in an image, motion detection will allow you to determine the direction of movement and the shape of your strokes in your sketch.
- Pay attention to basic shapes. All items are built from a combination of basic shapes (squares, circles, triangles, etc.). See what shapes underlie your subject and sketch those first.
Don't press too hard on the pencil. The sketch is only a preparation of the drawing. Therefore, you must comply with it. light hand and lots of short, quick strokes. This will make it easier to test various ways drawing a specific object, and will also give you the ability to easily erase mistakes.
Try to draw with gestures. Gesture drawing is a form of sketching where you use long strokes and connected lines to draw an object, even against paper. Although it seems complicated, this technique can help in defining the basic shapes of an object and provide a good basis for the final drawing. To draw with gestures, simply look at the object and move the pencil along the paper accordingly. If possible, avoid lifting the pencil from the sheet and use overlapping lines. Then you will return to your sheet and erase the extra lines to make the sketch perfect.
- This is a great practice for sketching like a sketch.
Hello! IN Lately I just can’t sit down to shoot the next video lessons, and even more so video courses, but I still try to draw regularly. It is clear that with a high load, there is no time left for large masterpieces. But this is not a reason to completely abandon the creative component of life. In such a period, the art of sketching comes to the rescue or quick sketches. If you have only 10-30 minutes a day free, then they are quite enough to devote to quick sketches, thereby not only maintaining your drawing skill, but also improving your view of things, the confidence of strokes and lines.
In this article, I will talk about some services that allow you to sketch more efficiently. Let me remind you that main idea sketching - for very a short time to depict on paper the main idea, the concept of the drawing, so that this idea is clear to any viewer. At the same time, the time limit plays a very important role - the artist begins to look at the object of drawing differently, highlights only character traits and features of the object. In sketching, the individual traits of the artist himself, including emotions, can be very clearly manifested. the drawing is done quickly, vividly, with the desire to convey the image of the object as quickly as possible.
I decided to try my hand at the art of sketching and now I know for sure that I will not give up this business, because. I see a lot of useful things for myself in this process, especially in the direction of development creativity. For the experiment, I used one of the foreign services quick poses, where photos of models are provided free of charge for sketching for a while. I will return to this site a little later, but for now let's look at others:
characterdesigns.com
This resource, in addition to information about the development of the character, offers a whole set of photosets that can be used as reference for sketches. There is no time limit here, as well as options for selecting objects. The principle is simple - choose a set of photos opposite " Choose a photoset:"and press the button . Next, choose your favorite photo and draw a sketch. This is the simplest option and essentially only provides you with photos. You have to control the drawing time yourself, which is a big minus.
reference.sketchdaily.net
An excellent service with a tool for submitting references on various topics with the ability to select a time interval. By clicking on the link, you can choose what you want to draw - the full body (Full Body), body parts (Body Parts) or animals (Animals). For example, you decide to draw hands. To do this, you need to go to the bookmark Body Parts and set the settings:
- Body part (Part): hands (Hands)
- Gender: male (Male)
- View (View): front (Front)
- Time interval (Time): e.g. 2 minutes
Next, click on the button . A random photo will open for you and the countdown will begin, during which you must have time to draw the object depicted in the photo. Adrenaline starts to go off scale when you don’t have time, and time comes to an end very quickly 🙂 That’s when in the next picture you start thinking about how to be in time and what steps you need to take for this. Your own view is born on what needs to be drawn first and what to detail later, so that it can convey the main features of the object.
I will not translate all the settings here. Even if you don't know in English, then by simply enumerating the parameters you can find out what each setting item is responsible for. There is nothing difficult there. Let's move on to the next service.
artists.pixelovely.com
Also a very nice site specially made for sketching with the ability to choose what you want to draw. And as in the previous service, in addition to human figures, you can choose references of different animals and birds. Consider choosing a reference for drawing a human figure. To do this, go to the Practice Figure Drawing section and select the answers to the questions.
For example, we want to draw only male dressed (covered) models with a time interval of 2 minutes. In this case, the settings will look like this:
Next, click on the button and start drawing. After 2 minutes, the picture will change to another one and you will start a new sketch. Of the minuses - it is not visible how much time is left until the end of the time interval, there is no timer.
quickposes.com
Well, we got to the service, which I stopped at one time. The service differs from similar ones in that for a certain number of hours you get a certificate from quickposes . There are 3 levels of certification:
- Level 1 (for 10 hours of drawing)
- Level 2 (for 30 hours of drawing)
- Level 3 (for 70 hours of drawing)
BUT! There is a prerequisite! Only 30 minutes of drawing spent per day are credited to the certificate. This means that you can get a first level certificate in a maximum of 20 days, provided that you draw for 30 minutes every day.
This is done mostly in order to instill in you the skill of daily sketching. The certificate itself should not be a goal, it's just a nice addition, as the author of the site writes.
If you want to track time and get a certificate, then prepare your email address and go to home page site quickposes:
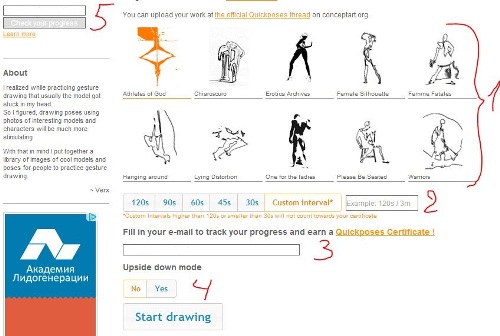
Here we need to select options:
- themed poses, such as athletes or warriors
- reference display time interval
- your email
- inverted mode (I always put No)
And push the button to start drawing.
To check your progress, you can enter your email in the left column of the site (number 5 in the screenshot above) and click on the button .
It is important to always use the same email address, because later on it will send you a certificate.
Here are some of my sketches that I drew using the references of this service:


It was very interesting to try sketching different materials e.g. pen, pencil, charcoal, pastel and on different paper. I always set the interval to 120 seconds, because in addition to the main silhouette, I wanted to have time to add a few details. But sometimes this was difficult to do, because. time was running out quickly.
I would like to note that several times I had a very interesting state, when all thoughts left my head and the hand itself drew what it considered necessary. At the same time, I kept in mind the drawing completely, and not some individual details and strokes. It's quite difficult to put into words, but it's much easier to feel when you're drawing fast and want to make the drawing recognizable.
I didn't manage to draw every day. There were days when there was no time even to allocate 10 minutes. Either there was time, but there was no strength. So instead of 20 days, I scored 10 hours of drawing in about a month. At the same time, on the 4th-5th day, thoughts began to creep into my head, such as why do you need this, you don’t need to force yourself to do it every day, etc. 🙂 But if you don’t pay attention to them and continue to draw, then they soon leave and you just enjoy from the process.
As a result, after about a month, I received such a certificate in pdf format by mail:

At the same time, both from the results and from the sensations, I noticed that the strokes and lines in the sketches became more confident and much more pleasing to the eye.
I suggest you try your hand at quick sketches. Draw anytime, anywhere, be liberated in drawing. It is not necessary to create only full-fledged pictures. Even 5 minutes of sketching is good for creative development.


