Charcoal pencils. Choosing the right drawing pencil White charcoal for drawing
Coal. With a high probability, we can assume that the very first graphic material in the history of man was a simple ember from a fire. They were painted at all times and it is surprising that even now he has not lost his relevance and love of artists.
Coal is very beautiful material with great graphics capabilities. It gives a wide range of tones, beautiful velvety and varied texture. They are painted on paper, cardboard and canvas, combined with any other soft materials (sepia, sanguine and chalk), but more often they are used as a self-sufficient medium.
It is great for sketching and allows you to create dynamic live drawings. The material is beautifully rubbed, quickly corrected, easily erased with an elastic band and self-sharpened in the process of drawing. They can apply thin strokes and create wide “strokes” by drawing with a plane. The technique of charcoal drawing even gave rise to such a strange term as "pictorial drawing".
And coal is good for everyone, except for one thing - it is very fragile on the surface. This is the most loose graphic material. That is why coal works are very easy to smudge and cannot be stored loose.
Its softness has its advantages. You can not be afraid to make a mistake - the material is easily knocked off the surface with a cloth or bristles of a brush, and thus the drawing can be corrected many times, achieving the best result. That is why it is often used to apply a drawing to a canvas before painting.
Zhaoming Wu. Charcoal portrait. I.E. Repin. Portrait of Eleonora Duse. Coal on canvas. Zhaoming Wu. Charcoal portrait. Educational setting. Coal. Chinese school. Coal. I.S. Kulikov. Portrait of a peasant woman. Coal, pastel.
In the 15th century, it became widespread in Italy interesting way fixing the charcoal, when the drawing was already applied to the surface of the paper smeared with glue, and after completion, the work was kept on steam, and thus the charcoal was fixed.
It must be said that people invented many different ways fixings - dipped in a solution of glue, treated with rosin dissolved in gasoline, sprayed with skimmed and filtered milk from a spray bottle, sprinkled with beer, but none of them turned out to be perfect.
Nowadays, coal is fixed in the same way as other soft graphic materials- with a special fixative or hairspray.
There are two types of coal - natural and pressed. Natural is different irregular shape and different thicknesses, always has a core, as it is made from real wood sticks. Such sticks crumble more strongly, and sometimes unevenly burnt specimens come across among them. Such twigs draw pale and scratch the paper.
If you live in a private home and have a stove, charcoal can be easily made on your own. When I was little, my father prepared himself such charcoal for drawing under painting. To do this, he took willow or birch sticks peeled from the bark with a diameter of 3-6 mm, vertically packed them in a vertical tin can. Then he filled the holes between the bars with sand and closed the jar very tightly so that oxygen would not penetrate into it. For greater confidence in the tightness of the cover, the seams can be covered with clay. After that, it was necessary to put it in the coals of the oven for 5-6 hours and wait a few more hours until the jar cools down. The result was a cool artistic charcoal.
I.E. Repin. Portrait of Romanov. Zhaoming Wu coal. Charcoal portrait. N.I. Feshin. Sketch. Coal. Zhaoming Wu. Charcoal portrait. N.I. Feshin. Sketch. Coal. I.E. Repin. Portrait of MO Levenfeld. Coal, sanguine. N.I. Feshin. Man from Bali. Coal. Casey Childs. Coal. I.E. Repin. Portrait of I.S. Ostroukhov. Coal.
The pressed rod was invented in the 19th century. It is made from coal chips, fastened with vegetable glue. Unlike wood, it has correct form, uniform structure and gives a deeper tone and is produced from one to four hardness numbers. In addition, it holds better on the surface, although it still requires fixation.
Such coal can also be purchased in the form wooden pencils. A charcoal pencil in practice turns out to be very convenient - it is convenient to draw small parts.In Russia, such a pencil is produced under the name "Retouch" softness 3M (Production Krasin). IN Lately The quality of "Retouch" leaves much to be desired. I bought it quite recently and was very disappointed - it draws pale and, moreover, constantly finds scratching clay lumps in the composition. It's a pity, because even 15 years ago it was great.
The predecessor of pressed coal in the 19th century was fat coal - this is ordinary wood, but additionally impregnated with vegetable oil. I have not tried to draw with such material, they say that it gives a darker line and crumbles a little less than a simple wood.
Now on sale you can find any charcoal, classic wood, in the form of pressed bars, rods and pencils in a wooden frame. To work with coal, given its flowability, it makes sense to use paper or cardboard with a rough surface.

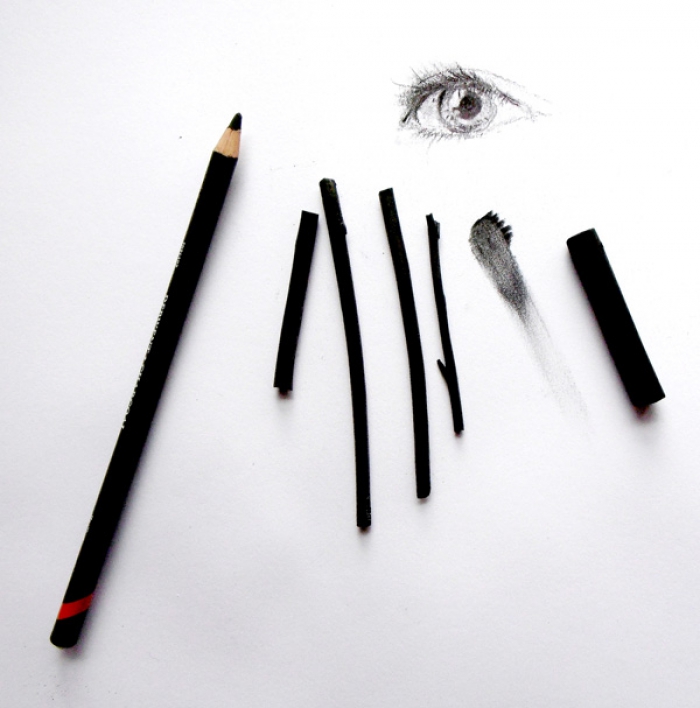
Charcoal pencils.

Paper sticks for blending charcoal.


Set of all types of coal.

Set of all types of coal.

Set of all types of coal.
Summing up, I note that I don’t see much point in painting with charcoal when there is pressed one. At one time, I suffered a lot with the fragility of my charcoal drawings, and most of them had to be thrown away due to poor preservation. Therefore, when pressed coal appeared on sale, for me it was happiness and salvation.
But you should try to work with both to form your own opinion.
There is another wonderful pencil, similar to charcoal, but different in composition - this is an Italian pencil. But about him in the next article.
Charcoal is one of the most basic drawing tools. Like a pencil, it has its own set of advantages and disadvantages. To get the most out of the material, you can learn a few basic charcoal drawing techniques for beginners to start sketching with confidence.
Generally, charcoal is great for sketching. It comes in a variety of hardness levels that allow you to quickly move your hand across the paper, mix easily, and transfer fine details when needed.
Common charcoal drawing techniques and tools
First, you need several types of coal. Charcoal has two various forms: wood and pressed. It is important to know the difference between them.
From left to right: charcoal, pressed black charcoal and pressed white charcoal
Charcoal
Charcoal is a soft stick, very light. It weighs almost nothing and moves easily across the paper. Because it's light, you won't get a dark black. Instead, you'll want to use charcoal for drawing and blending.Pressed coal
Pressed charcoal looks more like a pencil—in fact, it's often made in the form of a pencil! Here the coal is packed very tightly. Difficult to mix and difficult to wash. Compressed charcoal is best for subtle details and when you need a bold shadow. You can also find white pressed charcoal which works well for highlights and accents.
Klyachka - an eraser for coal

This eraser strongly resembles plasticine - you can shape it with your fingers and use it in reductive drawings. To clean the eraser, just remember it in your hands. You will feel like a child again!
5 charcoals you need to know
With charcoal, pressed charcoal, and nag in your arsenal, you can start trying three simple method charcoal drawing. You can then combine them into more interesting compositions. Experiment on rough paper.Mixing charcoal

Charcoal is great as a base for your drawing; you can cover your composition with charcoal and grind it into paper with your fingers. Then you can add more charcoal top or rub it again.
Pressed charcoal line drawing

Pressed charcoal is best left for fine lines, intricate detail, and achieving bold blacks. Because charcoal is very dense, it does not move around as easily as charcoal. Although you can sketch with them, pressed charcoal is not ideal for quick drawings where your hand must move at lightning speed. Rather, it is best for work where you draw lines, especially since pressed charcoal is difficult to erase.
Nag drawing
 Have you ever tried to draw The drawing nag is perfect! First create a base layer with charcoal, then use a blot to remove some of the charcoal, creating an image with contrasting lines.
 This tool won't remove lines as cleanly as a regular eraser, but it can pick up extra charcoal. I like to put it in the tip and use it as an eraser.
Layers of pressed and charcoal

Start by painting with charcoal as your base. Rub it with your finger. Then draw more precise details with pressed charcoal. For a special accent, use white pressed charcoal.
Combining all methods into one composition
Here coal shows all its possibilities. When you combine charcoal, pressed charcoal and paint nag, you get a better feel for your painting. You can achieve this in a number of ways, but start by mixing charcoal on your paper. Then, using a nag, paint the image, removing the layer of charcoal. Finish the pressed charcoal composition by adding subtle detail lines and highlights. We've all seen the marks on the end of every pencil, but what do HB and 2B mean, and how do they differ? When should we use graphite pencil, charcoal, or charcoal pencil? And why do pencils come in different shapes?
Let's start with something simple: forms.
Pencils usually come in four shapes: hexagonal, semi-hexagonal, round, and triangular. Some specialty pencils are also elliptical, octagonal, or rectangular; there are also novelty pencils that come in different shapes. They are formed by forming a wooden case around the lead, which prevents lubrication during operation.
The four most common pencil shapes
Hexagonal pencils are commonly used for writing. They have very sharp edges for easy grip and prevent scrolling. The hard body, however, is not ideal for shading, and sharp edges often cause blisters.
Hexagonal pencils with smooth edges are often used for drawing. They have more rounded edges than just hexagonal pencils, so they're less rigid, but it also means less grip for writers.
Pencils with round edges are often made for marketing reasons, as smooth edges look more attractive. But such pencils are less practical, because. roll off the table and do not grip the hand well.

Triangular pencils are best for kids who are just starting to draw. Their shape helps children learn how to hold a pencil correctly. It is easier for children to hold large objects.
gradation
In school, on test exams, we were always intimidated by the need to fill in the circles with HB or 2B pencils, but what does this really mean?
H stands for "hardness" and B stands for "blackness" according to European system classification of pencils. Or, respectively, T and M, according to Russian. They are used to define the different shades of gray and black that can be achieved with a given pencil.
The center of the pencil, graphite, is made from a mixture of clay and graphite. The relative proportions of each determine the grading of the pencil - more clay means a stiffer pencil, while the amount of graphite affects blackness.

Gradation from 9B to 9H
The American pencil grading system uses numbers and is primarily used for writing pencils. There are only five grades: #1 (softest), #2, #3 and #4 (hardest), corresponding to European 2H, H, F (halfway on the scale), HB and B.
Writing materials
Most pencils are made from graphite, the materials of which are made from a mixture of clay and graphite. These pencils make the smoothest strokes. Solid graphite pencils simply do not have a wooden body and are primarily used by artists to cover large spaces.
Charcoal pencils are deeper in blackness but smudge easily and are more abrasive than graphite.
Charcoal pencils are made up of clay and carbon black, or mixed with charcoal or graphite. On a scale of smoothness and blackness, they are located between graphite and charcoal, respectively.
Watch this video on how to choose a pencil for your artistic endeavors:
Which pencil to choose for drawing - video for beginners
As you move forward, you will also come across things like specialty pencils that are designed for drawing. Try experimenting with them at least once to understand how they work and decide for yourself if they are right for you.
Charcoal is one of the oldest artistic materials, which is still used today to create both sketches and independent work. Read on - and you will learn how to draw with charcoal if you are completely unfamiliar with this material. By the way, what types of coal are used in drawing?
Types of coal for drawing
- Coal sticks. They are made from willow, beech or grape twigs, which are fired in a sealed oven at high temperature. When shading, creating gradient transitions, toning large areas, it is easier to use soft types of charcoal, and when drawing small details, clear lines - hard ones.
- Charcoal pencils. They are also made of wood, but they look like graphite pencils, only with a charcoal lead inside. The advantages of such pencils over sticks are that they do not get your hands dirty and it is easier to draw with them, especially small details. But wide shading with them will not succeed.
- Pressed charcoal. In its production, not solid wood is used, but coal chips and vegetable glue, which are mixed and pressed. They are produced both in the form of sticks and in the form of pencils. They leave very deep, rich black lines that are difficult to remove from paper.
Additional tools
The paper on which it is best to draw with charcoal should be rough - a smooth surface will not hold particles of material, and it will crumble. There is a special paper for charcoal, but you can draw on pastel or watercolor. In extreme cases, you can use drawing paper if you rub the sheet with emery.

What else is remarkable about the charcoal graphics: the charcoal is quite easy to remove. In this case, for example, a kneaded eraser, a rag, or even a crumb of bread is used. The coal footprint will remain, but it will be enough to correct something. However, if the charcoal stripes are rubbed, then dark spots may remain on the paper, so you need to draw with charcoal without touching the sheet with your hand.

Pictures with charcoal should be treated on top with a special agent - a fixative-fixer, which creates a thin film on the surface of the paper, and the work can be stored without fear that the charcoal will crumble.
Charcoal drawing technique: main features
If you are just starting to draw, then it will be easier for you to try drawing with pencils. An ordinary graphite pencil allows you to draw even the thinnest lines and details, it is erased with an ordinary rubber band, the drawings do not need to be further processed during storage, and you can draw with a pencil on ordinary paper itself.
To the same graphics, although it is mastered faster, you still need to be able to adapt. When drawing, you need to constantly monitor the degree of pressure, vary it if necessary, and alternate it all the time with shading certain areas. This material rarely draws straight lines, it is more used when toning, creating a gradient.

When drawing, free movements are used, from simple to complex - first a sketch of the composition is created, which is then carefully drawn. You can control the thickness of the hatching when drawing with charcoal sticks by changing the angle of their inclination.

In addition to the usual method of drawing with black charcoal on light paper, there is a reverse method, when the sheet is completely painted over, and they begin to “draw” on it with an eraser, wiping the charcoal areas in the right places. Additionally, white pastel or crayons can be used.
Charcoal graphics: master class
And now we will look at how to draw with charcoal like this interesting drawing- a realistic imitation of a notebook sheet glued to a tree trunk. It is not performed too quickly, but it is exciting, and allows you to work out the main details of this technique.

You will need the following tools:
- charcoal paper (or watercolor, pastel);
- self-adhesive paper;
- perforated paper;
- hard pressed coal;
- charcoal;
- nag eraser;
- cotton pads and sticks;
- sharpened pencil;
- fixative for coal.
How to draw with charcoal: getting started
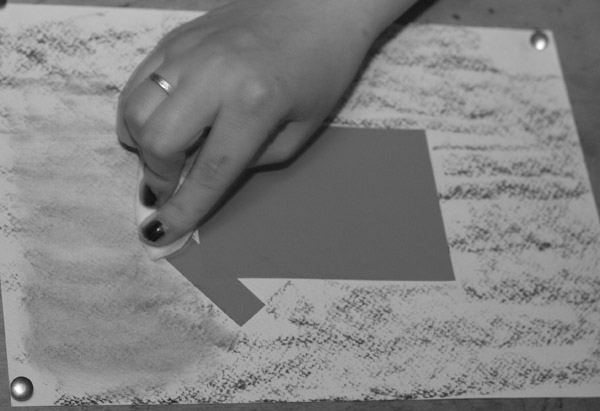
Take a sheet of paper and secure it to some kind of solid surface so that it doesn't move as you draw.

Cut out pieces of self-adhesive paper the size of a future sheet glued to a tree, and the adhesive tape on which it is held. Separate the self-adhesive from the protective backing and stick it on the paper in the right place.

Now take the charcoal and shade the leaf completely, then blend the resulting volume with a cotton pad to achieve a soft and uniform background.
In order not to smear anything and blow it off the sheet, fix the result. This is usually done with a special fixative, but if you don't have one, try using regular hairspray in several layers - although this method may darken your drawing.

Next, you should transfer the texture and texture of the wooden surface on paper. You need to draw with charcoal on the shaded surface, only this time not filling the entire area, but creating vertical lines side strokes.

Subsequently, these stripes need to be shaded, but not entirely, so that they are clearly visible on paper.

Now use compressed charcoal and draw darker strokes for more detail on the bark.

Lightly blend the resulting strokes, and then paint and blend them again until the wood surface looks realistic. Use the nag to erase the charcoal marks and leave white streaks, helping to add dimension to the design.

The first part of the drawing is finished, now you know how to draw a wood texture with charcoal.
Drawing with charcoal: toning
The future leaf from the notebook is hanging on a tree, and therefore should create a shadow falling on the trunk. Decide on the area that will be the shadow, and glue it on all sides with paper. Shade the remaining strip with pressed charcoal and blend.
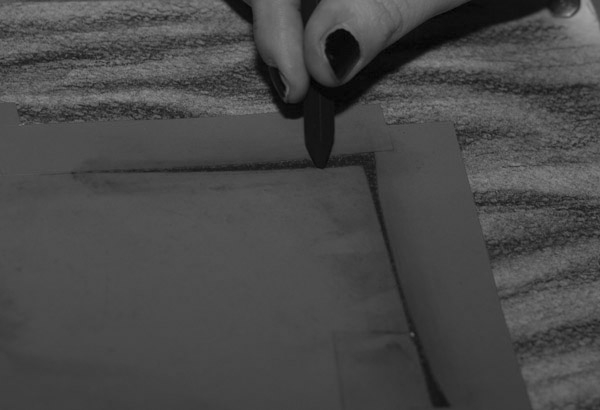
Peel off the self-adhesive paper from the drawing. Take a sharpened pencil and use a ruler to trace around the areas that will be the "adhesive tape".

Then you should give realism to the drawn tape. Attach the self-adhesive to the drawing so that it isolates the "adhesive tape" from the rest of the drawing. Paint over the tape with the charcoal residue on the cotton pad you used earlier, giving the strip of paper a gray tone.

Re-glue the paper in such a way that it covers the corner of the leaf, which is, as it were, sealed with “adhesive tape”, and then tint the free area again.

On top of the stripes, draw again the outlines of the tree bark and blend them. This is done in order to give transparency to the "adhesive tape".

Now take a perforated piece of paper and attach it to the drawing - you need to paint over the holes through it, like through a stencil. Blend the filled holes with a cotton swab.

Draw lines on the paper. They should be even, with the same indentation, so make it easy for yourself and seal the margins on both sides with self-adhesive.

On the resulting leaf, you can draw some simple sketch. And do not forget about the final fixing of the picture with varnish.

Once you figure out how to do these charcoal drawings for beginners, you will be able to draw more complex paintings, such as still lifes and portraits. Such work is often done in combination, for example, sketching a portrait with a pencil, and then starting to draw on it with charcoal, as shown in the following video tutorial for children:
To create graphic works in which the main emphasis is on the contrast of light and dark tones, the official distributor of the MPM group of companies offers to buy charcoal pencils for drawing at a bargain price. A convenient format in the form of traditional pencils allows you to create thin shading and draw details, as well as toning with the same convenience.
Among distinctive properties This tool is also worth noting:
- The possibility of fine sharpening and maintaining the sharpness of the rod for a relatively long time.
- Balanced softness of the lead that leaves a velvety mark without scratching the paper.
- High adhesion to paper (does not crumble).
- Easily washed out with water.
- Good compatibility with other materials.
- Eliminate the problem of dirt formation during operation.
Using charcoal pencils for drawing
This tool has all the properties of traditional charcoal and allows you to achieve various graphic effects when creating sketches, sketches, landscapes or portraits. The most advantageous look is the work done on matte textured paper. To create tints, the charcoal spreads easily over the paper by shading with a finger or torshon. The nag will allow you to correct errors or change the saturation of the tone.
The range includes a large selection of charcoal pencils for drawing of various hardness and saturation. The palette also contains tint materials with the addition of pigments, for example, sandy, burnt orange, with a green or blue tint. Black, white or colored pencil can be purchased individually or in sets of 4 pieces (in a blister or box).


