Learning to draw a cat. How to draw a kitten with a pencil step by step

A Puss in Boots from a favorite fairy tale or a beloved domestic cat often become characters in children's drawings. In addition, such pictures drawn with a pencil or paints can be a good decoration for a child's room. But to be right draw a cat, let's first learn how to draw such a cat in stages with a pencil. If you succeed with this cat drawing, you can try drawing your favorite cat or kitten.
1. Let's start drawing a cat with simple outlines

To more accurately draw a cat, it is better to learn to do it in stages, doing it in the first steps simple outlines. Start drawing by drawing a circle for the head, and just below it add another circle for the torso, this time a little larger. Then draw another circle at the very bottom of the drawing. To make it immediately clear that this is a drawing of a cat, you need to draw two lines of the front paws.
2. Draw the outlines of the paws and ears

In order not to "get confused" at this step, first draw the outlines of the paws, and then the ears. This is not difficult at all, and now you see that it remains only to draw a line of the back and we can say that the cat's drawing has "appeared".
3. Drawing of a cat. General outline

Start this drawing step by drawing the head. Draw a small circle for the cat's face and extend the outline of the back to the hind leg. Now it remains only to draw the outlines of the front paws, and move on to the next step.
4. Drawing detail

This stage is not difficult, but requires, as always, attention. Start by carefully removing all unnecessary lines. Now you just have to draw the cat's face in detail. Draw a lower oval and two symmetrical arcs for the eyes. And also draw a mouth and nose inside the contour of the muzzle, you can in the form of the letter "X".
5. The drawing is almost complete

Now that you're almost done draw a cat, add a few more details. It is not difficult to draw two more "arcs" for the eyes, only now in mirror image. The cat's pupils are narrow, like slits, and only when it gets dark, the "slits" open. That is why the cat can easily distinguish objects in the dark. From the eyes, draw two lines of the nose, and all that remains is to draw the claws on the paws. By the way, do you know how many claws a cat has on its front paws? No, not five, but four. But on the back foot five.
Always start drawing with what you think is easier to do. It is probably not difficult to draw ears, just two lines and ears are drawn. What else is easy to draw with a cat? Of course, cat whiskers, so draw them. The most difficult thing is to draw the eyes, you need not to be mistaken with the size, make sure that they are on the same line and the same. In addition, you need to make "glare" in the eyes so that the cat looks like a real one, but this is already on last step when you color the cat.
6. How to draw a cat with a simple pencil

Now that you are completely done draw a cat, add some shadows to the picture. Shadows will add volume to the picture, and the look of the cat will be more realistic and attractive. So that the cat does not look lonely in the picture, you can draw several objects nearby, for example, "put" it on the windowsill.
7. Drawing of a cat made on a graphics tablet

I made this drawing graphics tablet, nevertheless, the cat turned out to be of an indefinite color, but this is exactly the cat that lives in my house. You can color the cat in the color you like best, or just shade the drawing with just a simple soft pencil.
If you have a cat at home, then you know that outwardly a cat is different from a cat. She is smaller than a cat, her muzzle is small, and not such an impudent look. Approximately, as in this figure, made on a graphics tablet.
Tigers belong to the family of cats, more precisely felines, and before you draw it, try draw a cat. The cat has the same body structure and even the gait is very reminiscent of tiger grace. And sometimes a mustachioed cat's muzzle, exactly like a tiger's, with the same predatory and contemptuous look.
The lion is one of the largest predators in the cat family. It is not easy to draw him, if only because we rarely see a lion, and a cat, although it looks like a lion, is still not a lion. The picture of a lion from the first drawing lesson may not work out, then take a closer look at your cat first and draw it first. Then it will be easier for you to complete the drawing of a lion.
In this lesson, we learn to draw a rabbit. In some ways, he also looks like a cat, although of course there are many differences. But if you managed to draw a cat correctly in stages, then it will be easier for you to draw a rabbit.
A kitten is more difficult to draw than an adult cat, because a kitten cannot be made to sit still for even a minute. Therefore, drawn pictures of kittens "from nature" are quite rare. The only way to draw a kitten, and a cat too, is only sleeping.
Cats and cats are incredibly graceful and beautiful animals, so drawing them is a real pleasure. For novice artists who have recently begun to master graphics, master classes on how to draw a cat with a pencil in stages are suitable.
The creation of such cats does not require skill, talent or artistic taste. If a child asks to draw a cat, and time is running out, then you can limit yourself to funny images.
sleeping kitten
Anyone can easily draw such a sleeping miracle. All that is needed for this is an A4 sheet, soft and hard pencils, an eraser, a little patience and perseverance.
Stage 1: We start drawing a sleeping cat from the head. For this hard pencil draw a circle and mark thin auxiliary lines. The vertical divides the muzzle clearly in half, and the horizontal passes so that the upper part accounts for more than half of the circle.
Stage 2: Focusing on the auxiliary lines marked in the first stage, we outline the kitten's eyes, nose and mouth.
Stage 3: Mark the contour of the head with a soft pencil. We draw ears, protruding fur, and a funny “whirlwind”.

Stage 4: draw the body of the animal and draw the tail. Please note that the kitten is curled up, so the tail covers part of the muzzle.
Stage 5: On last step paws and mustaches are drawn. Gently erase the extra lines and markings with an eraser. The kitten is ready. If desired, it can be painted with paints or colored pencils, or left as is.

naughty kitten

This naughty baby will appeal to any child. You need to start drawing a mischievous kitten from the head. We draw a circle, we add triangular ears and we draw a muzzle. Then follows the drawing of the torso and paws. Play with the emotions of a kitten and show your child that from small parts depends on the mood of the cat shown in the picture. Surprise can be conveyed widely open eyes; a protruding tongue will add mischief, and by slightly shifting the pupils to the side, you can make a thoughtful or sad cat.
Kitten from circles

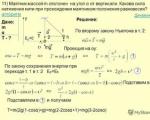
Such a drawing of a cat from circles with a pencil can be done even by a child, since this is one of the most simple ways for beginners. The animal is drawn from the back, so there is no need to draw features and keep proportions.
First, two circles are drawn on the sheet so that they intersect slightly with each other. In this case, the diameter of the lower one should be approximately two times larger than the upper one. Then the ears are drawn to the top, and the tail to the bottom. Then the mustache is drawn and the wool is arbitrarily marked.
One circle, two circles
Another good example how you can easily and quickly draw a cat with a pencil.

A larger circle is drawn first, and then another smaller circle is drawn inside it. Add ears, facial features and tail. A funny sleeping kitten will appeal to children and will be able to quickly distract the child and cheer him up.
Such a sketch is a cross between simple schematic representations And realistic drawings animals.
We mark the contour of the animal with thin auxiliary lines made with a hard lead. The sketch of the head looks like an octagon, the ears are triangles, the torso is a rectangle or cylinder. After that, we make markings for the paws.
We spend horizontal line in the center of the head, thus indicating the level of the eyes. We draw outlines of the mouth and nose, round eyes. We draw a chin, mustache.

We clearly denote the muzzle. We draw in detail the eyes, nose, mustache and cheeks. soft pencil draw villi on the ears, on the head and muzzle. Then we draw the front paws with claws and pads, detailing the back.

At the final stage, all auxiliary lines are carefully erased. It's the turn to draw fur. For these purposes, a 2M (or 2B) lead is best suited, but in principle any soft lead can be used.

Realistic
It seems to many that realistic portraits pets is not the easiest task for beginners, however, in fact, not all sketches are difficult. You can verify this with an example step by step instructions to the portrait of the Scottish fold.
Draw a Scottish Fold cat with a pencil
Scottish Folds are loved by many breeders for their temperament and charming appearance. Thanks to distinguishing feature breeds - ears bent forward and down, these cats look so cute that it is impossible to resist squeezing such a mustache. We offer a simple step by step lesson for beginners, how to draw a British cat with a pencil in stages.
At the first stage, auxiliary lines are outlined with a hard pencil: 1 vertical and 2 horizontal. The vertical one shows the center of the muzzle, so it needs to be moved slightly to the right from the center of the page, since the cat sits slightly turned.
The horizontal ones should be parallel to each other as they indicate the size of the animal's eyes. After that, you need to start drawing the contour of the muzzle and eyes.
Important! For a cat to be proportional, the distance between the eyes must match the size of the eye.
When drawing the nose, remember that its size should be less (narrower) than the distance between the eyes.

Then with a lead M or TM we darken the eyes and nose. More experienced artists, confident in his movements, you can use a black pen for these purposes.
To make the look of the cat "alive", do not forget to leave unpainted, white places, as in the picture.

In the third step, you will need a 2M (or B2) pencil. Gently, with smooth lines, shading the strokes, darken the places around the pupils. Notice how the color transitions from the darkest (around the pupils) to the lightest. Then, arrows are marked with a hard lead, in the direction from the nose. They show directions for drawing wool.

With the softest lead (it is better to use B4 or 4M), focusing on the arrows, draw the darkest wool. The crown and under the ears should be the darkest.

To complete the picture, draw the rest of the wool. The cat is ready
Attention! The color of the villi depends on the force of pressing.

Already drew +13 I want to draw +13 Thank you + 239
In this lesson we will show you how to draw a kitten with a pencil step by step. We have prepared 12 step by step photos video lessons. We are sure that thanks to our lessons you will 100% draw a kitten with your own hands.
How to draw a cute kitten with a pencil step by step for beginners
- Step 1
In order to draw it correctly, you need to figure out what it is made of. From what, from what, what are our kittens made of?.. Naturally, from the head, carcass, paws (4 pieces) and tail. All forms are very simple: the body and front legs resemble sausages, the hind legs are sausages with lentils attached to the upper, the head is a flattened ball, the ears are rounded triangles.
- Step 2
Now we connect the parts together. Naturally, we do not stupidly apply one to the other - this is not soviet togo making a teddy bear! And the kitten's paws are not nailed. They need to be grown. Imagine that you are sculpting it from plasticine - you are making a body, a foot, and then pressing it into the body with the upper part and lubricating the junction with your finger. So here. The transition from the body to the legs should be smooth, do not forget that the kitten still has to walk and jump on them! If the muzzle is half-turned, then the far ear must be turned: it will become Narrower, and the inside of the ear will almost not be visible.
To make the picture look more alive: do not draw with straight lines! Also, don't draw the whole object with one simple arc. Look at the near forefoot: it's not straight, not concave or arched, it bends in both directions!
- Step 3
Now draw the eyes and nose. We draw them in the lower part of the head, leaving the kitten more space for the brains (the brains will be useful to him in life). We draw the eyes almost at the same level with the nose, in fact, the inner corners of the eyes and the lower corner of the nose form an obtuse triangle. Do not forget that the head is not round, but spherical. That is, it is voluminous, so even with the slightest turn there will be slight distortions.

- Step 4
We draw the pupils, following the lesson of Caracal. Carefully point the nose, eyes, outline the eyebrows and mouth (this way you can make the muzzle more expressive).

- Step 5
Now the contour and features of the faces .. muzzles! ready. But he doesn't have to be bald! This is not a sphinx, this is an ordinary kitten. You need to make it wool. Therefore, before painting the fur, I wipe the clear dark outline of the kitten. Well, I paint my eyes, I like to do it Dark from above, a light arc below, a white highlight at the top.

- Step 6
Now you can make the outline woolen. We draw in place of the old contour of the wool. Carefully draw the tail. Many people like to immediately draw a panicle, the shoby was more magnificent and more beautiful. In fact, a thin, tapering tail looks much more touching!

- Step 7
The most tedious part is shading the kitten with hairs. At the same time, we make sure that the hairs grow in the right direction, do not continue each other and do not merge. You can make a few stripes on the tail and leave a white breast.

- Step 8
Woolen but flat. As if covered in texture. Ugly. Need to add volume! We add it along the edges of the legs, body, head, with neat semicircular strokes. We hatch from the edge to the middle along the arc! Select arcuate stripes. The far foot should be darker than the near foot. Also, you can put shadows on the paws above the fingers and above the triangular nose. We paint over the ears in depth.

- Step 9
Now, it's beautiful! Now we strengthen all the shadows, because there are not enough of them yet. If somewhere a very dark place turned out, lighten it with a nag. And along the edges we add random thin hairs to enliven the picture. Do not forget about the mustache: they grow on the muzzle near the nose, on the eyebrows and in the ears. Well, you need to put it on the surface, then a shadow will come to our aid if there is no time or desire to come up with something else

- Step 10
From the same simple forms, combining them, bending, you can make various poses. It's okay if the sketches are sloppy, you can always draw 5 pieces, select the most successful one and redraw it for a clean copy.

Video: how to draw a muzzle with a pencil
How to draw two kittens with a pencil step by step


How to draw a sleeping kitten


How to draw a lying kitten easily
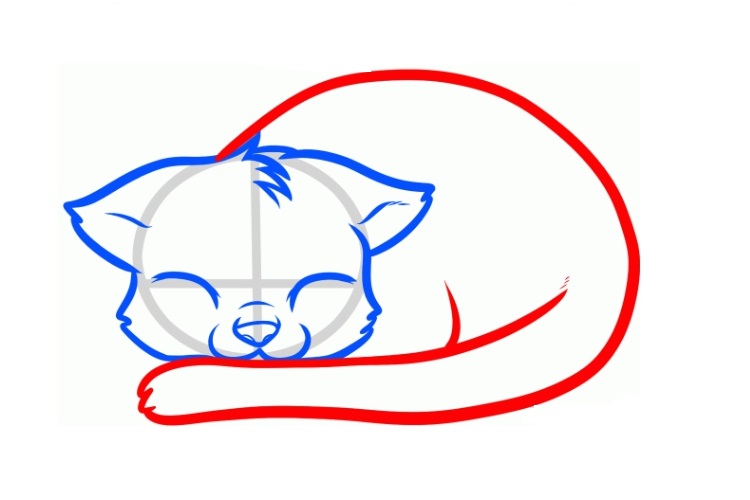
- Step 1
In the first stage, we determine the position of the cat's head and its shape. The shape of the head in cats varies from a round head, like a Persian cat, to an elongated and angular, like a Siamese. From the head we draw the skeleton of our cat up to the tip of the tail. On average, the length of a cat's body without a tail is 60 cm, and the length of the tail is 25-35 cm. It was roughly estimated that a third of our line is the cat's tail.

- Step 2
We draw an oval on the fold of the line, which will indicate to us the chest of the animal. We also draw a circle on the line of the skeleton, denoting the hip part of the hind leg. On the “future face” of the cat with a thin, barely noticeable line, we denote a cross, which in the future will help us draw eyes, mouth and nose.

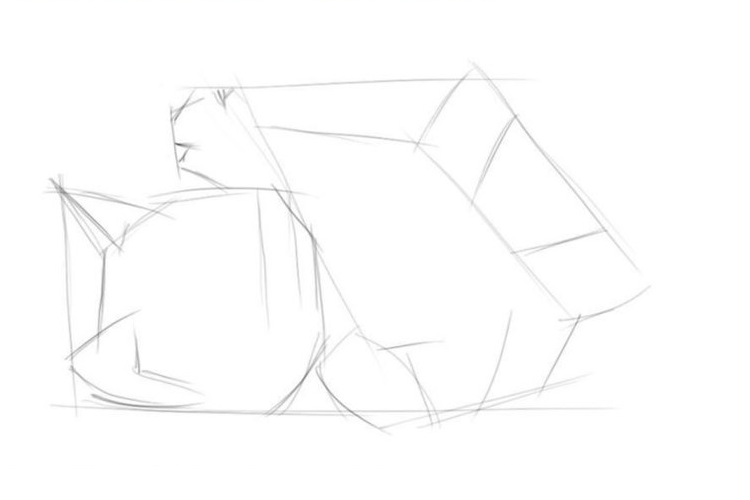
- Step 3
We draw three paws. The ones we can see. We will not see the fourth behind the body of the cat. On the cross, draw beady eyes, a heart-shaped nose and a mouth with a downward bend, as shown in the figure.

- Step 4
The most difficult and responsible. They inhaled and held their breath: it is necessary to carefully draw a smooth line, starting from the head, to draw the torso and tail. In this case, you need to carefully go around the skeleton in the part of the tail and go around the legs. Hooray, exhale!

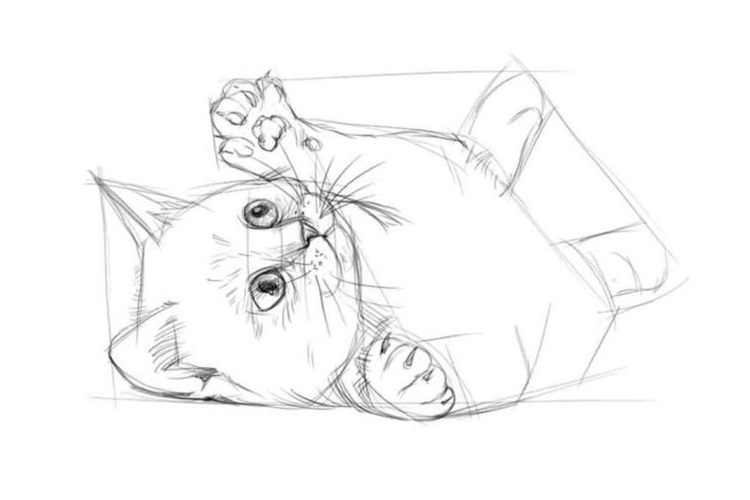
- Step 5
Well, now you can turn on the fantasy: we draw the ears of our cat and fluffy fur on the chest. On the "face" we outline the eyes, nose, highlight the mouth brighter.

- Step 6
We continue to fantasize. Add fur on the back, give more correct form tail. We carefully draw the ears.

- Step 7
The motto of the cat: "Mustache, paws and tail - these are my documents." Paws and tail are already there. So mustache!

- Step 8
Well, now you know how to draw a Lying Kitten with a pencil step by step!

Video: how to draw a lying black kitten
How to draw a playing kitten

How easy it is to draw a kitten with a pencil step by step

How to draw a kitten on a tree

How to draw a cartoon kitten with a pencil step by step

How to draw a small kitten with a simple pencil

Video: draw a kitten sitting with a pencil
How to draw a fluffy kitten with a simple pencil

Video: draw a fluffy kitten with a simple pencil
How to draw a fluffy kitten with colored pencils
- Step 1
Draw a sketch

- Step 2
We take blue and paint over the eyes, pupils with black. We paint over the nose with pink.

- Step 3
Dark blue and white paint over the eyes. Burgundy nose.

- Step 4
We begin to hatch the muzzle with gray and yellow. We take a pen that does not write and draw in the place where the antennae should be, then when we completely paint over the hair, the antennae will be realistic and they will not be painted over.

- Step 5
Light brown paint over the wool.

- Step 6
We take dark brown and continue to hatch the wool. Paint over the ears with pink and yellow.

- Step 7
With a pen in the ear, draw the wool in different directions. Paint over with gray and dark brown.

- Step 8
We continue to draw white wool with a pen, then paint over with white.

- Step 9
We shade the wool with gray and light brown.

- Step 10
Add a little yellow and brown.

- Step 11
Adding dark brown

- Step 12
We start hatching with black. Add a little blue to the white wool.

How to draw a cute kitten with colored pencils

Video: how to draw a realistic kitten
You can draw a cat using paints, crayons, a pencil and others. visual means. However, if you are a beginner, it is better to start with the simplest, gradually moving on to more complex ones. Having mastered the technique of drawing with a pencil, in the future it will be easier for you to draw with paints and other materials. It is also worth considering that when using the same drawing technique, the result, due to individual abilities, each artist always gets his own.
Learning to draw a cat in stages
First you need to remember what the body of a cat consists of - this is the body, head, tail, ears and paws. The listed body parts are simple figures: the body is an oval, the head is a slightly flattened circle, the ears are triangles with rounded corners, and the paws and tail are elongated ovals.
Putting together the drawn shapes
This should be done smoothly, as if adding parts of the body to each other, as in the process of modeling from plasticine. If the muzzle of the future cat is conceived in half a turn, then the far ear should be shown turned, and its outline in the figure should be made thinner so that its inner side is almost invisible. To make the cat more believable, you should not draw only straight lines, any part of the body has irregular shape with bulges and smooth bends.

We draw a muzzle
The eyes and nose of the future cat should be drawn in the lower part of the head, after delimiting the areas on the muzzle: first, mentally divide it in half, determining where the upper border of the eyes will be, and then divide the lower part into three lobes. Thus, in the middle part of the lower lobe, the nose will be outlined, and under it - the mouth of the future cat. The inner corners of the eyes should form a triangle with the lower corner of the nose.

Draw wool
How to draw a fluffy cat? In place of the old contour, we apply small dashes - wool. There is no need to rush to draw a broom in place of the tail, the result will be much neater and more natural if you draw individual hairs along the contour of the tail.

Shading the body
At this stage, we shade the cat's body, completely covering it with small hairs, observing the direction and length. The breast and the inner side of the ear closest to us can be left unshaded.

Adding Volume
We do this by drawing the paws, torso and head with brighter bold strokes. The strokes should go in an arcuate manner from the edges to the middle. We make the far paws darker than the near ones. We lay shadows over the nose, eyebrows and on the paws.

Finishing touches
Strengthen the shadows, add a mustache and some messy dashes on the ears, tail and paws. Voila, the cat is ready!

Draw a cat with a pencil (a method for beginners)
A simpler version of a cat drawing using a pencil is clearly displayed by the following diagram:
- We depict a circle and an oval, which will later become the head and body of the animal.
- We add 4 small ovals to the large oval - these will be the limbs of the future cat, and in the circle we outline a smaller circle - the muzzle.
- We draw triangular ears, paws in the form of two small ovals and outline the places for the eyes.
- We finish the tail with an arc, supplement the forelimbs with oblong oval details - paws, draw eyes.
- We complete the marking of body parts.
- We draw a mustache in detail, add a little wool on the muzzle, give the drawing a finished look.

Cartoon cat coloring for child
Drawing a funny cartoon cat in anime style that will bring a lot of joy to your child is not difficult at all. Follow the visual instructions and repeat.
- We draw big circle, divided into 4 parts, and under it an oval.
- We slightly stretch the muzzle of the future cat to the sides and decorate the ears.

- We designate the nose, eyes and eyebrows.
- We finish the paws.

- We complete the drawing of the animal with the image of the body (in place of the previously outlined oval) and tail.
- We remove the auxiliary lines, outline the outline of the coloring cat and let our baby color the resulting cute kitten with paints or felt-tip pens.

Another option for creating a simple but very cute cartoon cat coloring book can be seen in the video below.
Here are some more simple ways to portray a cat that are suitable even for beginners.

And, using the step by step diagrams below, you can easily and quickly draw cats of various breeds.


Drawing master class for children from 5 years old "Cats of our yard"
The master class is designed for older children preschool age, students, teachers and parents.
Drawing- one of the favorite activities of children. Most children boldly take on any visual material. But unfortunately, not everyone manages to transfer their plans to a piece of paper. In this master class, a method for teaching drawing according to algorithmic schemes is proposed.
The proposed algorithms are simple and rational.
Target: To teach children to draw animals using algorithmic schemes.
Tasks:
- to educate children's interest and desire to engage in artistic creativity.
- cultivate patience and perseverance,
- develop creative thinking
-to consolidate the ability to draw round and oval shapes.
For work you will need:
-paper,
- paints or pencils (in this master class we used watercolor)
- simple pencil
-brush,
-water.
Lesson progress:
"Cats of our yard"
It was raining outside the window. Fedka went to the window, sighed heavily, from that that today he will not be able to go for a walk. Probably the same way Fedka thought and his cat sitting on the window and looking at the falling raindrops. The cat's name was Vaska, he was red-haired and loved to walk on warm sunny days. Vaska did not walk alone, he had friends from our yard.
The cat from the second floor was called Tihan, he was black in color, and a white wooly path ran from the pink nose to the tip of the tail. Tikhan was the master in the yard, that even the dogs were afraid of him, and once again preferred not to meet him. Tihan loved to fight very much.
In the summer, grandchildren came to Baba Shura from the first floor and brought their kitty Murka. Murka had a smoky color, her fur was soft like plush. Murka loved to sleep on the windowsill and look at people passing by.
And not so long ago, another red cat Murzik appeared in our yard, he was presented as a birthday present to a girl named Olya. Murzik is still quite small and restless, he loves to hide everywhere, run in packages, and sometimes he climbs to the very top of the carpet hanging on the wall. All cats, like people, are very different, each has its own character and appearance. These are the cats of our yard.
-Guys, let's try to draw cats, which are described in the text.
Step work.
"Cat Tihan"
1. We draw a large circle - the torso. photo 1

2. In the lower part of the large circle - the body, draw a smaller circle - the head. photo 2

3. Draw ears. photo 3

4. In order to symmetrically draw a muzzle, you need to divide the small circle into 4 parts. photo 4

5. Now draw the eyes, nose, mouth. photo 5

Remove dividing lines.
6. We draw the antennae, paws and tail. photo 6

7. Coloring. Meet the cat Tihan. photo 7

Murka cat.
8. We place three identical circles on the sheet - the head, the front of the body, the back of the body. photo 8

9. We draw paws, ears, a tail. photo 9

10. Draw eyes, mouth, nose, mustache. photo 4.5.

11. Coloring.
Murka kitty.

Cat Murzik.
12. We draw a circle-head, an oval-torso. photo 12