Techniques for drawing a tree (from work experience). How to draw a deciduous tree with a pencil step by step How to draw a beautiful tree with a pencil
The question of how to draw a tree, for example, as widespread as an oak, is asked by almost every novice landscape painter. After all, beauty surrounding nature it is simply impossible to display without knowing how to draw trees correctly.
Such a tree as an oak was loved to depict in their paintings by many great painters, for example, such as Shishkin. Perhaps the reason for the popularity of these plants was their impressive and powerful appearance. The crown of the oaks is wide, the branches are long and thick, and the trunk becomes more and more voluminous every year. Thanks to all this, this tree, drawn in pencil in stages, always looks extremely impressive.
In order to depict an oak, you will need the following items:
1). mechanical pencil(or the most ordinary pencil, but sharply sharpened);
2). Gel pen having a black tint;
3). A set of colored pencils;
4). Eraser;
5). Paper.
Now you can move on to learning how to draw a tree with a pencil in stages. This process can be broken down into separate steps:
1. Draw a horizontal line, thus indicating the place where the tree grows. Then draw the beginning of the trunk and the roots of the oak;

2. Draw the outlines of the tree crown with light lines. After that, draw powerful and rather long branches. Try not to keep the branches completely straight. In order for the tree to end up looking realistic, draw them curved in some places, and also sometimes overlapping each other;

3. Draw grass under the tree with short strokes. Then draw individual thin branches;

4. Mark the location of the foliage. Remember that the crown of the tree must have irregular shape otherwise it will not look natural;

5. Having understood how to draw a tree with a pencil, you can move on to coloring the finished image. To do this, you must first circle the pencil sketch with a pen, and then erase it using an eraser;

6. With brown pencils, start shading the oak trunk;

7. Continue coloring the tree trunk as well as its branches;

8. Finish painting both the branches and the trunk of the tree using the pencils of the same colors, as at the very beginning of work;

9. In order to draw grass, use pencils in dark green and light green shades;

10. Start painting the crown of the oak tree. Shade the most darkened areas with an olive-colored pencil. For well-lit areas, choose a light green pencil, and use a rich green pencil as an intermediate shade;

11. Finish painting the foliage using pencils of the same green scale;

12. Having understood how to draw a tree in stages, you need to give the picture a finished look. To do this, you need to finish the grass so that it matches the scope of the crown. After that, you need to shade the sky with a light blue pencil.

The drawing of a luxurious oak is ready! Now, knowing how to draw a tree, you can create a very interesting landscape. For example, next to a tree, you can depict a small house or a peacefully grazing horse. You can color the finished drawing of a tree not only with pencils, but also with felt-tip pens or paints.

To learn how to draw trees, you need to understand a few principles that will help you see patterns in the structure of trees. The diagrams and drawings below allow you to see all this clearly. And then you need to observe nature and regularly make sketches. Only by constantly practicing in drawing you can master the necessary skills. So, what principles do you need to understand in order to learn how to draw trees?
1. The cylindrical shape of the trunk and branches of the tree.
The tree trunk is based on a cylindrical shape. Therefore, when an artist draws the bark, behind the texture of the bark, you need to see the volume of the trunk. This means that it will be lit unevenly. That is, on the one hand - the light, and on the other - the shadow. The light can also be in the middle of the “cylinder”, and on its sides, respectively, a shadow. The same applies to branches. But because of their small thickness, chiaroscuro will be hardly noticeable. Therefore, artists use this technique: the branch is written in one color, and its edge is emphasized with dark paint. The underlining gives the impression of a shadow and the branches appear voluminous.
2. The structure of the bark of a tree is most often cracks.

The structure of the bark in most trees is a crack in the surface layer of the trunk. Cracking and roughening, this layer becomes thicker and rougher over the years. Each individual "tubercle" of the cortex has a lighted and a shadow side. But looking at the tree, we do not see such details, but perceive the image as a whole. Therefore, the artist does not copy each “corinka”, but conveys the texture with a bark-like stroke. For example, you can use a "clumsy" stroke, with different line thicknesses. In this case, the area of the bark, which is in the shade, will be darker.
3. The shape of the trunk and branches. branch direction.

Each type of wood has its own characteristics. For example, the nature of the bends of the trunk and branches. The oak branches are more sinuous and clumsy. The trunk of a pine is mostly straight. In a willow, the trunk can branch into several trunks, forming a "slingshot". The same character and many large branches of willow. Therefore, when drawing a tree, you need to be observant and see the various features of the structure.
In addition, there is another aspect that many people forget about. Often novice artists draw branches to the left and right of the trunk, forgetting that the branches are still growing back and forth, surrounding the trunk from all sides. If the branch grows forward, it will block the trunk and other branches. Thus, plans are formed in the tree drawing: the first, second, third ... The branches of the first plan will close the branches of the second plan, etc.
4. The fractal principle of tree branch hierarchy.

A fractal is a repeating self-similarity. If you carefully observe the trees, you can see how small and large branches, as well as the trunk, are similar to each other. Indeed, the crown of a tree consists of a hierarchy of branches: very small, small, medium, large, very large, and the tree trunk itself. They are based on the same form. As if they took one branch and made from it many copies of larger and larger sizes. Knowing this principle, drawing a tree will be much easier.
5. The trunk of a tree is not visible everywhere: it either appears or hides in the foliage.

The trunk of the tree, its branches and large branches will pass between the masses of small branches and leaves. The trunk can then appear between them, then go deeper, where it is no longer visible. Because of this, shadows from groups of branches and leaves will fall on it. Therefore, when transmitting chiaroscuro on the cylindrical surface of the trunk, you also need to see if there are any falling shadows from its foliage on it. On a sunny day, it happens that the tree trunk is dotted with “spots” of falling shadows.
6. Chiaroscuro on the entire crown of the tree as a whole.

The whole mass of branches and leaves of a tree without the lower part of the trunk is called the crown. It has volume. That is, on this whole mass as a whole there is light, partial shade, shadow and reflex. For example, often sunlight falls on the crown from above. This means that the top of the tree will be lighter than the bottom. However, the crown of the tree is made up of clusters of foliage, between which there are gaps through which the sky or the shadowy interior of the crown can be seen. These clusters or groups of branches themselves are also illuminated by sunlight in different ways. This means that the crown of the tree will not be depicted in the figure as a solid silhouette. So we come to the study of the next important principle.
7. Foliage and tree branches are combined into groups.

A huge number of leaves of a tree, as well as the branches on which they grow, are combined into groups, forming clusters. The crown of a tree is not a continuous mass of foliage. The crown consists of many groups of branches and leaves. Moreover, these groups also differ in size and shape. They are not the same. Each group is illuminated daylight, which means that each individual mass of foliage has its own light, its own shadow, its own reflexes and penumbra. That is, as in the drawing of a plaster ball, students convey chiaroscuro, and in the drawing of a tree, in each individual mass or group of branches and leaves, chiaroscuro must be conveyed. However, along with this, it must be remembered that the chiaroscuro of individual groups will be subordinate to the general chiaroscuro of the entire crown (which I wrote about in the previous subtitle). But how to translate it into a drawing? For example, the sun shines from above. The lightest point on the tree will be at its top. The most dark dot- from below. But the crown consists of the aforementioned groups of branches. So each group has its own chiaroscuro. Suppose there is one group at the top of the tree and another group at the bottom of the tree. So, the light on the top group will be lighter than the light on the bottom group. Also, the shadow on the top group will be lighter than the shadow on the bottom group (in the figure they are numbered #1 and #2). It turns out that the particular is subordinate to the general. The chiaroscuro of individual groups of branches is subject to the general chiaroscuro of the entire tree crown. But there are exceptions to this rule. If a group of leaves from the lower shadow part of the tree protrudes more and more light falls on it, then it can be as light as the one at the very top (from our example).
8. Imitation of foliage through hatching.

In the previous schematic drawings, the trees look "cartoonish" and simplified. In this drawing, the tree must be depicted realistically. To do this, you need to pay attention to the technique of execution. Hatching can be very different depending on the surface being depicted (I wrote about the types of hatching). It should convey the "materiality" of the depicted object. In our case, this is the foliage of a tree. And the artist does not need to draw thousands of individual leaves on a tree. You just need to shade so that you get the impression of foliage. But how should a tree be hatched to make it realistic and lively?
The secret is that the stroke can create the illusion of foliage. That is, the nature of the lines will be similar to the nature of the leaves. In the above figure, you can see three types of hatching corresponding to three types of leaves - maple leaves, oak leaves, willow leaves. In one case, the line is "prickly", in another "clumsy", in the third - the strokes are more oblong. But these are just examples. You can come up with your own kind of stroke. Here you need to connect your imagination and not think in a stereotyped way. For the bark of a tree, you should come up with another stroke, for the grass a third, etc. In this regard, I can only give this advice: the drawing looks spectacular when the line thickness changes. That is, you need to work with a blunt and sharp tip of a pencil lead. Therefore, inventing your hatching, you can take this moment into account.
9. Gaps in the mass of foliage.

The crown of the tree is not monolithic and, as I wrote above, consists of branches and leaves combined into groups. Consequently, gaps will form between these groups, through which the sky or the inner, shady part of the tree can be seen through.
It would seem that everything is simple. But, just here, for novice artists, a problem arises in drawing trees. The fact is that beginners depict these gaps not between masses of foliage, but between individual leaves, and they draw them the same in size. The result is a painting in which the viewer sees a tree whose silhouette looks "cartoonish" and unnatural. In nature, the gaps in the foliage are located at different distances from each other. The gaps themselves are also everywhere different in size. But such a pattern is due not only to nature, but also to the laws of composition. IN fine arts is the concept of rhythm. Just like in music, by the way. If the artist places objects at the same distance from each other, then the depicted view looks boring and not natural. If the artist changes the location, size, tone or color, then the painting becomes dynamic and natural. Thus, rhythm is created in painting.
Imagine that we are painting a dark green silhouette of a tree against the sky. This silhouette is dotted with "dots", which are gaps in the tree through which you can see the sky. So, these points need to be made different in size and at different distances from each other. Large, small, medium ... Between small groups of branches, between large clusters of foliage, between individual leaves of a tree, etc.
Therefore, the crown of the tree will not look like a solid mass of foliage, but like a loose structure penetrated by branches and having gaps between clusters of foliage.
10. Non-template approach.


In order to understand how to apply the above theory in practice, here are two of my drawings of trees. The first is maple, and the second is oak. Try to follow in these drawings the nine principles outlined above. Let me tell you straight away that there is different types drawing: line, tone, quick sketches and many hours of detailed drawings. These maple and oak drawings are quick sketches. And in such sketches, artists do not draw everything. Therefore, somewhere you can find some deviations from what you read above. Here it is just clear that I did not use a template approach, but was guided precisely by the principles, thinking about how best to apply them. Therefore, in conclusion, I will add that the artist must add creativity, fantasy and intuition to theoretical knowledge. Then the drawing will be more expressive and devoid of the monotony of a template approach.
The tree is almost always present in children's drawings, the themes of which are related to nature - summer holidays, vacation of parents, a trip to the country, and small artists strive to fill urban landscapes with green spaces. It is better to teach a child to draw a tree correctly in stages, starting with pencil sketches and gradually moving on to using watercolors.
How to draw a tree with a pencil step by step
To begin with, explain to the children, walking in a park or forest, that a tree consists of a trunk, large and small branches, and a crown. Seeing a tree in nature, it will be easier for a child to draw it.
- Draw two parallel lines on a piece of paper. vertical lines- you get a trunk, from which to the right and left outline the main branches.
- Between thick skeletal branches, bring out thin processes directed upwards.


- Using colored pencils, make the crown bright green and the trunk and branches dark brown.


How to draw a tree with a pencil - birch
The beautiful birch cannot be confused with other trees because of the white with black stripes of the trunk. It is not difficult to draw a birch, the main thing is to observe the proportions, thickness, and direction of the branches.
- Draw a thin line on the sheet, draw a second one parallel to it. Make small notches on the trunk and bring out the main branches from them.
- Mark flexible, leaning to the ground, shoots. Shade the body of the birch with black spots and define with a horizontal line the place where the trunk merges with the ground.
- Circle the entire silhouette of the tree with thick lines. Scatter leaves on the branches that resemble rhombuses with a rounded base and color them with a green felt-tip pen.

How to draw a tree with a pencil - oak
This version of the image of a deciduous tree is the easiest.
- Lay a sheet of paper horizontally with the wide side. Draw a small fluffy cloud in its upper part - a crown.

- From it, outline lines that look like a nose, eyebrows, mustache of an old wizard from oriental tale. Outline the foliage with curly curves, reminiscent of a bouffant updo.


- Give the contours of the trunk volume by circling it with a double line. Draw strong branches with winding lines, supporting curly foliage with their power. With several rays, lowered down and touching the ends, depict the roots that have come to the surface of the earth.


- Place the leaves in the thick of the crown, forming a living wavy fringe. Erase unnecessary basting and paint the picture with paints.


How to draw a tree with a pencil - pine
Draw a pine according to the scheme - it's simple and accessible even to a first grader.
- Draw two straight vertical lines on the sheet, tapering at the top. To the right and left of them, according to the number of branches, depict curly clouds - the future needles. Connect the clouds with branches extending from the trunk, at the bottom of which make a couple of stumps - the remains of broken off dry knots.


- Draw the trunk with longitudinal lines, depicting cracked bark. Separate the line of the earth with a wavy line, put up a tent under the tree and paint your art with watercolors.


How to draw a tree with a pencil - spruce
Even a child can draw such a Christmas tree in a few steps.
- Draw a vertical line, limiting it at both ends with segments. Duplicate it with the second beam and connect both outlines at the top point - get the trunk.
- Draw branches-paws going from the stem part to the sides: the first pair - down, the rest - up.
- From each large paw, bring out shaggy processes. Dot them with densely small needles using a green pencil.
- Make a tree trunk in the same way. The tree is ready. Hang colorful balls on it, and - in front of you is a wonderful application for a New Year's card.


Trees are always very interesting to draw and quite simple. The main thing is to use our advice, be observant, and you will succeed great picture, which will decorate a children's or school corner.
Instruction
very unusual and interesting shape has a maple leaf. It should begin with the image of a circle, with a part of a triangular shape missing at the bottom. Inside the resulting figure, you need to draw 5 straight lines directed in different directions. From the junction of these lines down, you need to draw another line (leaf stalk). Next, around each of the five lines, you need to draw figures sticking out in different directions, resembling the outlines of houses. Around the two lower strips, smooth triangular lines should be drawn, connected at the base of the handle. Now the outlines of the maple leaf should be serrated, and veins should be drawn inside the leaf.
The oak leaf also has a very interesting shape. Drawing an oak leaf is easy. First you need to draw on an oval with a slightly elongated lower part. Then wavy lines should show unusual shape oak leaf. At the bottom of the resulting figure, you need to draw a short stalk. Next, you need to draw veins on the plate.

Drawing a linden leaf is also not difficult. The base of the linden leaf is a figure resembling. So, first of all, you should draw just such a figure. Next, the sheet should be memorized and the stalk should be drawn to it. It remains to draw thin veins inside the sheet. Linden leaf is ready.

A strawberry leaf consists of three small leaves. In order to draw it, for starters, you need to draw on paper 2 intersecting perpendicular lines(cross). The three upper segments should be the same, and the lower one should be slightly longer than the rest. Next, draw three ovals connected to each other. The three initially drawn segments should become their middle lines. Now the three resulting ones should be serrated using triangular lines. Then you need to finish the sheet with a stalk and veins.

A rowan leaf, like a strawberry leaf, consists of several leaves. First you need to draw the main long line. From it, you should draw an average length of a pair of segments directed in opposite directions. Now you need to draw oblong leaves with small edges. The segments coming from the main stem should serve as median lines to the leaves. The lower part of the main line should be turned into a leaf stalk. The final step in drawing a rowan leaf is the image of veins on it.

Related videos
note
Now you will learn how to draw a maple leaf. Step 1. To make it easier for us to draw a leaf, let's make a sketch of three lines. Step 2. Let's put four points, which will help later in drawing the sheet. The sheet is ready, it should turn out something like this. Watch the video below and you will learn how to draw leaves on a branch.
Sources:
- how to draw oak leaves
Each tree differs from another species in silhouette, bark structure, leaf shape. Big variety trees distributed throughout the world. Therefore, the variety of forms of their leaves is also great. To learn how to draw leaves trees, take a simple sheet of birch or linden without any difficulties. How to learn to draw leaves, you can take their most complex forms.

You will need
- sheet of paper, pencil
Instruction
Prepare necessary materials for drawing leaves trees. Start drawing a birch leaf in the form of a teardrop shape. Jagged its edges with triangular lines. On the sheet you need thin and small veins. Don't forget to add a cutting.
Draw a linden leaf. It won't cause any problems either. His sheet resembles. Thus, on paper, you need to designate such a shape of the figure. Serve the sheet, draw the veins inside and draw the stalk to it. Linden leaf turned out.
Draw a maple leaf. It has an interesting and unusual shape. Start it with the shape of a circle without the absence of a triangular part at the bottom of it. From this shape, draw five straight lines that point in different directions. From the center of the connection of these lines, draw another line - this will be a maple stalk. Then, around each of these lines, you need to draw figures sticking out in different directions. They resemble the shape of houses. Around the 2 lower strips, you need to draw triangular lines that connect at the base of the maple handle. It remains to memorize the sheet and draw thin veins.
Learn to draw an oak leaf. It is not difficult. Draw on paper a figure in the form of an oval with a slightly elongated part at the bottom. Use wavy lines to show nice shape oak leaf. And at the bottom of this figure draw a stalk. Don't forget to draw the veins on the sheet.
Try drawing a leaf. It consists of three small leaves. Draw two perpendicular lines on paper. The three sections at the top should be the same length, and the bottom section should be slightly longer than the rest. Then draw 3 ovals. They must be interconnected. It turned out three. Serve them with triangular lines. Draw the leaf veins and stalk.
Helpful advice
To draw tree leaves, use with a simple pencil. This is the most common drawing tool, it does not take long to find it.
Sources:
- How to learn to draw leaves, branches and other parts of a tree
There is a great variety of trees. All of them have a certain appearance and differ from each other in the shape of the trunk, the structure and color of the crown and have different sizes and shapes of leaves. You can draw a single leaflet from nature or using a stencil.

You will need
- - paper;
- - a simple pencil;
- - eraser;
- - brush;
- - watercolor paints.
Instruction
Draw a birch or linden leaf. To do this, outline an oval with a thin line. Draw a vein in the middle and depict both halves. Make teeth around the edges. Draw the sheet more clearly.
To make the leaf look more natural, circle it along the contour with a thin tip of the brush. With smooth strokes, paint over the entire sheet. The veins should have a lighter tone. To do this, with a brush dipped in water, draw a light stripe. To keep the lines thin, hold the brush vertically. Blot the drawing with a clean, soft cloth. The paint from the places moistened with water will be absorbed by the paper. Light stripes form on the sheet.
Draw an oak leaf. To do this, also draw an oval, narrow it at the end. Draw the main vein in the middle. It will smoothly pass into the stalk. Mark small strips from it in different directions. Draw the right and left sides of the leaf symmetrically. Make the edge of the sheet wavy.
Draw a strawberry or strawberry leaf. To do this, visually determine the ratio of the width of the sheet to its height. Draw a horizontal strip of the sheet with a thin line and mark its width. Draw the leaves, make the edges jagged.
Draw a branch with leaves. On a piece of paper, mentally mark the location of the branch, sketch it. Look, how many leaves will there be? Will the leaves be the same size or different? Keep in mind that some of the leaves cover the others. Look carefully at the shape of the leaves, their color. Draw some leaves darker and others lighter.
Try to draw maple leaves. They can be green, yellow and red. Look closely at the sheet. It has a complex polygon shape. Unlike the leaves of other trees, the maple leaf has five veins. The strips diverge from the base in different directions. Draw a separate leaf around each line. Draw sharp teeth in the shape of a crown.
It is very difficult for artists to depict a maple leaf, so draw a maple leaf from nature. Take a sample, dry it, or make a stencil out of it on a thick sheet or cardboard. Take Blank sheet paper, place in the center. Draw dots at a small distance along the outline of the maple leaf with a pencil or marker. Remove the sheet, carefully circle the dots along the contour.
Related videos
note
When drawing leaves, note that their vein always passes into the stalk.
Helpful advice
When drawing leaves, carefully look at the fact that if some leaves are folded in half along the middle strip,
then both halves will be the same.
Sources:
- http://ceolte.com/view/631
Leaves different breeds trees are ideal models for learning to draw. Their form, on the one hand, is clear and symmetrical, and on the other hand, not too simple, consisting of several elementary forms. Drawing leaves allows you to hone not only the skills of building figures and their proportions, but also the ability to select and mix colors, convey the texture of the material, and many others. Oak leaves have an interesting recognizable shape that fits into a simple oval.

You will need
- - paper for drawing;
- - a simple pencil;
- - eraser;
- - paints, brush/colored pencils/pastel.
Instruction
Focusing on the drawn axis of symmetry, draw an oval that is elongated and narrowed at one end. To do this, mark on both sides of center line approximately the same distances corresponding to half the width of the oak leaf. On the axis itself, mark the length of the sheet, proportional to its width. Connect the found points with smooth lines forming an oval, one end of which is made narrower.
More specifically, draw the central vein inside the oval, passing at its narrow end into the “tail” of the leaf. From this vein, draw lateral, thinner ones - they are directed at an angle of about 45 degrees to the central one.
Now draw the characteristic wavy edges of the oak leaf. To do this, draw a small semi-oval above each side vein, and smoothly combine the gaps between them with small curves.
Gently erase the auxiliary lines of the outer oval. On the side veins, add even smaller lines. Make the middle vein and the “tail” into which it passes thickened by drawing a line that duplicates it next to it.
You can paint an oak leaf different materials, but the principle in any case will be approximately the same. First, set the main, relatively light and light, tone of the leaf: leafy green in summer, or yellow-orange, ocher-brown in autumn.
In nature there is big variety trees, as well as a wide variety of animals or birds. All this huge set is classified according to different criteria. But features are important for an artist appearance tree. And in order to learn how to draw it, you need to observe the shape of the trunk, the shape of the branches, leaves, the shape of the entire crown of the tree. After all, each breed has its own characteristics. Therefore, we will discuss these features in 6 types of trees - maple, birch, pine, spruce, willow and oak (but I recommend reading at the beginning).
Maple.
- The trunk of a maple can bend and branch, from which it acquires a sinuous shape.
- Bark dark color, generally similar to the bark of most trees.
- The top of the crown of this tree is rounded, but may also have an irregular shape.
- The maple leaf is known to have a pointed star-like shape. Large masses maple leaves create a "prickly" texture of the surface of the crown.
- When shading the crown, you can also use longitudinal strokes, but in order to show the nature of maple foliage, it is better to add a “clumsy” or “prickly” texture stroke to the drawing, similar to maple leaves (I wrote about the texture of hatching). The same principle should be followed in painting, painting the canvas with such strokes that would create the illusion of foliage. Considering that leaves and branches are combined into separate groups, the texture of hatching and painterly stroke should be varied.
Birch

- Birch comes in many varieties. In the middle lane, the trunk of birches, as a rule, is straight and “slender”. In other areas, the birch trunk can form a "slingshot", bifurcating at the root.
- The birch crown often has an elongated shape, directed upwards. However, there are also birch trees with a spreading, squat crown.
- Birch bark is white on the surface. But it has dark "strokes", which are essentially cracks through which a dark inner layer is visible. The closer to the ground, the more often these "touches" appear on the bark. "Black dashes" are on the trunk at the base of the branches, i.e., in those parts of the trunk where the branches grow from. They can have a triangular and rectilinear shape.
- Small birch branches are so thin and flexible that they hang down, rushing down. The leaves growing on these branches form vertically directed rows. The branches leaning towards the ground are bent, giving the appearance of birches a special thrill and lightness.
- In a pencil drawing or painting, the graceful character of birch trees can be conveyed by longitudinal vertical hatching or appropriate strokes of paint. The movements of the pencil or the movements of the brush may repeat the movement of the branches described above.
Pine

- Pine trunk straight. However, there are pines with a trunk curving at the top, which have a "stocky" character. Often there are ship pines in which the crown is located at the top of the tree, and the trunk is straight and tall.
- The bark of this tree has a reddish color, which, as it approaches the ground, becomes much darker, turning into a gray-brown. In the middle of the trunk, the pine bark resembles a flaky, scaly structure. Closer to the ground, it coarsens and forms a dense cracking layer.
- The crown of young pines has a triangular, conical shape. But the crown of mature trees will already be more rounded.
- The branches of perennial old pines can be winding and gnarled. As a rule, pine branches are not strongly directed upwards. To a greater extent, they are directed away from the trunk.
- Pine needles are longer than spruce needles. Therefore, they create the feeling of a fluffy crown, which must be displayed by graphic means, or painting techniques if it's not a drawing, but a painting. It is necessary to use a texture stroke or appropriate strokes in painting. Each branch has light and shadow, so the artist needs to think about how to draw the volume of individual branches in the total mass of the crown.

- Spruce and pine have much in common, but they are different trees, with their own characteristics. For example, if the trunk of a spruce is as straight as that of a pine, then the nature of the branches will already differ from the nature of the pine branches. The branches of the spruce are slightly curved upwards. In the lower tiers, the old branches are lowered down and resemble “paws”.
- Spruce needles are shorter than pine needles, so the overall texture of the crown of this tree will differ from pine.
- The crown of spruce is shaped like a triangle or a cone and consists of tiers.
- When an artist paints a landscape, he paints trees in volume. To do this, you need to trace how the entire tree is illuminated and how individual branches or tiers of branches are illuminated. For example, going inside the crown, the spruce "paw" plunges into the shade. Outside, it can remain light, as it receives more daylight.
- The color of spruce needles is dark and saturated. Therefore, both individual spruce trees and the spruce forest as a whole will differ in color from other types of trees.

- Willow trees can look different depending on the variety. For example, at weeping willow the branches are more flexible and plastic than those of an ordinary willow. Because of this, its branches hang down, rushing to the ground.
- The willow is characterized by a constant branching of the trunk, as well as large branches.
- Willow leaves are narrow and oblong. This greatly affects the appearance of the tree. That's why this feature you need to be able to reflect through hatching or manner of writing in painting.
- The color of willow foliage is not easy. One side of the leaf is green. And on the other - light, gray-green. Therefore, the overall color of the tree is distinguished by gray-blue hues.
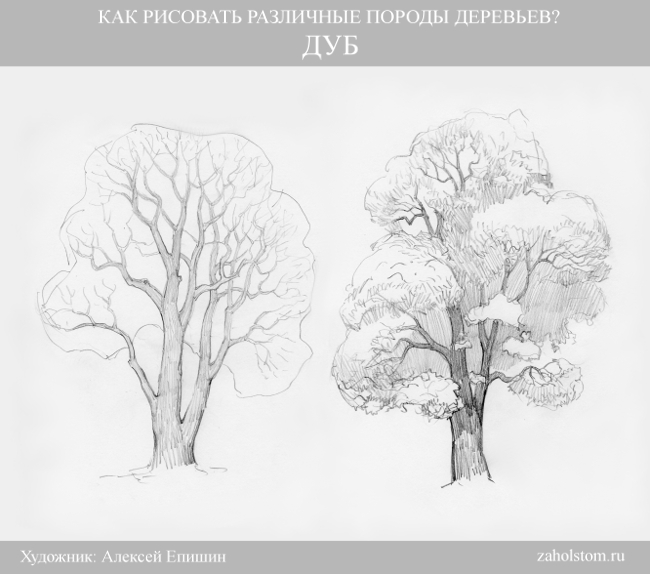
- The oak trunk is powerful. In old trees at the base, it can reach a large diameter. But in dry areas, oaks can be less stocky, looking like slender young oaks.
- The branches and trunk of the oak are sinuous and gnarled.
- The shape of the leaves is wavy. That's why general form foliage as a whole will be "sloppy-curly".
- The bark is rough and dense.
- The color of the foliage is dark green, saturated.
Here I have considered the features of the appearance of only six varieties of trees. In nature, there are a huge variety of trees and other plants. How to learn to draw, if not all of them, then at least a couple of dozen varieties? To do this, you need to develop observation. If the artist has a “set eye” and good powers of observation, then it doesn’t matter what he will draw. The main thing is to understand nature and notice key points. And what points you need to pay attention to, just discussed in educational material. For those who want to learn how to draw landscapes with trees well, it will also be useful to study the schemes and the technique called (I mentioned it at the beginning of this article).


