How to draw a beautiful leaf. How to draw autumn leaves with a pencil? Leaf prints
The leaves of different trees look different, so it is easiest to draw them from nature. But, if winter is outside the window and the leaves have long flown around, then you can use high-quality photographs. To draw tree leaves, you can use an ordinary pencil, but a colored drawing will look much more impressive. With the help of adults, you can even understand how to draw leaves. Small child.
Before you draw the leaves with a pencil in stages, and then decorate them, you should collect all the essentials:
1). multi-colored pencils;
2). Liner;
3). Eraser;
4).Album sheet;
5). Pencil.
If all those stationery that are listed a little higher are already at hand, then you can start studying the question of how to draw leaves in stages:
1. Making light strokes, outline the outlines of the leaves;

2. Start drawing a bouquet of leaves. In the central part, depict oak branches by drawing leaves of the shape characteristic of this tree and acorns;

3. Draw birch leaves above the oak leaves;

4. Above and below the oak leaves, draw aspen leaves, the teeth of which are somewhat rounded;

5. Draw linden leaves in the middle;

6. Draw a rowan leaf from the edge;

7. From below, depict a ribbon tied with a bow, with the help of which a bouquet of leaves is assembled;

8. Now you understand how to draw leaves with a pencil. But in order for the image to look beautiful and bright enough in the end, it is recommended to colorize it. To do this, first circle the sketch with a liner;

9. Using the eraser, erase the pencil lines;

10. Paint over the stems brown. And paint over the acorns with green shades, as well as yellow and brown tones;

11. Shade the oak leaves with different shades of green;

12. Color the birch leaves with green and yellow tones;

13. With a yellow and orange pencil, as well as green tones, shade a rowan leaf;

14. Color the linden leaves with different shades of green;

15. With a yellow pencil, as well as green tones, paint over the aspen leaves;

16. Color the ribbon with which the bouquet is tied with a blue and blue pencil.

The leaf image is complete! Now you know how to draw leaves. To color a bouquet of leaves, you can use not only colored pencils, but almost any paint, for example, watercolor or gouache. The main thing is that in the end the image is colorful and spectacular.

Leaf prints on paper: drawing with children. Step by step description unconventional technique of painting with leaf prints. Examples and ideas for children's creative work.

Leaf prints on paper: draw with children
Leaf prints on paper unconventional technique drawing with children preschool age, which allows you to get an interesting texture of the image using paints. This technique uses natural tree leaves.
There are several stages in drawing in this technique.
Stage 1. Autumn leaves of trees and shrubs are collected together with children on an autumn walk. Leaves of different shapes and sizes are selected.
Stage 2. A plot is invented from the collected elements - leaves. What can be depicted with the help of collected leaves, using them as mosaic elements to create a pattern or plot? What do they look like? What can be added to bring the picture to life?
The child lays out a "sketch" from the leaves on paper - his future plot. Can draw something with a simple pencil. Think right away what kind of background will be needed so that it matches the plot and contrasts with the color of autumn leaves.
Stage 3. We begin to create on the background - to create a drawing using the “leaf prints on paper” technique. First we make the background - draw it with a wide flute brush.
Stage 4. When the background is dry, we make leaf prints on it according to our sketch.
For this:
- Step 1. We paint a leaf of a tree from the back side (the side where the veins are clearly visible) desired color thick gouache.
The paint must be thick.
IT IS VERY IMPORTANT: You can’t draw too much water on the brush, so we remind the child of the rule: after wetting the brush in a jar of water, you need to remove excess water by applying the brush several times to the edge of the jar. Extra drops of water will flow from it. And only after that you can pick up thick gouache paint on a wet brush.
— Step 2. We lay the prepared sheet with the paint down on the background. This must be done very carefully and carefully. Put a paper towel on top and press down with your palm.
— Step 3. Carefully remove the sheet and napkin from the background. The image is ready. Then we repeat everything with the following leaves.
— Step 4. We supplement the resulting image with details.
Consider this technique using examples of drawing an autumn forest with children 4-6 years old using the “prints with leaves on paper” technique.
Drawing in the technique of "prints of leaves on paper": example 1
Theme: Draw an autumn forest
For work it is necessary to prepare:- gouache paints; - white album sheet A4; - a flat wide brush (for example, No. 12), - fallen leaves from different trees.
How to draw an autumn forest with children using the technique of leaf prints on paper: a step by step description
Step 1. Draw the sky on the background.
Let's start with the background design. Place an A4 size sheet horizontally. Dip the brush in white and blue paint and move from left to right to paint the sky and blur it a little with water. Going down the sheet, we try to take more white paint on the brush than blue. The sky can be drawn on 1/4 sheet.

Step 2. Draw the ground on the background.
Invite the children to remember what colors fall has? Let them think about the difference between old trees and young ones? What trees will they depict in the picture? Let's paint the ground with fallen leaves with brown-green paints by moving the brush from left to right.

Step 3. Draw a tree using the technique of leaf prints on paper.
Choose a piece of paper you like, preferably a large one. We paint it on the reverse side with paint of any color in accordance with the colors of autumn. This is an important nuance, since the veins on reverse side tree leaves are more pronounced, which means they will give us a more beautiful print.
Reminder: in this painting technique, the paint must be thick enough. Do not wet the brush too much in water, otherwise the print will be smeared.
Paint the tail of the leaf too.
Then you need to take a leaf, lay it carefully on the prepared background in the background so that there is no shift of the leaf on the paper. From above we cover our sheet with a paper napkin. It will protect your work from smearing the paint that has come out from under the leaflet. Next, you need to press down the napkin with your palm or lightly stroke it with your fist.
Remove napkin. Carefully remove the leaf by the tail.
So the first painted tree appeared in our autumn forest!

Step 4. Draw old trees big size leaf prints.
Similarly, we draw a few more trees with prints of different leaves of large size and paints of different colors. These are old trees, they are larger in size. Try to paint the leaves in several colors. This is what happened to the four-year-old Nastenka.

Step 5. We draw young trees and bushes with imprints of leaves.
Now let's choose a few smaller leaves - these will be young trees and shrubs. Let's paint them with different colors of autumn and make prints on foreground. Thus, we get a landscape - an autumn forest. This is the autumn forest that seven-year-old Liza painted with leaf prints.

Drawing in the technique of "prints of leaves on paper": example 2
Theme: draw an autumn tree
We decided to draw a tree collectively with a group of children. On a sheet of drawing paper in A1 format, I outlined a tree trunk and branches. And Mark and Lesha painted the barrel with brown paint.

Nastya and two Polinas painted the leaves and made prints on the tree. When the boys had painted the trunk, they also joined in the work with the leaf prints.

This is such a fabulous autumn tree during the fall of the leaves that the children came up with and drew.

We could not throw out the leaves painted after the prints. We glued some under the tree with PVA glue. And the rest dried - useful for future creative work.
leaf print painting- a very interesting and exciting activity. Give free rein to children's imagination and they will "create" wonderful works!
Creative task:
When discussing fall work, talk to the children and ask:
- Which deciduous trees Are you aware?
Have you been to the autumn forest? What happens to the leaves on the trees in autumn? Tell me, on which trees the leaves turn yellow, and on which they turn purple?
- Draw the autumn forest with leaf prints.
- Devote an hour family creativity. Sit in a close family circle and draw on paper a big tree with prints of autumn leaves. Have fun and decorate your home or your cottage, kindergarten group with this children's creative work.
I am sure that your children will have unforgettable impressions for a lifetime. Good luck with your family work!
Drawing with leaf prints on paper in kindergarten
And here is how children from Saratov painted with leaf prints on paper. This photo was sent to our competition "Autumn Workshop" by Ilyushina Natalya Vasilievna (Saratov, MDOU kindergarten No. 196 of a compensating type, educator of the 1st category).

Such drawings - prints of autumn leaves - were obtained by children - pupils of Natalya Vasilievna.


Leaf prints on paper: materials for activities with children
Before drawing with leaf prints, discussing the plots of future children's work, read one of the poems about autumn to the children, discuss what palette of colors autumn has, how autumn differs from other seasons. Spread the leaves of different trees around the children and play the game “We walked through the forest” (a description of the game is given below) and discuss how the leaves of different trees differ from each other in shape and size, color, how they can be recognized.
To help teachers and parents, a small selection of poems to discuss with preschoolers before drawing autumn trees using the technique of leaf prints on paper: these are poems about the colors of autumn. Choose those verses that are more in line with your intention and the intention of the child. There are also hints in these verses about what to paint in the autumn landscape.
Poems about the colors of autumn for drawing lessons using the technique of leaf prints on paper
Autumn on the palette
mixed paints:
Yellow color - for linden,
for rowan - red.
Ocher in all shades
for alder and willow -
All trees will
to look nice.
The wind blew
dried leaves,
For cold rain
beauty is not washed away.
Did not decorate
only a pine tree, yes a Christmas tree,
Too many girlfriends
prickly needles. (O. Korneeva)
Who paints the leaves
at oaks, birches.
maples and aspens -
So outfit them toss!
Peeped in the morning
like on a maple branch
tiny autumn
in a green dress
yellow scarf,
and red boots
taking with you
watercolors of various
deftly paints the leaves
V different colors.
So, here, and is born
this beauty! (G. Ryaskina)
Autumn colors scattered
On trees and bushes.
And they burn brighter
Like summer fires.
Golden and crimson
Yellow holiday dress.
The last leaf falls
Falling leaves are coming!
I draw autumn orange –
A leaf that flew away with the last hello,
Unripe berries of tart mountain ash,
Fragrant flowers small baskets.
The path to the house with a bed of leaves,
And an elegant red fur coat - a fox.
And yellow - grass and weeping willow,
And the prankster maple lush mane.
I paint autumn with blue paint:
Rain of the page in a line oblique,
And clouds of nimble flying flock,
And a puddle with a brave seagull boat.
There is a lot of work for the red color:
Here the sun rises before the windy dawn,
Fireworks of viburnum sparkle on the branches,
And late raspberries are hiding.
But the fly agaric in a bright red beret
Stands on a hillock, dreaming of summer.
I'll draw white polka dots for him
And a fluffy skirt on a thin leg.
Now I'll pick up emerald paint
And I will add green color to the Christmas trees.
And then, beyond the forest, up to the sky,
I draw expanses of winter bread.
I'll spend a little black:
I will paint clothes for crows and woodpeckers.
Brown I paint trees and branches,
And white mushrooms tight berets.
And again I draw the fire of leaf fall ...
How many colors do I need for autumn!
Gives autumn miracles
And what!
The forests are dressed up
In golden hats.
On a stump they sit in a crowd
red mushrooms,
And the spider is a dodger! -
Pulls the network somewhere.
Rain and withered grass
Sleepy more often at night.
Incomprehensible words
They mumble until the morning.
(Author - M. Geller)
Who is in our park today
Did you paint the leaves?
And circles them, blows them off the branches?
It's autumn!
Poems and the game "We walked through the forest"
Autumn has come to visit us
Rain and wind brought
The wind is blowing, blowing
It plucks leaves from branches.
Leaves swirl in the wind
And under our feet lie down.
Well, we'll go for a walk
And let's pick up the leaves...
Then the children stand in a circle and, moving in a circle, pronounce the words and among all the proposed leaves of the trees, they find the leaf that is mentioned in the text.
We walked through the forest, we found an oak leaf ....
... an ash leaf was found ...
... they found a leaf from a birch ...
…We Maple Leaf found!
Autumn took a basket under her arm
Colors cheerful in a bottle spread:
Yellow for the leaves, blue for the sky
A little brown to paint the trunks,
A drop of green so that they are not withered
The sun burnt bangs of grass.
I poured a little orange paint,
To color the mushrooms by the path,
Red and white for fly agaric
I saw a saffron growing near the fence,
For russula various paints -
May the world be joyful, as if in a fairy tale!
Brushes in the basket, easel and tripod,
Let them be surprised - that's the artist!
She went out into the street, waved her brush -
The blue sky was covered in clouds.
Again waved and became around
Gray grass, and the river, and the meadow ...
What happened to my paint?
Apparently I don't know how to paint.
-Paints do not need to be mixed all at once.
You need to write with different paints. (O. Goldman)
Leaf prints on paper: more options for tasks for children
This idea was sent to us at our Autumn Workshop by Anastasia Iosifovna Kalinkova from St. Petersburg.
“Autumn Park” was painted using the technique of leaf prints on paper by her son Jaromir (3 years old). Jaromir made prints not with gouache paints, but with finger paints. And then I painted the trunks with felt-tip pens. This is the drawing he made.

Anastasia came up with different tasks for her son based on a drawing obtained using leaf prints. She writes:
“Drawing is interactive. We used it as decoration for table theater. Can be on the go fairy tale finish the job. Yes, it's raining for us. A hedgehog crawled into the park (plasticine and seeds were used for its manufacture) and began to prepare for the winter - to make a nest for itself.
You can also use this drawing for reading classes. With the help of a thematic poster, we compared the leaf from which tree became our painted tree. Then we signed the cards with the names of the trees with the “hand in hand” technique, and the child picked up the cards with the names for our trees.
More about drawing with prints with preschool children You will find interesting information in articles on the "Native Path":
More interesting ideas By autumn crafts and drawing with children You will find
Tree leaves are perhaps the most beautiful of natural decorations. That is why, the leaves can often be seen in the paintings of the most different artists- from beginners to professionals. If you don't know how to draw leaves yet, this article is for you.
Don't be put off by the fact that the photo shows only one oak leaf. Having learned how to draw it, you can easily draw any other leaves - the main thing is to correctly understand the principle.
How to draw leaves quickly and easily
First, draw the outlines of the leaf. To do this, approximately in the middle of a paper sheet, draw a vertical strip, slightly curved - this will be the middle. And to it - add a drop-shaped detail. This is the basis of the future oak leaf.
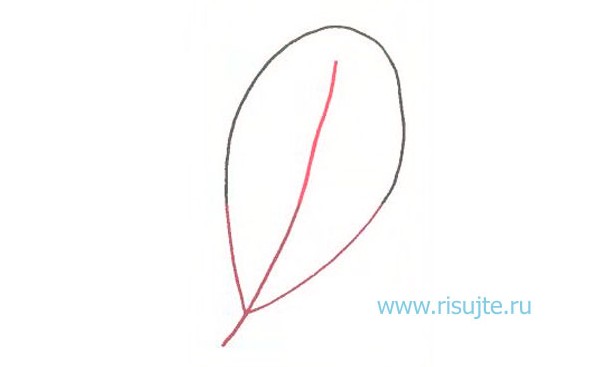
Now, it's time to turn this sketch into a more detailed drawing. To do this, right inside the drop-shaped part, draw carved wavy lines - like a real oak leaf. In some places, you can slightly go beyond the edges of the sketch outlines - or, conversely, not reach them. It doesn't matter. Your drawing does not have to exactly repeat the photo. After all, no two leaves are exactly alike. And you also need to slightly change the lower part of the leaf - making a stem from a simple line.

There is very little left. Erase the extra pencil lines left over from the sketch with an eraser. And then - draw the veins of the leaf. It's very simple - just draw on vertical line in the middle, several straight small lines on each side.

That's all! Now you know, how to draw leaves. And, not only oak. In the same way, you can draw maple leaves, and birch and any other tree.

Draw with pleasure!
Instruction
very unusual and interesting shape has a maple leaf. It should begin with the image of a circle, with a part of a triangular shape missing at the bottom. Inside the resulting figure, you need to draw 5 straight lines directed in different directions. From the junction of these lines down, you need to draw another line (leaf stalk). Next, around each of the five lines, you need to draw figures sticking out in different directions, resembling the outlines of houses. Around the two lower strips, smooth triangular lines should be drawn, connected at the base of the handle. Now the outlines of the maple leaf should be serrated, and veins should be drawn inside the leaf.
The oak leaf also has a very interesting shape. Drawing an oak leaf is easy. First you need to draw on an oval with a slightly elongated lower part. Then wavy lines should show unusual shape oak leaf. At the bottom of the resulting figure, you need to draw a short stalk. Next, you need to draw veins on the plate.

Drawing a linden leaf is also not difficult. The base of the linden leaf is a figure resembling. So, first of all, you should draw just such a figure. Next, the sheet should be memorized and the stalk should be drawn to it. It remains to draw thin veins inside the sheet. Linden leaf is ready.

A strawberry leaf consists of three small leaves. In order to draw it, for starters, you need to draw on paper 2 intersecting perpendicular lines(cross). The three upper segments should be the same, and the lower one should be slightly longer than the rest. Next, draw three ovals connected to each other. The three initially drawn segments should become their middle lines. Now the three resulting ones should be serrated using triangular lines. Then you need to finish the sheet with a stalk and veins.

A rowan leaf, like a strawberry leaf, consists of several leaves. First you need to draw the main long line. From it, you should draw an average length of a pair of segments directed in opposite directions. Now you need to draw oblong leaves with small edges. The segments coming from the main stem should serve as median lines to the leaves. The lower part of the main line should be turned into a leaf stalk. The final step in drawing a rowan leaf is the image of veins on it.

Related videos
note
Now you will learn how to draw a maple leaf. Step 1. To make it easier for us to draw a leaf, let's make a sketch of three lines. Step 2. Let's put four points, which will help later in drawing the sheet. The sheet is ready, it should turn out something like this. Watch the video below and you will learn how to draw leaves on a branch.
Sources:
- how to draw oak leaves
Each tree differs from another species in silhouette, bark structure, leaf shape. Big variety trees distributed throughout the world. Therefore, the variety of forms of their leaves is also great. To learn how to draw leaves trees, take a simple sheet of birch or linden without any difficulties. How to learn to draw leaves, you can take their most complex forms.

You will need
- sheet of paper, pencil
Instruction
Prepare necessary materials for drawing leaves trees. Start drawing a birch leaf in the form of a teardrop shape. Jagged its edges with triangular lines. On the sheet you need thin and small veins. Don't forget to add a cutting.
Draw a linden leaf. It won't cause any problems either. His sheet resembles. Thus, on paper, you need to designate such a shape of the figure. Serve the sheet, draw the veins inside and draw the stalk to it. Linden leaf turned out.
Draw a maple leaf. It has an interesting and unusual shape. Start it with the shape of a circle without the absence of a triangular part at the bottom of it. From this shape, draw five straight lines that point in different directions. From the center of the connection of these lines, draw another line - this will be a maple stalk. Then, around each of these lines, you need to draw figures sticking out in different directions. They resemble the shape of houses. Around the 2 lower strips, you need to draw triangular lines that connect at the base of the maple handle. It remains to memorize the sheet and draw thin veins.
Learn to draw an oak leaf. It is not difficult. Draw on paper a figure in the form of an oval with a slightly elongated part at the bottom. Use wavy lines to show nice shape oak leaf. And at the bottom of this figure draw a stalk. Don't forget to draw the veins on the sheet.
Try drawing a leaf. It consists of three small leaves. Draw two perpendicular lines on paper. The three sections at the top should be the same length, and the bottom section should be slightly longer than the rest. Then draw 3 ovals. They must be interconnected. It turned out three. Serve them with triangular lines. Draw the leaf veins and stalk.
Helpful advice
To draw the leaves of the trees, use a simple pencil. This is the most common drawing tool, it does not take long to find it.
Sources:
- How to learn to draw leaves, branches and other parts of a tree
There is a great variety of trees. All of them have a certain appearance and differ from each other in the shape of the trunk, the structure and color of the crown and have different sizes and shapes of leaves. You can draw a single leaflet from nature or using a stencil.

You will need
- - paper;
- - a simple pencil;
- - eraser;
- - brush;
- - watercolor paints.
Instruction
Draw a birch or linden leaf. To do this, outline an oval with a thin line. Draw a vein in the middle and depict both halves. Make teeth around the edges. Draw the sheet more clearly.
To make the leaf look more natural, circle it along the contour with a thin tip of the brush. With smooth strokes, paint over the entire sheet. The veins should have a lighter tone. To do this, with a brush dipped in water, draw a light stripe. To keep the lines thin, hold the brush vertically. Blot the drawing with a clean, soft cloth. The paint from the places moistened with water will be absorbed by the paper. Light stripes form on the sheet.
Draw an oak leaf. To do this, also draw an oval, narrow it at the end. Draw the main vein in the middle. It will smoothly pass into the stalk. Mark small strips from it in different directions. Draw the right and left sides of the leaf symmetrically. Make the edge of the sheet wavy.
Draw a strawberry or strawberry leaf. To do this, visually determine the ratio of the width of the sheet to its height. Draw a horizontal strip of the sheet with a thin line and mark its width. Draw the leaves, make the edges jagged.
Draw a branch with leaves. On a piece of paper, mentally mark the location of the branch, sketch it. Look, how many leaves will there be? Will the leaves be the same size or different? Keep in mind that some of the leaves cover the others. Look carefully at the shape of the leaves, their color. Draw some leaves darker and others lighter.
Try to draw maple leaves. They can be green, yellow and red. Look closely at the sheet. It has a complex polygon shape. Unlike the leaves of other trees, the maple leaf has five veins. The strips diverge from the base in different directions. Draw a separate leaf around each line. Draw sharp teeth in the shape of a crown.
It is very difficult for artists to depict a maple leaf, so draw a maple leaf from nature. Take a sample, dry it, or make a stencil out of it on a thick sheet or cardboard. Take Blank sheet paper, place in the center. Draw dots at a small distance along the outline of the maple leaf with a pencil or marker. Remove the sheet, carefully circle the dots along the contour.
Related videos
note
When drawing leaves, note that their vein always passes into the stalk.
Helpful advice
When drawing leaves, carefully look at the fact that if some leaves are folded in half along the middle strip,
then both halves will be the same.
Sources:
- http://ceolte.com/view/631
Leaves different breeds trees are ideal models for learning to draw. Their form, on the one hand, is clear and symmetrical, and on the other hand, not too simple, consisting of several elementary forms. Drawing leaves allows you to hone not only the skills of building figures and their proportions, but also the ability to select and mix colors, convey the texture of the material, and many others. Oak leaves have an interesting recognizable shape that fits into a simple oval.

You will need
- - paper for drawing;
- - a simple pencil;
- - eraser;
- - paints, brush/colored pencils/pastel.
Instruction
Focusing on the drawn axis of symmetry, draw an oval that is elongated and narrowed at one end. To do this, mark on both sides of centerline approximately the same distances corresponding to half the width of the oak leaf. On the axis itself, mark the length of the sheet, proportional to its width. Connect the found points with smooth lines forming an oval, one end of which is made narrower.
More specifically, draw the central vein inside the oval, passing at its narrow end into the “tail” of the leaf. From this vein, draw lateral, thinner ones - they are directed at an angle of about 45 degrees to the central one.
Now draw the characteristic wavy edges of the oak leaf. To do this, draw a small semi-oval above each side vein, and smoothly combine the gaps between them with small curves.
Gently erase the auxiliary lines of the outer oval. On the side veins, add even smaller lines. Make the middle vein and the “tail” into which it passes thickened by drawing a line that duplicates it next to it.
You can paint an oak leaf different materials, but the principle in any case will be approximately the same. First, set the main, relatively light and light, tone of the leaf: leafy green in summer, or yellow-orange, ocher-brown in autumn.
Guys, we put our soul into the site. Thanks for that
for discovering this beauty. Thanks for the inspiration and goosebumps.
Join us at Facebook And In contact with
All children love to draw. But sometimes the child does not turn out the way he wants. Or maybe he doesn’t have enough familiar ways to express himself? Then you can inspire him to experiment with different techniques among which there is sure to be a favorite. After that, your child will probably want to invent something new.
website collected the most interesting techniques for you.
Patterns from dots
First, draw the simplest squiggle. Then, using a cotton swab and paints (gouache or acrylic), we make intricate patterns, as the soul lies. Paints are best pre-mixed and slightly diluted with water on the palette.
Frottage
Since childhood, a technique familiar and loved by many. We put an object with a slightly protruding relief under a sheet of paper and paint over it with pastel, chalk or an unsharpened pencil.
Foam prints
Having dipped a sponge in thick gouache, a child can draw landscapes, bouquets of flowers, lilac branches or animals.
Blotography
One option: drip paint on a sheet and tilt it in different directions to get some kind of image. Second: the child dips the brush into the paint, then places the inkblot on a sheet of paper and folds the sheet in half so that the inkblot is printed on the second half of the sheet. Then he unfolds the sheet and tries to understand who or what the drawing looks like.
Hand and foot prints
It's simple: you need to dip your foot or palm in paint and make an imprint on paper. And then use your imagination and finish drawing a couple of details.
Paint Patterns
For such an application, you need to apply a thick layer of paint on paper. Then, with the back end of the brush on the still wet paint, scratch patterns - a variety of lines and curls. When dry, cut out the desired shapes and stick on a thick sheet.
Fingerprints
The name speaks for itself. It is necessary to paint the finger with a thin layer and make an imprint. A couple of strokes with a felt-tip pen - and you're done!
Monotype
A drawing is applied to a flat smooth surface (for example, glass). Then a sheet of paper is applied, and the print is ready. To make it more blurry, a sheet of paper must first be wetted. When everything is dry, you can add details and outlines if desired.
Grattage
The highlight of the work is that the drawing needs to be scratched. A sheet of cardboard is tightly shaded with spots of multi-colored oil pastels. Then black gouache must be mixed on a palette with soap and painted over the entire sketch. When the paint is completely dry, scratch the pattern with a toothpick.
air paints
To prepare the dye, you need to mix a tablespoon of "self-rising" flour, a few drops of food coloring and a tablespoon of salt. Add a little water to the consistency of thick sour cream and mix well. The paint can be placed in a confectionery syringe or in a small bag. Tie tightly and cut corner. We draw on paper or ordinary cardboard. We place the finished drawing for 10-30 seconds in the microwave at maximum mode.
"Marble" paper
Paint a sheet of paper yellow acrylic paint. When it is completely dry, paint over again with diluted pink paint and immediately cover with cling film. The film needs to be crumpled and gathered into folds, since it is they who will create the desired pattern for us. We wait for complete drying and remove the film.
water painting
We draw with watercolor a simple figure and fill it with water. Until it dries, we put colored blots on it so that they mix with each other and form such smooth transitions.
Prints of vegetables and fruits
Vegetable or fruit should be cut in half. Then you can cut some kind of pattern on it or leave it as it is. We dip into the paint and make prints on paper. For prints, you can use an apple, potato, carrot or celery.
Leaf prints
The principle is the same. We smear the leaves with paint and make prints on paper.


