How can I adjust the valves to give 2106 VAZ. When the gap is too big. Hydraulic compensator for valve protection.
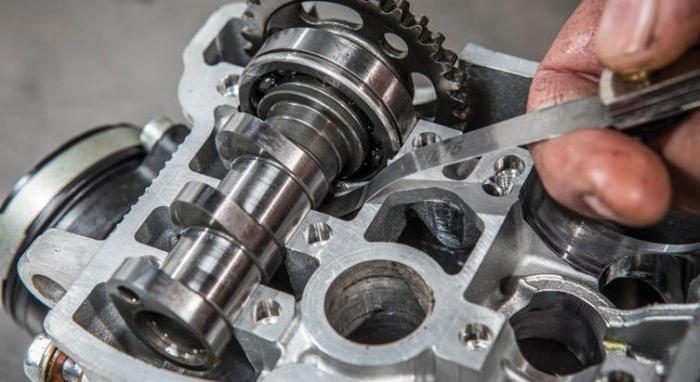
Then a retainer is inserted, after which the camshaft rotates until the cam comes off the washer. After removing the old washer and checking / replacing with a new one, the camshaft rotates backward again. Note that the camshaft must be rotated with a key that rotates the camshaft gear. should not be twisted, since during rotation it is necessary to load properly.
What is the result
It is worth noting once again that for measurement accuracy, it is optimal to cool the engine to 20 ° C, and then take measurements. Clearances must be measured at least twice. The camshaft must be rotated one full turn. If the gaps do not match, then the measurements must be repeated. For exact definition It is best to have several probes of different thicknesses on hand.
In addition, the use of larger or smaller shims is highly discouraged. This should be understood as the installation of small washers, as well as a slight turning of elements of a larger diameter before installation. In such cases, a reasonable way out may be the usual rearrangement of the washers already on the motor in places. The fact is that these parts are heavily loaded. The initial discrepancy to the required dimensions downwards and any third-party adjustment manipulations can lead to accelerated wear of the washers, malfunctions in the engine, or failure of the internal combustion engine itself.
An experienced driver immediately determines when the VAZ 2106 valves need to be adjusted. A running engine makes a special knock, engine power has dropped, and fuel consumption has increased. Unlike foreign cars, the domestic auto industry produced (and produces) classic cars in which many operations are performed manually, and are not automatically configured.
Why is valve adjustment required? The running engine heats up, and quite strongly. When heated, it increases and changes the main parameters of the parts. At the same time, many of them need regular systematic adjustment to the standards approved at the factory. Structural features in the gas distribution mechanism determine the adjustment approximately once every six months, or even more often. Such work is easy for self-fulfillment, you just need to follow the order of disassembly-assembly.
Reasons for the need for work and their stages
The precise operation of the valves is required for the accuracy of the operation of the phases of the gas distribution mechanism, the normal compression in the cylinders and the process of fuel combustion depend on this. The smooth operation of the engine leads to its long-term efficient operation. A small valve clearance prevents it from clearly seating in the seat of the block head, because of this, the gases from the combustion chamber come out. The exhaust valve can burn out, its seal deteriorates, and the oil becomes clogged with combustion waste. This leads to an increase in its consumption.
When the clearance of the element is too large, then the opening of the intake valve will be insufficient, the fuel mixture will flow in deficiency. The engine will "knock" and work worse. That is why regular inspection and adjustment is necessary. Scheme auto 2106 contains the necessary drawings for independent work. The procedure for connecting the electrical wires of the wiring in the carburetor to the EM valve from the safety block also describes the “six” wiring diagram.
On an engine that has worked for a certain time, it is difficult to adjust the valves with a conventional probe without error, so it would be wiser to use a micrometer. Any dismantling work begins by turning off the supply of electricity from the battery. The engine must be cold! When removing the top cover of the engine, be careful not to touch the wiring harness located on the side wall. Disconnect, just in case, the battery so that the wiring does not close. Disconnect email. wire wiring from el. coolant temperature sensor, remove the distributor el. ignition (when removing the head of the block).
In the first variant, using a probe, the operation scheme is as follows.
- Turn the crankshaft until the sprocket marks and the housing at the camshaft case match.
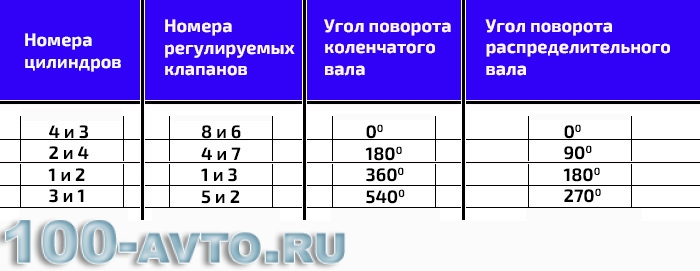
- First of all, valves No. 6 and No. 8 are regulated.
- After turning 180 degrees, adjust No. 4 and No. 7.
- On the next 180 degree turn, adjust #3 and #1.
- Lastly, adjust elements No. 2 and No. 5.
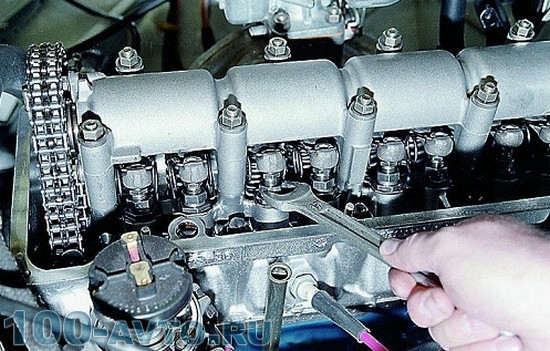
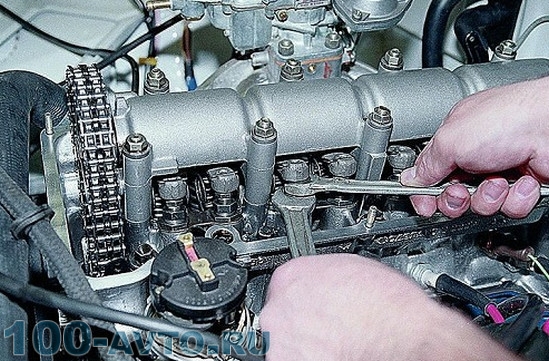
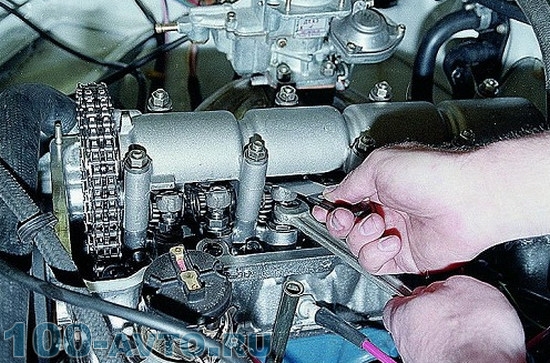
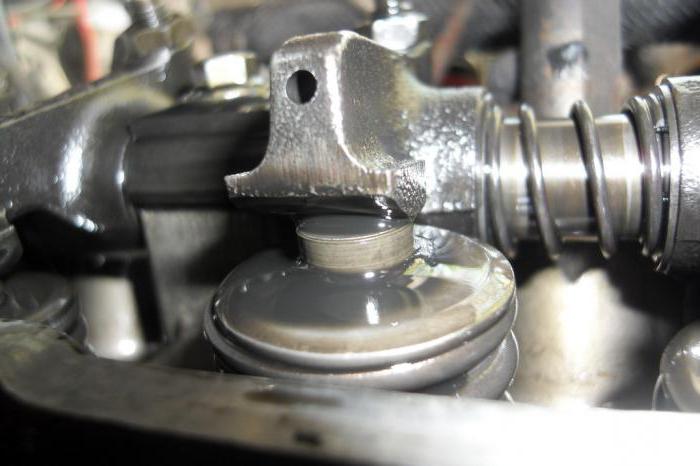
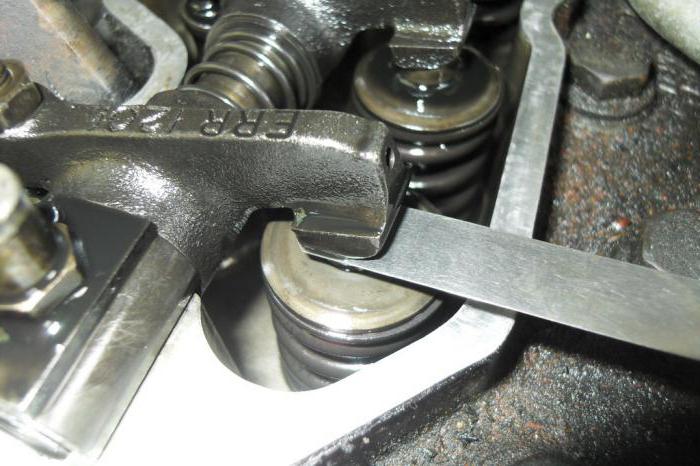
The operating procedure is as follows: there is a gap between the fist and the lever, the probe is inserted into it. Lightly applied force - the valve does not need to be adjusted. When the passage of the probe has occurred without effort, or it is not inserted at all, use the keys (by 17 and 13) to unscrew the lock nut of the adjustment bolt and turn it to the desired angle.
The second method is using a micrometer and a special marking bar.
She hangs herself on the camshaft. First, everything is adjusted in the “zero” position, then rotated 180 degrees, as in the first version. The bar is placed on the camshaft, the shaft mark should be at the “0” point. The hourly micrometer is set to "0" and fixed. Inspect and remove the backlash, the micrometer should show 0.5 mm. Following the micrometer, the valve is adjusted with a key of 13. Tighten the valve and at the same time make sure that it does not go astray! The rest of the valves do the same.
Repair of the EM valve of the fuel jet 2106
One of the problems and the cause of interruptions in the operation of the engine at idle can be the XX installed on the jet ( idle move) damaged solenoid valve. The fuel jet XX is one of the components of the carburetor. Its structure scheme may or may not have a solenoid valve.
In the latter case, the replacement of email. magnetic valve - plug-holder. The VAZ 2106 fuse box gives voltage to this valve during working ignition. At the same time, the layout of the “six” wiring shows their connection.
It is serviceable or it needs to be replaced, you can check it after cleaning the central channel of the fuel jet. After installing it, twisting, connect the solenoid valve to the "plus" el. car wiring harness. The engine is started, power is removed from the element terminal.
Turning on the ignition, touch the power wire to the valve terminal. Clicked - power is supplied to the solenoid valve. There is no click - the EMC needs to be replaced or fuse No. 9 has failed (see the wiring diagram for the VAZ 2106 car).
Different cars, depending on the type of engine, may have two or more valves per cylinder. Some of them serve to inlet the fuel-air mixture, others release exhaust gases. The first valves are simply called intake, and the second - exhaust. And they are actuated and regulated by the so-called valve (or gas distribution) mechanism. There is a lot of controversy about how to adjust the valves in the most profitable and simple way.
Importance of adjusting engine valve clearances
After starting, the engine and all its parts begin to heat up, and therefore expand. At the same time, one should not forget about the natural wear and tear of rubbing and contacting parts. This necessitates strictly defined clearances between some components. And the thermal clearances of the valves (between the camshaft cam and the valve stem) are among the most important.
If the gap is too small, the engine will not be able to fully realize its potential, which will not be slow to affect the dynamic and speed characteristics of the car. Along the way, overheating of the exhaust valves and melting of their edges will occur.
If the gap is more than expected, then the characteristic “clatter” of the engine will be a wake-up call for the car owner, which can sometimes go away with the car warming up. With increased clearance, the camshaft cam starts to "knock" on the valve stem rocker instead of pushing through it.

Sectional view of a valve train using the example of a twin camshaft engine
The need to adjust the valves is ripe if the following signs are visible:
- in the area of \u200b\u200bthe cylinder head cover there is an extraneous, slightly ringing sound;
- the gas distribution mechanism was repaired;
- the last adjustment of the thermal clearances of the valves was carried out more than 20 thousand km ago;
- engine output has dropped noticeably;
- as a consequence, high fuel consumption is possible.
In most modern motors, hydraulic compensators are used to adjust thermal gaps. It is convenient and does not require third-party intervention, although there is an opinion that the wear of components still occurs a little faster. The engines of many cars, in particular on the VAZ classic, require manual adjustment of thermal gaps. Someone considers this business simple, someone, on the contrary, is responsible and serious work. It all depends on experience, options for techniques, skill and patience. Work is recommended to be carried out after approximately 20 thousand kilometers since the last adjustment.
There is also not much difference whether you have to deal with a gasoline or diesel engine. There are no significant and fundamental differences in the process of adjusting the valves.
Even better is to combine valve clearance adjustment with an engine oil change. And in that exact order. This will allow dirt, dust and sand that can get into the motor during adjustment to leave then along with the old oil and oil filter.
Preparation
Before starting work, it is better to thoroughly wash the car body and clean the engine compartment of dust and dirt so that nothing extra gets into the engine after removing the cylinder head cover. Then it is very desirable to install the car on the most even surface, tighten the parking brake and place stops under the wheels. It will be useful to have good and uniform lighting. If the latter is not enough, get additional light sources.
It is not at all necessary to buy such stops, it is quite possible to make them yourself
Next, you need to wait until the engine cools down to the recommended temperature (usually 15-25 ° C) so that the measurements are as accurate as possible. Sometimes experienced craftsmen take up the “hot” adjustment, taking into account certain corrections for the increased temperature of the motor. But engines are different, with their own nuances and amendments, so it's better to wait. Free time can be used to replace filters, check optics, etc.
The valve clearances can also be adjusted with the cylinder head removed. Here, to whom which scheme of work is more convenient, this method cannot be considered wrong. It should only be remembered that when installing the cylinder head on the machine and broaching, clearance shifts are possible either in plus or minus from the required indicators. Therefore, it is better to play it safe and double-check.
List of tools for work
- Set of wrenches.
- A couple of screwdrivers.
- Measuring probe.
- Set of adjusting washers.
- Micrometer.
- Tweezers.
- Special device for adjusting valves.

A set of tools for adjusting valves on VAZ cars
Valve clearance adjustment using a feeler gauge
- First you need to unhook all the tubes from the valve cover, the cables leading to the damper actuators, and dismantle the air filter housing. To make the crankshaft scroll easier, the candles can also be unscrewed.
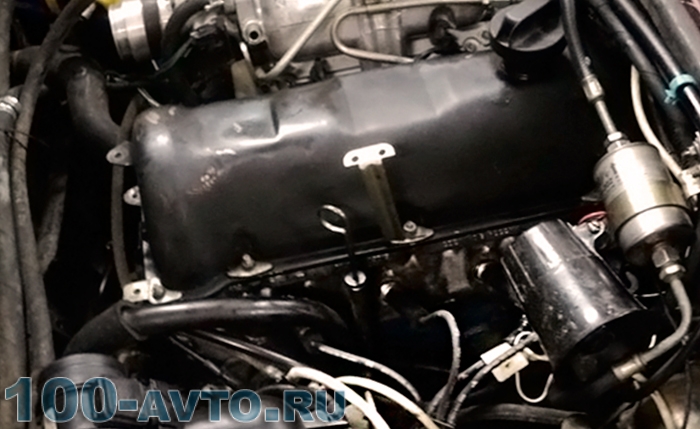
- Unscrew the two nuts and remove the cover, after which oil residues are removed from the top of the cylinder head.
- Remove the front timing belt cover.
- The piston of the cylinder from which the clearance adjustment will begin is set to the top dead center of compression. All valves in this position will be closed. In the process, for the most accurate result, you can focus on the marks applied by the manufacturer.
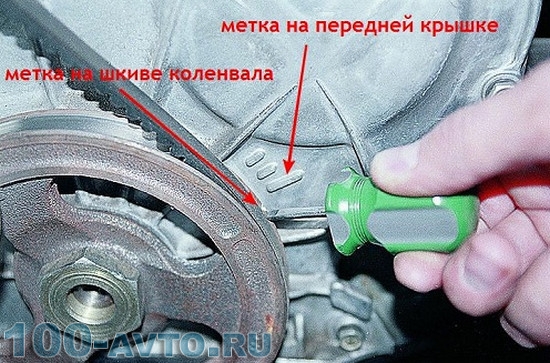
- Next, the crankshaft should be rotated clockwise along the sprocket. For optimal valve adjustment, it is required that the marks on the crankshaft and bearing housing coincide. For more convenience, you can apply your own labels. Then in the future the position of each cylinder can be determined by the teeth of the sprocket.
- On the screw used to set the gap, the lock nut is pressed. The gap is set in such a way that the flat feeler gauge is the bolt turning limit. Then the locknut is tightened. Along the way, it is necessary to monitor the tightening force of the locknut, otherwise the obtained parameters can be knocked down.
- Having finished with the tightening, it is necessary to check the set gap again with a probe. The latter should pass with a slight effort. If the result differs from the desired - carry out the adjustment again.
- Repeat the process with all subsequent valves.
Above was a method for adjusting valves using a feeler gauge. On many modern cars for this procedure, special adjusting washers are used. The whole scope of work is perfectly demonstrated in the video below.
An example of valve adjustment on a VAZ 2108–2115
How to adjust a 6-cylinder in-line engine: video
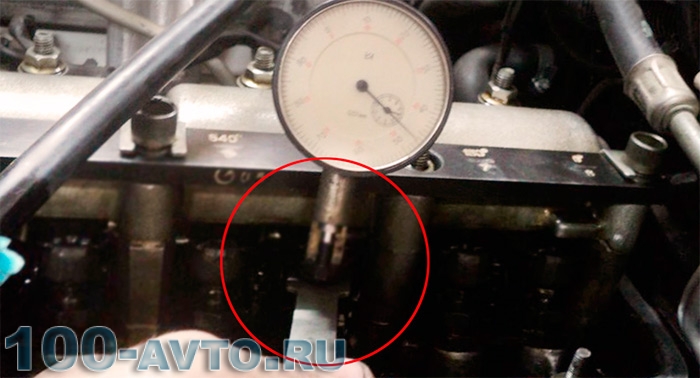
How to adjust with a rail and indicator
A special rail paired with an indicator can also be used to adjust the thermal clearance of the valves. This set helps to achieve greater accuracy than using a feeler gauge or washers.
Video about the sequence of work
If there is HBO (gas)
If the vehicle is equipped gas equipment, valve adjustment acquires its own characteristics. The intake valve clearances can be set according to the instructions, as for gasoline. But graduation needs special attention. This is due to the characteristics of the fuel-air mixture on gas, the combustion temperature of which is higher and the combustion time is lower. In the presence of HBO, it is better to adjust the exhaust valves at intervals twice as often, and set the gaps themselves to the maximum allowable according to the instructions. Some masters advise to bet 10-20% more than recommended.
Using the above methods, it is possible to accurately adjust the thermal clearances of the valves, simultaneously optimizing the gas distribution phases and improving the overall operation of the entire gas distribution mechanism. This will increase the service life of engine components and its motor resource.
It is necessary to pay attention to the operation of the valves in the car in the event of a characteristic knock during engine operation, with a noticeable drop in its power, an increase in fuel consumption, and also with unstable idling. Due to some design features of the car's gas distribution system, it needs maintenance approximately every six months. For many motorists, adjusting the VAZ 2106 valves with their own hands has become a familiar procedure, even because this work is not particularly difficult.
Why do you need valve adjustment?
If you carefully consider the "six" valve system, its execution can be conditionally compared with the rocker arm diagram. Rotating, the camshaft presses its cam on one side of the rocker, raises it, while the second edge, located on the top of the valve, lowers the rocker, while opening ways for injecting the fuel mixture or for removing gases.
Between the parts under consideration, it is necessary to provide a certain gap. The valve opens to an indicator that ensures the correct functioning of the motor.
Helpful advice
If the gap is too small, the valves close incompletely, which causes a decrease in engine power, entails excessive fuel consumption and failure of the valves themselves. In addition, due to the discrepancy between the gaps and the normative indicators, the noise generation of the engine increases, the rods are deformed, respectively, the gap of the under-closing of the valve itself increases even more.
Fuel burning in the engine leads to heating of all its parts, including the gas distribution mechanism. Due to heating, the valve clearances discussed above also decrease. As conceived by the developers, the indicator of temperature gaps for the VAZ 2106 motor should be 0.15 mm.
In the initial unheated state, the gaps between the parts in the gas distribution mechanism are maximized, therefore, when the engine is started and for the next few seconds, noise is heard from the impacts of the rocker arms and rods. As the engine warms up, the noise decreases.
Engine valve adjustment
Adjustment is carried out on an unheated engine, the temperature of which is 20-25 ° C. The car must be installed on a flat area, if it is a garage, you need to take care of good lighting.
For work you will need:
- Straight screwdriver;
- Set of wrenches;
- A key that could turn the shaft;
- A feeler gauge that serves as a measuring device to control the determination of the correct clearance value.
The procedure for adjusting valves VAZ 2106
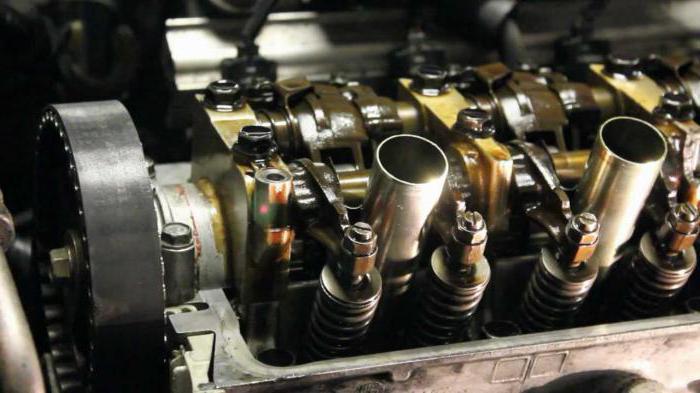
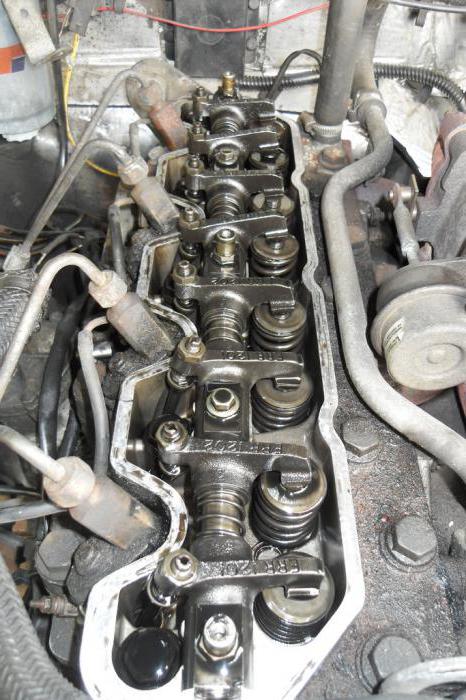
1. At the very beginning, the gas distribution mechanism is disassembled - these actions will open access to setting and adjusting parts. For this purpose, the air filter is removed.
2. The next step is to remove the valve cover, which will allow you to see the camshaft housing and other internal parts.
3. The crankshaft is rotated so that the pulley and cover marks match front oil seal. When the shaft is in this position, the compression stroke begins in the fourth cylinder.
4. The gap is checked: for this, a 0.15 mm probe is used, the entry of which must be accompanied by a certain force. Gap adjustment is required if the probe passes too easily into the gap, or if it does not pass at all.
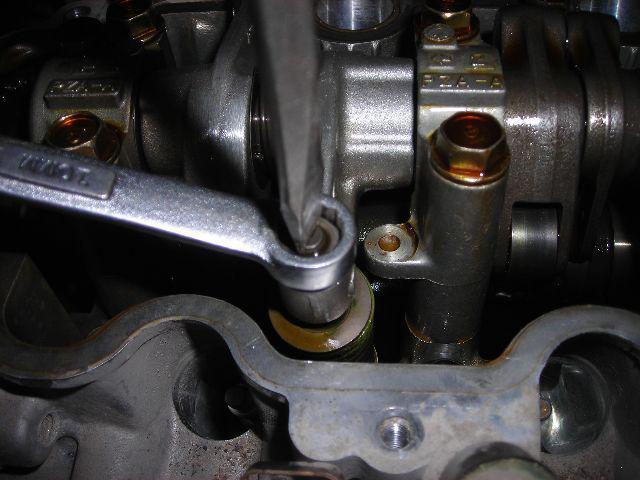
5. Wrench "14" holds the adjusting bolt, and wrench "17" loosens the lock nut. By turning the bolt, the desired clearance is set, the bolt is fixed with a lock nut. After performing these steps, a control measurement is carried out with a probe.
To adjust the valves as correctly as possible, you need to follow certain order actions:
- Valves No. 6 and No. 8 are regulated, the crankshaft is rotated half a turn;
- A similar operation is carried out with valves No. 4 and No. 7, turning the shaft;
- Valves No. 1 and No. 3, shaft rotation;
- At the end, the clearance of valves No. 5 and No. 2 is set.
After these steps, several full turns of the shaft are performed, a control check of the gaps is made with a feeler gauge, and all previously removed parts are assembled.
In fact, we managed to make sure that adjusting with a probe is not particularly difficult, in fact, turns are made with the shaft and the bolts are adjusted. But this method is frankly inaccurate due to the existing wear at the points of contact between the cam and the rocker arm.
The above disadvantage is absent if the gap adjustment is carried out using an indicator and an adjusting rail.
Adjustment of valve clearances using a control rail
1. As in the above case, the vehicle must be parked on a level surface. This second adjustment method will allow you to achieve greater accuracy when performing work. The same tools are used and similar steps are taken to remove the filter.


2. After aligning the marks of the pulley and the stuffing box cover, a rail is installed, which is attached to the camshaft housing with three bolts.

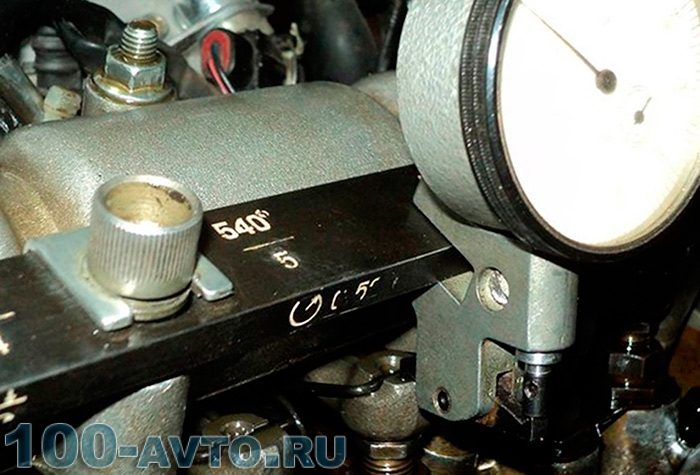
4. The existing clearance is measured and, if necessary, adjusted similarly to the feeler gauge method. The adjustment is carried out according to the scheme considered in the first case.
As a result, properly adjusted valves will reduce fuel consumption, increase engine power, stabilize its operation and reduce noise.
Below you can watch a video on how to independently adjust the valves on the VAZ-2106.
The car engine is equipped with two or more valves per cylinder. One is designed to let the fuel mixture into the cylinder. The other is used to release exhaust gases. In technical terms, they are called "inlet and outlet valves". engine sets the sequence of their opening at a certain moment of the valve timing.
Due to the fact that the car engine, its parts and mechanisms are exposed to high temperatures, installation thermal gaps are provided on the valves of the gas distribution mechanism.
Misalignment and consequences
When the thermal clearance of the valve changes during long-term operation or when individual elements of the system break down, the efficiency of the engine and the life of parts are significantly reduced. This is also accompanied by increased fuel consumption and a characteristic knock in the engine compartment. If, for example, the gap is greater than the norm, the element cannot open completely, and this contributes to a drop in power characteristics. Burning of the valve and its seat is possible in the case of a very small gap. In any case, these faults have a bad effect on the reaction of the engine when you press the accelerator pedal.
Expert advice
In order to encounter this problem less often, it is recommended periodically, approximately every 30,000 km of a car’s run, to check what clearances are on the valves. If necessary, they should be adjusted.
Gap setting
To begin with, there are a few important points during these repairs. Firstly, it is necessary to carry out adjustment only on a cold engine. Secondly, it is worth knowing that for different valves (inlet, outlet) there are different installation dimensions, the same applies to varieties of car brands.
There are also engines that do not need periodic clearance adjustment. This is due to the design of the gas distribution mechanism. The valves are actuated by hydraulic compensators, which, in turn, compensate for the gap using engine oil. At the same time, the service life of those is approximately 60,000 km, it all depends on the manufacturer and driving style. IN this review instructions will be presented in detail on how to adjust the thermal clearances of the valves of VAZ engines and some foreign cars. To carry out this operation, it is additionally recommended to purchase a new valve cover gasket, since after dismantling the cover, oil may leak from the gasket in the future.
The gap is checked with a special measuring probe, the thickness of which must meet the technical requirements of a particular brand of car.
Adjustment process
Basically, the process of installing valves does not differ much depending on the engine and looks about the same.
First you need to bring the piston of the cylinder on which the adjustment will be carried out to top dead center during the compression stroke. At this point, the intake and exhaust valves will be closed and their rocker arms should move radially within the set clearance.
Next, loosen the control nut on the adjustment screw. Install a feeler gauge between the camshaft cam and the valve end, and then use the adjusting screw to set the recommended clearance and lock the screw. At correct installation the control probe should pass in the gap with little effort. If there is even the slightest discrepancy, you need to repeat the setup procedure.
After turning the crankshaft one hundred and eighty degrees, the operation should be repeated on the next cylinder. In this case, it is important to take into account the motor of the car.
Setting the gap on a VAZ "nine" car
The valve clearance of the VAZ-2109 is regulated by selecting and installing special shims. They are placed between the end of the valve and the camshaft cam.
Setting the required clearance is a simple and completely feasible process, but it requires special care and a careful approach to business from the master.
Tool and fixtures
To carry out the work, you must have a number of tools and devices:
- Standard set of keys.
- A set of control probes.
- A set of washers for adjustment.
- Valve squeeze tool.
Directly the process
First remove the valve cover. To do this, first dismantle the air filter housing, breather pipe and throttle cable.
In order to measure the gap between the valves of the cylinders, it is necessary to periodically scroll the crankshaft. And so that it scrolls easily, it is recommended to unscrew all the spark plugs.
Next, remove the protective plastic timing belt cover. Then we scroll the crankshaft clockwise until the alignment marks on the camshaft gear coincide with the mark on the metal cover. It is recommended to turn the crankshaft by the nut of the generator pulley, using the key for seventeen.
After the moment when the marks coincide, it is necessary to rotate the shaft by three more teeth of the timing belt.
After carrying out the preparatory work, you can measure the clearance of the exhaust valve on the first cylinder and the intake valve on the third. The optimum intake valve clearance should be two tenths of a millimeter with a maximum allowable error of five hundredths of a millimeter. And for graduation it is 0.35 mm. When the actual clearances do not correspond to the norm, then using the device, you need to pull out the washer, after lowering the piston to the bottom dead center.
Next, the thickness of the required washer for installation is determined. From the measured value, you need to subtract the value of the recommended clearance, and add the size of the washer to the result. All washers are laser marked with the value of its thickness. In the event that for some reason the marking is poorly visible, a micrometer should be used.
What valve clearance should be set when adjusting is indicated in the car.
In the future, with each revolution of the crankshaft one hundred and eighty degrees, the clearance value is measured: the fifth and second exhaust and intake valves, the eighth and sixth exhaust and intake, the fourth and seventh, respectively. After installing washers of the required size, the gap size is checked again.
Valve clearance adjustment on imported vehicles
Timely installation of the correct gap size is also necessary for imported car engines. As a rule, the adjustment process differs little from carrying out these operations on domestic engines. So, for example, on Honda cars, valve clearances can be set by hand, without the help of a specialist, using only a screwdriver and a wrench. As an exception, several rare power units of the manufacturer can be named, in which a hydraulic compensation system is used (C32A engines). In the rest of the engines of various series (B16-18-20; D13-14-15-16-17; R18-20; ZC and others), repairs are carried out quite simply and without the use of additional equipment and equipment.
Renault valve clearances
Before you - detailed instructions on an independent engine "Renault Logan".
We unscrew the bolts securing the air filter housing and remove it. Dismantle the valve cover pipe. We remove the armored wires from the spark plugs and unscrew them one by one. Next, you need to unscrew the bolts and carefully remove it. Then, using a jack, you need to hang out the front of the car and turn on fourth gear. Next, rotate the front wheel until the F mark appears on the camshaft gear. It is important to monitor the valve of the first cylinder. Using a feeler gauge, we check the thermal gap, after loosening the locknut of the set screw. After the gap is set, tighten the locknut and re-measure. After that, we proceed to adjust the second element of the same cylinder.
After the work is done, we carry out control measurements. We turn the crankshaft three hundred and sixty degrees and check the clearances of all valves.
According to technical specifications engine, installation standards have the following indicators:
- Inlet valves - 0.1-0.15 mm.
- Graduation - 0.25-0.3 mm.
In the case of a complete replacement of the exhaust valves, special grinding gaps are provided - 0.2-0.25 mm.
Adjustment procedure on the ZMZ-402 motor
Valve clearances are set in approximately the same way as on other cars.
The first step is to turn the crankshaft clockwise, set the piston of the first cylinder to TDC (compression stroke) and match the pulley and cover marks. In this case, the valves must be closed. First, we adjust the outlet. Its gap should be 0.35-0.4 mm. The intake valve clearance should correspond to 0.4-0.45 mm. After working with the first cylinder, we move on to the second. Don't forget to rotate the crankshaft half a turn.
At the end of the work, we carry out control measurements, if necessary, we make adjustments. Install the valve cover gasket and the valve cover itself. This completes the operation.
Outcome
At proper conduct repair process, the car engine will be more responsive, the characteristic noises from under valve cover and reduce fuel consumption. The resource of the gas distribution mechanism will increase significantly. Also, to prevent damage to the elements of the gas distribution system, it is necessary to monitor the degree of tension of the camshaft drive belt. In this case power unit will last much longer than its lifespan.
So, we figured out how to independently adjust the valves on the car.


