How to take a great group photo. How to photograph a group portrait
To get successful group shots in which all faces are clearly visible, our simple tips and recommendations.
Group portrait: how to take the best shots
- Lighting: make sure the room is well lit. In dark rooms, the camera's flash may produce excessive light.
- Location of people: in order to be seen as a group in a photograph, you must stand close to each other. If you are photographing a wedding or children's day birthday, it is best to highlight the newlyweds or birthdays, (for example, with funny hats or other accessories).
- Creativity: taking off group portrait, think creatively. For example, all participants in the shooting do not have to stand at all; some may crouch, lie down, or even jump.
- How to avoid closed eyes: since blinking is perfectly normal for a human being, you, as a photographer, will need to take several shots. Divide the number of people present by three. For example, if there are nine people in front of you, take three consecutive photos so that you have at least one photo where everyone's eyes are open.
- Communication with people: the photographer must be able to communicate with the people he photographs and give clear instructions. Note that these instructions don't have to be commands, and it's good to let people relax from time to time.
- Shooting time: If you are photographing an event, you should start shooting as early as possible! At the very beginning, all people are still in good mood and are more willing to be photographed. Do not take pictures at noon - it is better to do it in the afternoon. At noon, the sun often blinds and casts unnecessary shadows. In some cases, it may be better to wait until the sun is covered by clouds. If you are photographing in the late afternoon, when the sun is already setting, you need to remember special ones.
- The shoot place: Naturally, the photography location also has great importance. Make sure it's suitable for a group shot. If there are a lot of people in the photo, you can arrange them, for example, on a hillside or on the steps of a staircase.
- Perspective: in many cases, a new perspective helps create a completely new frame, so it's a good idea to take multiple photos of the group from different angles.
I am sure that the reading will be useful not only for wedding photography professionals, but also for all those who want to improve their skills and / or just learn how to competently shoot groups of people on the holiday. In the article, I want to highlight 12 tips so that you can create interesting photos, if numerous eyes of the portrayed are turned on you.
One of the most common types of photography is a group photo.
Such pictures are typical for weddings, travel, for sports, For school activities etc.
In the world every day, people take thousands of photos in which you can see two or more people. However, unfortunately, many of the pictures that I see posted in in social networks on the internet don't cause me any positive emotions leaving me indifferent. To be more precise, such shots often fill the teeth. There are many objective reasons for this disappointment.
Common photo-errors of group portraits can be expressed as follows:
- the views of the portrayed are directed in different directions, because of which the picture loses its “center of gravity”;
- someone at the moment of photographing blinks or closes his eyes;
- parts of the body of someone are visible in the frame, but there is no face, or the head is partially “cut off”;
- people are too far from the camera and they are almost invisible, or vice versa, they are so close to the lens that some of them simply do not fall into the frame, while the photo may be blurry due to a focus error.
Despite such obvious missteps when photographing groups of people, such as wedding photographer I have identified simple tips that will help you improve your professional level in obtaining excellent shots that you will surely be proud of.
And even more so, I consider it unacceptable to commit such flaws at solemn events. Eg, wedding photographer you just have to remember these things.
1. Preparation.
Few people like to wait. So don't test the patience of those you shoot. You just have to be prompt and prepared to take pictures. This means that you should immediately pay attention to the following:
the location of your photoshot;
imagine how you can arrange people;
the camera is ready for combat: uncovered, the correct lens attached, the battery is charged, the flash may have been prepared.
2. Location.
The location chosen for the filming process is important for a number of reasons. For example, for sprinters, the frame of their competition on the treadmill a moment before the start will be characteristic: readiness, tension, endurance. And, you see, the photograph of these runners in front of a brick wall will turn out to be completely meaningless. Another reason for choosing a location is to make sure the background matches the intent of the shot: it shouldn't be distracting. Thus, keep the aesthetics of the background in mind.
Choose a location that meets the conditions for normal shooting, where there is enough light for the shot and where there are no problems with the background. Also avoid backlight, unless, of course, this is the author's creative idea.
3. Continuous shooting.
One of good ways to avoid problems when someone in the group of portrayed turns away / blinks / closes his eyes, is to quickly take several photos of the same scene. I often switch my camera to continuous shooting mode. And I find that the first shot is often useless, but one or two in a given series will certainly be successful.
I also shoot people “before” the moment when I ask them to get together. Since the very moment of preparation is quite interesting. I use this technique even after I give a "light out" and say that "I took everything off, thank you." In the meantime, I press the camera shutter. As a result, I have non-staged shots when the lyuli are natural.
4. "Comfortable" distance.
Try to get as close as possible to your subjects so that, firstly, you maximize the best technical capabilities of your optics, and secondly, so that everyone naturally enters the frame. By getting closer to the subject, the photographer thereby achieves greater detail, which means that the portrait will turn out to be more contrasting and expressive.
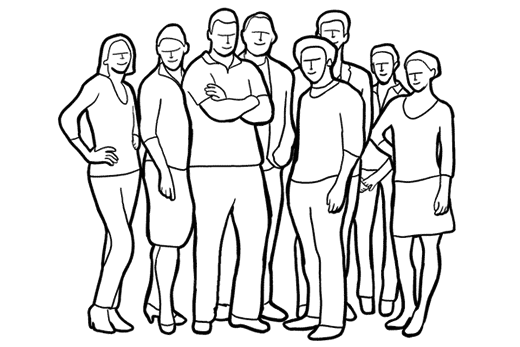
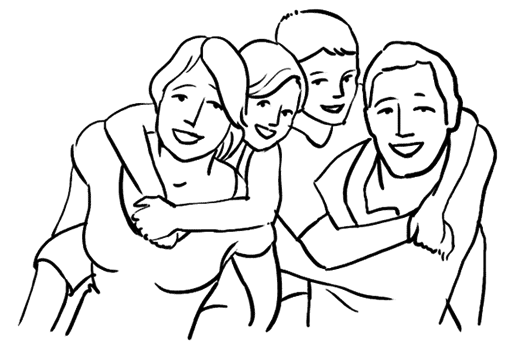
5. Group formation.
The most familiar and correct when forming a group of people filming is the situation in which the taller ones are located behind. But there are other points that can be taken into account for a harmonious frame. The heroes of the occasion (if we are talking about a wedding) are best placed in the center, which will give significance to these figures. In addition, to enhance the effect, you can ask all those present to look at the young, thus. enhance visual attention.
Taller participants in the photo shoot can be placed at the edges, and not just in the background.
Try to minimize the distance between the rows of guests. If they stand in two rows, then between the first and second, if there is a third row and even a fourth, then, respectively, between all of them. This will make it easier to work with aperture, which means it will affect the sharpness of the entire photo, when not only people in the foreground, but also in the background will be in focus.
Ask everyone to raise their chins a little higher than usual, this will visually remove “double chins” in the photo.
6. Timing.
Those participating in the filming process are subconsciously waiting for some signal from the photographer that right now he will press the shutter, and prepare for it: they make noise, take a pose. There comes a moment of calm - a kind of hint to the photographer that most of it is ready, which means it's time! And indeed, this second it is better to make continuous shooting. But I repeat that both “before” and “after” this moment you should not stop taking pictures. Or say out loud: “Oh, something didn’t work out!” Thus, to discourage people, to attract their attention, to surprise, so that emotions change on their faces. And now have time to shoot them until they become again, indignant, and most importantly - do not disperse! This trick works amazingly!
Try, for example, at a wedding to make group portraits before the buffet table, while the guests are still sober.
To get enough detail in your photo, you need to have enough light when taking the photo. Do not neglect the flash, not only in the dark, but also in bright sunlight to remove harsh shadows from faces.
Try to avoid situations in which people squint from excess light, take them into partial shade.
8. Organization.
I know how easy it can be to lose control of a group of people. Sometimes this happens for objective reasons, but sometimes it happens that the photographer himself is slow, late, not sociable, thinks about something else, etc. It is important not to lose contact, to state tasks clearly and in a simple way, to be polite but persistent. Be sure to thank people for their participation with a kind word.
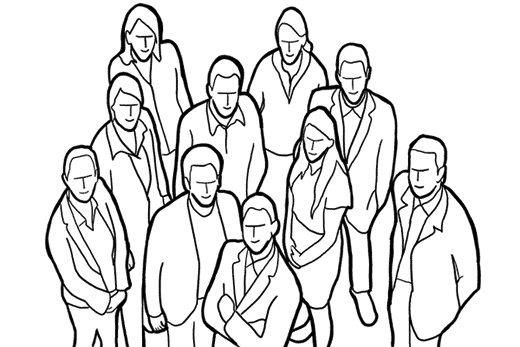
9. For large groups.
In fact, photographing several dozen people at the same time is not an easy task. But often the solution to this problem lies in a different plane, in literally this word. It is worth changing the shooting angle: position yourself on top - climb more high point, stand on a bench, on a parapet, even climb a tree or a ladder. In addition, it gives an unusual perspective to your photo shots, and you can capture a much larger number of people in the frame from a height.
Don't forget to shoot with wide-angle lenses.
10. Use a tripod.
There are a number of reasons why a tripod can be quite useful when photographing people. Firstly, the presence of a tripod in itself informs those present that photography is a serious and responsible matter. And besides, it attracts attention. It's amazing that a professional-looking photography kit can get people respectful of what's going on and mentally prepared to take part in a photo shoot. Secondly, a tripod gives you more freedom, expanding the boundaries of manipulation with shooting modes.
11. Use the services of an assistant.
If you have to organize a large group of people for filming, then an assistant is needed here at the right time.
An assistant is often an indispensable person at a wedding when you have to photograph the relatives of the bride and groom, friends, etc. When you need to organize invitees into different kinship groups for portrait shots. In these cases, I often ask the newlyweds to send one of their relatives as assistants to me, who would be able to quickly, competently and tactfully organize guests for photography without delay. I ask such a person that no one be forgotten and missed. Having a helper from a family member ensures that you, like good wedding photographer, consider everyone. In addition, they listen carefully to the assistant and fulfill his requests with great willingness, since the invitees are familiar with him.
12. Smile!
Yes, you should smile! There is nothing worse than a grumpy, tired photographer. Have fun and enjoy the process of taking pictures and you will see that people will be kind to you in return. I usually come home from a wedding I just worked at with my facial muscles incredibly tired from smiling. I find that in some cases my smiles and joy for the couple help the couple to relax and show their sincere positive emotions. It really works!
Discover the knowledge by reading articles on "Tips for a wedding photographer".
03.11.2010 12817 Feature articles 0
As you know, one of the most common types of photography is “group photography”. Group photos are everywhere, from wedding shots to picnics, parties, sports and school events, and more.
Undoubtedly, thousands of group photos are taken every day around the world - however, unfortunately, many of them, for many reasons, leave even the authors of these pictures in dismay. Most common mistakes while taking group photos are as follows:
- necessarily one or more people look “in the wrong direction” or in different directions (i.e. at different photographers),
- blinking (someone will definitely do it),
- someone is missing from the photo
- different moods in the group (some are smiling, some are serious, some are playing for the camera, etc.),
- the group looks too small or vice versa does not fit into the frame.
While most people continue to face these problems, you can safely use different tricks and increase the chances of getting exactly the picture you need.
1. Preparation
Often unsuccessful shots are the result of the unpreparedness of the photographer himself. People don't like to be kept waiting - so consider the following aspects of filming:
- evaluate the location of the shooting in advance
- decide how you place people - outline the boundaries of the frame
- make sure that no one is covered by the other person's head
- be sure to notify all those who you need in the frame in advance
- make sure your camera is turned on and the batteries are charged, and the settings are set.
2. Terrain
The location where you place the group is important for this type of shoot for many reasons. For novice photographers, this will help convey the semantic content of the photo - for example, a snapshot sports team on the playing field reveals the idea better than a shot of the same team against a stone wall. Another reason for meticulous terrain selection is to prevent details from appearing that could detract from the image itself.
Find a group location with enough light for filming and no distracting details on background. Also prevent the group from being directly in front of a window - as a result, reflected light from the flash will ruin the frame.
3. Use continuous shooting
One of the best ways to avoid the "multi-eye" and blinking of your photos is to shoot continuously. Usually, the first shot is not the best, but the next shots after it will almost always show the group in more relaxed poses, and people look more natural.
Take a few shots before everyone is ready - sometimes staging a group photo can be quite original and more natural, with people advising each other where to stand and what pose to strike. If you have a zoom lens, alternate shots at wide focal lengths with tighter edges.
4. Shooting "close"
Try to shoot the group as close as possible (while being careful not to cut off the extreme "models" from the frame). The closer you can shoot, the more details you can see in the faces - this is what really enhances the quality of the frame.
If your group is small, get close and take a couple of shots up to face and shoulder level. Effective method- ask the whole group to tilt their heads so that you can come closer to them. Another option is to move people from one line and mix positions, placing them closer or further away.
5. Composing
In most cases, your band will be able to naturally create the desired composition (we all did it once). Tall people will recede into the background, short ones - to the fore. But there is something else that can be added to the composition:
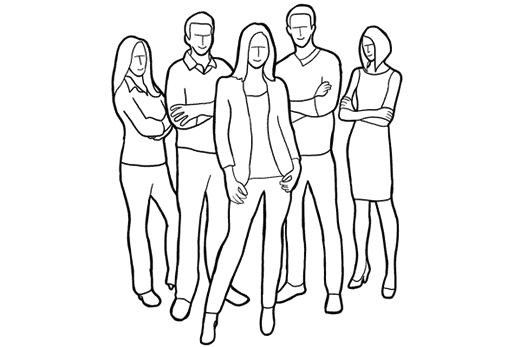
- if the production is centered around several main characters (wedding, birthday), identify them at the central focal point, placing them in the center of the entire group (you can diversify the frame by first focusing the views of the entire group on the lens, and then on the main characters)
- for formal shots, place taller participants not only in the background, but also so that they are centered, and on both sides of them place lower participants try not to “deepen” the group (i.e. keep a minimum distance between the back and front lines ). This will help keep everyone in focus. If, nevertheless, the arrangement turned out to be “deep”, adjust the aperture settings
- ask everyone to raise their chins - after filming you will be thanked for shots without double chins
6. Determining the right time to shoot
Choose your shooting time carefully. Try to choose a moment that matches the event. It is best to shoot when the group is already well rallied or when there is a moment of calm in communication.
It's also best to shoot at the start of the event, as everyone is just getting ready and looking their best. If possible, make sure that people who are under the strong influence of alcohol do not get into the frame.

7. Consider lighting
In order to get as much detail as possible in the picture, you need the perfect light. How you achieve this will depend on the situation, but remember to use flash and shoot up close to get the effect you want, especially if the group is small enough to main source light comes from behind the group.
If you're shooting on a clear sunny day and the sun is low, consider the direction of the shadow so you don't end up with a collection of shots with lopsided expressions on faces.
8. Control the process
Often there are situations when the photographer loses control over what happens to the participants. Chat with the group. It is very important to talk to people. It is important that they understand what is wanted from them, make them laugh, repeat that they look great and continue the dialogue throughout the filming. Remind people why they need to take a group photo. For example, during a wedding shoot, you can motivate guests with the following phrase: “(name of the newlyweds) asked me to take some group photos.” Or at a sporting event "let's take a group photo in honor of our victory." When you name a reason, people are more willing to pose and be filmed.
Another technique that can be used in group shooting is “if you see the camera, then it will see you too.” This is the key to success if you want every person to look into the lens.
If you are not the only photographer at the event, wait until the others have finished filming and then draw the attention of the whole group to yourself, otherwise everyone will look in different directions.
However, you shouldn't act like a dictator while filming or you'll end up with a mountain of shots of very angry people. Good photographer it should be a good psychologist who knows how to get attention, how to communicate, but especially to make sure people feel relaxed and like they're having fun.
9. For large groups
Shooting large groups can be just as challenging as shooting restless models. Arranging everyone by height, you will still come to the conclusion that you will not be able to please everyone. The solution may only be the option to "rise" on something to take a picture from above. By applying this move, you will fit many more people into the frame, and yet there will be a lot of detail in the frame (you will get a picture in which there will be more faces than bodies). It also makes it possible to get a good angle of the photo - especially if your lens has a good focal length.

10. Use a tripod
There is a long list of reasons why you should use a tripod when taking group photos. Firstly, a tripod immediately tells others that you are serious about what you are doing and can even help attract attention (you have no idea how impressive the arrangement of equipment can look). Secondly, for you, as a photographer, this is an opportunity to more freely and more enthusiastically join the process of setting up a group. Set the camera on a tripod so that it is ready to shoot at any moment (make all the necessary settings), and after you work with the group, you can just capture the moment you need (while the group is still full of energy and not tired of the process ).
11. Get yourself an assistant
An assistant will come in handy when organizing filming, as well as possible, especially when it comes to very big group. Especially the benefits will be felt during continuous shooting (like during a wedding, when you shoot different variants family photos). In such cases, you can ask the newlyweds to provide assistance with a family member or friend who has a list of invited guests, divided into groups to make it easier to photograph. The assistant helps to determine whether everyone who should be in the frame. If you have a family member helping you, he will not only tell you if everything is in the frame, but he will also be able to organize the arrangement process more efficiently, since he knows the guests well.
12. Smile
Yes, you should smile too! There is nothing worse than an irritable photographer. Have fun and enjoy the filming process and you will see people follow your example. Usually after shooting a wedding, I come home with a terrible pain in the facial muscles, because The best way to relax the couple and her family - to smile at them. It really works.
Now let's talk about group photography.
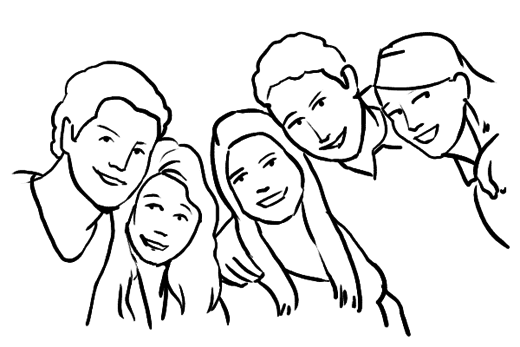
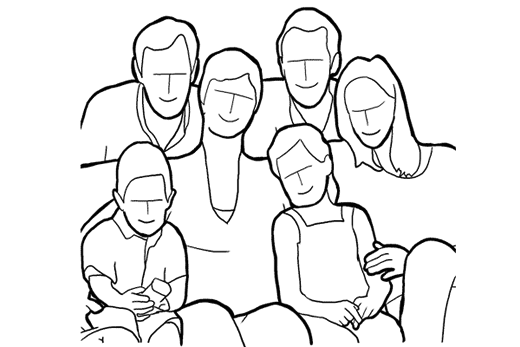
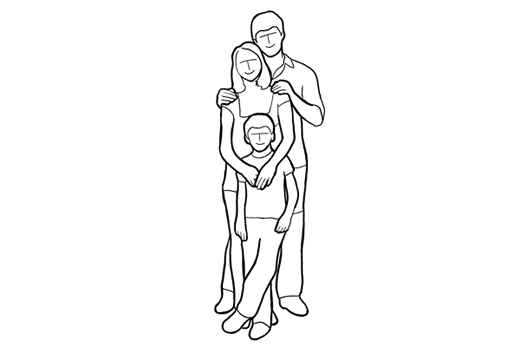
Generally, there are three types of group photography. The first type - is official photos with a large number of participants. The second one is more informal shots of friends. And finally, the third type is a family photo. Let's look at ideas and poses for photo shoots in that order.
1. When working with large groups of people, you do not have the ability to control the posture or facial expression of each individual person. There is nothing to worry about, as long as you pay enough attention to the overall composition. Think of the whole group as a single entity. Make sure that all participants are clearly visible.
2. Often in a group photo session, the only possible composition that allows you to fit everyone into the frame is a shot in full height. Usually this official photo on which is imprinted an important event, so your main goal will be to make sure that all participants are visible.
3. If possible, try to take the photo from a low altitude. You can go out to the balcony or climb into the car. The effort will definitely pay off, because instead of a standard group shot, you will get a photo with an interesting and non-standard composition.

4.
In some situations, people standing alone look more advantageous in the frame than a crowded company. Perhaps this is not the best option for a friendly photo, but it is perfect for a team shot, for example, musical group or people working together on a project. If the team has a clearly identified leader, place him or her on foreground for a more expressive composition.
5. This is a pretty standard version of a photo of a group of friends. Yes, it's simple and a little run-of-the-mill, but it works. So why not?

6.
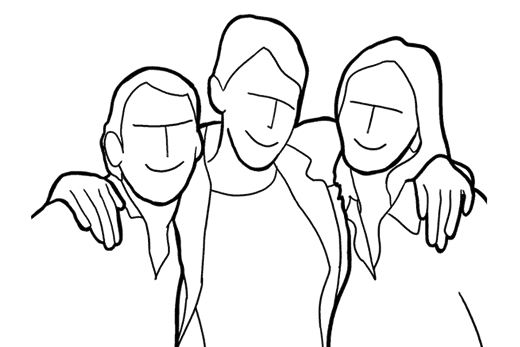
This funny composition will perfectly convey friendly relations between the participants in the picture. Ask people to stand closer and tilt their heads slightly towards each other and towards the camera.

7.
Ask the participants of the photo shoot to lie in a circle with their heads in the center, on the grass, on fresh air or indoors. Shoot from above.


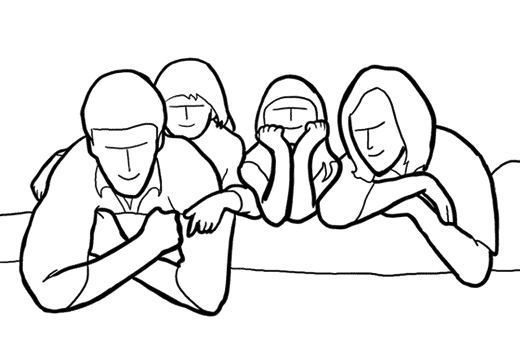
8.
Very simple and winning way place a small group of people in the frame. Select the "group leader" and place him or her in front. The rest of the participants must join one at a time. Each of them should look into the camera from behind the previous one. Ask them to lean on the participant in front, this will add to the picture of soulfulness.


9.
Variant of the previous pose. Place the leader forward and the rest of the participants so that they peek out from behind each other. Try experimenting with depth of field, and then choose which shots you like best - those where the focus is only on the leader or on all participants.


10.
A very fun way to capture a group of friends. For best result ask the models to jump up after a short run.


11.
very profitable and interesting composition for a group of people standing in a row. Make sure you can see everyone clearly and shoot up close with a wide aperture and focus on the first person in the row. Indeed, distant participants will look blurry, but they will not be offended, as the result will be a very interesting and unusual group photo.


12.
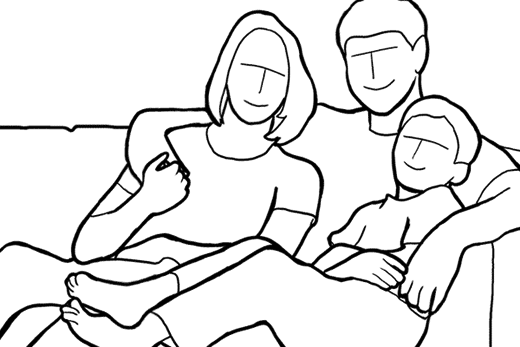
To continue, let's look at examples of family photography. The most common location for taking a family photo is the sofa in the living room. It's not the most creative idea for a family photo, but it works great. The easiest way to diversify this standard composition is to trim it tightly around the edges. There is no need to make your favorite sofa and furniture in the living room full-fledged participants in the frame. Let the family members be in the photo, and only they.

13.
Here's another great idea for a family photo - get out in the fresh air. Sit on the front lawn, in the park or on the beach - all these places will serve as a great backdrop. Most importantly, do not forget that you should not photograph sitting people while standing. Crouch and shoot from their level.


14.
Family members sat comfortably side by side. Ask them to rise a little, leaning on their elbows. Shoot from a lower angle.


15.
Very nice composition for a family photo. The shot can be taken both outdoors and at home on the bed. Looks equally good with any number of children.


16.
A cozy pose, the family comfortably settled on their favorite sofa.

17.
For an interesting and unusual shot, you should diversify the photo on the couch a little. Just take a photo from the back of the sofa and you will see that the frame looks completely new.


18.
Option photo from the back of the sofa.

19.
Very beautiful option family photo. Ask parents to ride their children on their backs.

20.
A very simple pose for a full length shot. Equally well suited for any number of people.

21.
Add a shot of a family holding hands while walking outdoors to the photo shoot. Take a series of shots and choose the photo with the best position of the legs. Use AF tracking to capture this shot.


In conclusion: be original and try to diversify these poses with your own ideas. Think about how to adapt one or another standard pose to the location and scenario of your shooting. Use our ideas runway for your own creativity!
It is quite difficult to learn how to take good pictures if you do not know the basics and main terms and concepts in photography. Therefore, the purpose of this article is to give a general understanding of what photography is, how the camera works and to get acquainted with the basic photographic terms.
Since today, film photography has already become mostly history, we will continue to talk about digital photography. Although 90% of all terminology is unchanged, the principles of obtaining a photograph are the same.
How a photo is taken
The term photography means drawing with light. In fact, the camera captures the light entering through the lens onto the matrix and, based on this light, an image is formed. The mechanism of how an image is obtained on the basis of light is quite complex and a lot has been written on this topic. scientific papers. By and large, detailed knowledge of this process is not so necessary.
How does image formation take place?
Passing through the lens, the light enters the photosensitive element, which fixes it. In digital cameras, this element is the matrix. The matrix is initially closed from light by a shutter (camera shutter), which, when the shutter button is pressed, is removed for a certain time (shutter speed), allowing the light to act on the matrix during this time.
The result, that is, the photograph itself, directly depends on the amount of light that hit the matrix.
Photography is the fixation of light on the matrix of the camera
Types of digital cameras
By and large, there are 2 main types of cameras.
SLR (DSLR) and without mirror. The main difference between them is that in a SLR camera, through the mirror installed in the body, you see the image in the viewfinder directly through the lens.
That is, "what I see, I shoot."
In modern ones without mirrors, 2 tricks are used for this
- The viewfinder is optical and is located away from the lens. When shooting, you need to make a small correction for the shift of the viewfinder relative to the lens. Commonly used on "soap dishes"
- Electronic viewfinder. The simplest example is transferring an image directly to the camera display. Usually used on point-and-shoot cameras, but in SLR cameras this mode is often used in conjunction with optical and is called Live View.

How the camera works
Consider the operation of a SLR camera as the most popular option for those who really want to achieve something in photography.
SLR camera consists of a body (usually - "carcass", "body" - from the English body) and a lens ("glass", "lens").
Inside the body of a digital camera is a matrix that captures the image.

Pay attention to the diagram above. When you look through the viewfinder, light passes through the lens, reflects off the mirror, then refracts in the prism and enters the viewfinder. This way you see through the lens what you are going to shoot. At the moment when you press the shutter button, the mirror rises, the shutter opens, the light hits the matrix and is fixed. Thus, a photograph is obtained.
Now let's move on to the main terms.
Pixel and megapixel
Let's start with the term "new digital age". It belongs more to the computer field than to photography, but it is important nonetheless.
Any digital image is created from small dots called pixels. In digital photography, the number of pixels in the image is equal to the number of pixels on the camera's matrix. Actually the matrix also consists of pixels.
If you magnify any digital image many times over, you will notice that the image consists of small squares - these are pixels.
A megapixel is 1 million pixels. Accordingly, the more megapixels in the camera's matrix, the more pixels the image consists of.

If you zoom in on the photo, you can see the pixels.
What gives a large number of pixels? Everything is simple. Imagine that you are painting a picture not with strokes, but with dots. Can you draw a circle if you only have 10 points? It may be possible to do this, but most likely the circle will be "angular". The more dots, the more detailed and accurate the image will be.
But here lies two catch, successfully exploited by marketers. Firstly, megapixels alone are not enough to get high-quality pictures, for this you still need a high-quality lens. Secondly, a large number of megapixels is important for printing photos in big size. For example, for a poster in the entire wall. When viewing a picture on a monitor screen, especially reduced to fit the screen, you will not see the difference between 3 or 10 megapixels for a simple reason.
A monitor screen will usually fit a lot fewer pixels than your image contains. That is, on the screen, when compressing a photo to the size of a screen or less, you lose most of your “megapixels”. And a 10 megapixel photo will turn into a 1 megapixel one.
Shutter and exposure
The shutter is what covers the camera's sensor from light until you press the shutter button.
Shutter speed is the amount of time the shutter opens and the mirror rises. The slower the shutter speed, the less light will hit the matrix. The longer the exposure time, the more light.
On a bright sunny day, to get enough light on the sensor, you need a very fast shutter speed - for example, as little as 1/1000 of a second. At night, it may take a few seconds or even minutes to get enough light.
Exposure is specified in fractions of a second or in seconds. For example 1/60sec.

Diaphragm
Aperture is a multi-blade baffle located inside the lens. It can be completely open or closed so that there is only a small hole for light.
The aperture also serves to limit the amount of light that eventually reaches the lens matrix. That is, shutter speed and aperture perform the same task - regulating the flow of light entering the matrix. Why use exactly two elements?
Strictly speaking, the diaphragm is not a required element. For example, in cheap soap dishes and cameras of mobile devices, it is absent as a class. But the aperture is extremely important to achieve certain effects associated with depth of field, which will be discussed later.
Aperture is denoted by the letter f followed by a fraction followed by the aperture number, for example, f / 2.8. How less number, the more open the petals and the wider the hole.

ISO sensitivity
Roughly speaking, this is the sensitivity of the matrix to light. The higher the ISO, the more sensitive the sensor is to light. For example, in order to get a good shot at ISO 100, you need a certain amount of light. But if there is little light, you can set ISO 1600, the matrix will become more sensitive and you will need several times less light for a good result.
What would seem to be the problem? Why make a different ISO when you can make the maximum? There are several reasons. Firstly, if there is a lot of light. For example, in winter, on a bright sunny day, when there is only snow all around, we will have the task of limiting a colossal amount of light and a large ISO will only interfere. Secondly (and this main reason) - the appearance of "digital noise".
Noise is the scourge of the digital matrix, which manifests itself in the appearance of "grain" in the photo. The higher the ISO, the more noise, the worse the quality of the photo.
Therefore, the amount of noise at high ISO is one of the most important indicators of the quality of the matrix and the subject of continuous improvement.

In principle, the noise performance at high ISO in modern DSLRs, especially the top class, is quite good level but still far from ideal.
Due to technological features, the amount of noise depends on the actual, physical dimensions of the matrix and the dimensions of the matrix pixels. The smaller the matrix and the more megapixels, the higher the noise.
Therefore, the "cropped" matrices of cameras of mobile devices and compact "soap dishes" will always make much more noise than professional DSLRs.
Exposure and Expopara
Having become acquainted with the concepts - shutter speed, aperture and sensitivity, let's move on to the most important thing.
Exposure is a key concept in photography. Without understanding what exposure is, you are unlikely to learn how to photograph well.
Formally, exposure is the amount of exposure to a photosensitive sensor. Roughly speaking - the amount of light that hit the matrix.
Your picture will depend on this:
- If it turned out too light, then the image is overexposed, too much light got on the matrix and you “lit up” the frame.
- If the picture is too dark, the image is underexposed, you need more light on the matrix.
- Not too light, not too dark means the exposure is right.

From left to right - overexposed, underexposed and properly exposed
Exposure is formed by selecting a combination of shutter speed and aperture, which is also called "expopara". The task of the photographer is to choose a combination so as to provide the necessary amount of light to create an image on the matrix.
In this case, the sensitivity of the matrix must be taken into account - the higher the ISO, the lower the exposure should be.
focus point
The focus point, or simply the focus, is the point that you have "sharpened". To focus the lens on an object means to choose the focus in such a way that this object turns out to be as sharp as possible.
Modern cameras usually use autofocus, a complex system that allows you to automatically focus on a selected point. But the principle of autofocus depends on many parameters, such as lighting. In poor lighting, autofocus may miss or fail to do its job at all. Then you have to switch to manual focusing and rely on your own eyes.

Eye focus
The point on which autofocus will focus is visible in the viewfinder. Usually it is a small red dot. Initially, it is in the center, but on SLR cameras, you can choose a different point for a better frame composition.
Focal length
Focal length is one of the characteristics of a lens. Formally, this characteristic shows the distance from the optical center of the lens to the matrix, where a sharp image of the object is formed. Focal length is measured in millimeters.

More important physical definition focal length, and what is the practical effect. Everything is simple here. The longer the focal length, the more the lens "brings" the object. And the smaller the "angle of view" of the lens.
- Lenses with a short focal length are called wide-angle ("width") - they do not "zoom in" anything, but they capture a large angle of view.
- Lenses with a long focal length are called long-focal lenses, or telephoto lenses ("telephoto").
- are called "fixes". And if you can change the focal length, then this is a “zoom lens”, or, more simply, a zoom lens.
The zooming process is the process of changing the focal length of the lens.
Depth of field or DOF
Another important concept in photography is the depth of field - the depth of the sharply depicted space. This is the area behind and in front of the focus point where objects in the frame look sharp.
With a shallow depth of field, objects will be blurred already a few centimeters or even millimeters from the focus point.
With a large depth of field, objects at a distance of tens and hundreds of meters from the focus point can be sharp.


Depth of field depends on the aperture value, focal length and distance to the focus point.
You can read more about what determines the depth of field in the article ""
Aperture
Luminosity is throughput lens. In other words, this is the maximum amount of light that the lens is able to pass to the matrix. The larger the aperture, the better and the more expensive the lens.
Aperture depends on three components - the minimum possible aperture, focal length, as well as the quality of the optics itself and the optical design of the lens. Actually, the quality of optics and the optical design just affect the price.
Let's not go into physics. We can say that the aperture ratio of the lens is expressed by the ratio of the maximum open aperture to the focal length. Usually, it is the aperture ratio that manufacturers indicate on lenses as a number 1:1.2, 1:1.4, 1:1.8, 1:2.8, 1:5.6, etc.
The larger the ratio, the greater the luminosity. Accordingly, in this case, the lens 1: 1.2 will be the most aperture

Carl Zeiss Planar 50mm f/0.7 is one of the fastest lenses in the world
The choice of lens for aperture should be treated wisely. Since aperture is dependent on aperture, a fast lens at its minimum aperture will have a very shallow depth of field. Therefore, there is a chance that you will never use f / 1.2, because you simply will not be able to properly focus.
Dynamic Range
The concept of dynamic range is also very important, although it doesn't come up very often. Dynamic range is the ability of a matrix to transmit both bright and dark areas of an image without loss.
You probably noticed that if you try to remove the window while in the center of the room, then the picture will show two options:
- The wall on which the window is located will turn out well, and the window itself will be just a white spot
- The view from the window will be clearly visible, but the wall around the window will turn into a black spot
This is due to the very large dynamic range of such a scene. The difference in brightness between inside the room and outside the window is too big for a digital camera to capture in its entirety.
Another example of a large dynamic range is landscape. If the sky is bright and the bottom is dark enough, then either the sky in the picture will be white or the bottom is black.

A typical example of a high dynamic range scene
We see everything normally, because the dynamic range perceived by the human eye is much wider than that perceived by camera matrices.
Bracketing and exposure compensation
There is another concept associated with exposure - bracketing. Bracketing is the sequential shooting of several frames with different exposures.
The so-called automatic bracketing is usually used. You give the camera the number of frames and the exposure offset in steps (stops).
Most often three frames are used. Let's say we want to take 3 frames at a 0.3 stop offset (EV). In this case, the camera will first take one frame with the specified exposure value, then with an exposure shifted by -0.3 stops, and a frame with a shift of +0.3 stops.
As a result, you will get three frames - underexposed, overexposed and normally exposed.
Bracketing can be used to more accurately match exposure settings. For example, you are not sure that you have chosen the correct exposure, shoot a series with bracketing, look at the result and understand in which direction you need to change the exposure, up or down.

Example shot with exposure compensation at -2EV and +2EV
Then you can use exposure compensation. That is, you set it on the camera in the same way - take a frame with exposure compensation of +0.3 stops and press the shutter button.
The camera takes the current exposure value, adds 0.3 stops to it and takes a picture.
Exposure compensation can be very handy for quick adjustments when you have no time to think about what needs to be changed - shutter speed, aperture or sensitivity in order to get the correct exposure and make the picture brighter or darker.
Crop factor and full frame sensor
This concept came to life along with digital photography.
Full-frame is considered to be the physical size of the matrix, equal to the size of a 35mm frame on film. In view of the desire for compactness and the cost of manufacturing a matrix, “cropped” matrices are installed in mobile devices, soap dishes and non-professional DSLRs, that is, reduced in size relative to full-frame.
Based on this, a full-frame matrix has a crop factor equal to 1. The larger the crop factor, the smaller the area of the matrix relative to the full frame. For example, with a crop factor of 2, the matrix will be half as large.

A lens designed for a full frame, on a cropped matrix, will capture only part of the image
What is the disadvantage of a cropped matrix? Firstly, the smaller the matrix size, the higher the noise. Secondly, 90% of the lenses produced over the decades of the existence of photography are designed for the size of a full frame. Thus, the lens "transmits" the image based on the full size of the frame, but the small cropped sensor perceives only a part of this image.
white balance
Another characteristic that appeared with the advent of digital photography. White balance is the process of adjusting the colors of an image to produce natural tones. Wherein Starting point serves as pure white.
With the right white balance - the white color in the photo (for example, paper) looks really white, and not bluish or yellowish.
The white balance depends on the type of light source. For the sun he is one, for cloudy weather another, for electric lighting third.
Usually beginners shoot on automatic white balance. This is convenient, since the camera itself chooses the desired value.

But unfortunately, automation is not always so smart. Therefore, pros often set the white balance manually, using a sheet of white paper or another object that has a white color or as close to it as possible.
Another way is to correct the white balance on the computer after the picture has been taken. But for this it is highly desirable to shoot in RAW
RAW and JPEG
A digital photograph is a computer file with a set of data from which an image is formed. The most common display file format digital photos— JPEG.
The problem is that JPEG is a so-called lossy compression format.
Let's say we have a beautiful sunset sky, in which there are a thousand semitones of various stripes. If we try to save all the variety of shades, the file size will be simply huge.
Therefore, when saved, JPEG throws out “extra” shades. Roughly speaking, if there is Blue colour, slightly more blue, and slightly less blue, then the JPEG will leave only one of them. The more “compressed” a Jpeg is, the smaller its size, but the less colors and image details it conveys.
RAW is a "raw" data set fixed by the camera's matrix. Formally, this data is not yet an image. This is the raw material for creating an image. Due to the fact that RAW stores a complete set of data, the photographer has a lot more options for processing this image, especially if some kind of "error correction" made at the shooting stage is required.
In fact, when shooting in JPEG, the following happens, the camera transmits “raw data” to the camera’s microprocessor, it processes them according to the algorithms embedded in it “to make it look beautiful”, throws out everything superfluous from its point of view and saves the data in JPEG which you see on the computer as the final image.
Everything would be fine, but if you want to change something, it may turn out that the processor has already thrown out the data you need as unnecessary. This is where RAW comes to the rescue. When you shoot in RAW, the camera simply gives you a set of data, and then do whatever you want with it.
Beginners often bang their foreheads on this - having read that RAW gives the best quality. RAW doesn't provide the best quality on its own - it gives you a lot more ways to get it. best quality during photo processing.

RAW is the raw material - JPEG is the finished result
For example, upload to Lightroom and create your image "manually".
A popular practice is to shoot RAW+Jpeg at the same time, with the camera saving both. JPEG can be used to quickly view material, and if something goes wrong and a serious correction is required, then you have the original data in the form of RAW.
Conclusion
I hope this article will help those who just want to take photography at a more serious level. Perhaps some terms and concepts will seem too complicated for you, but do not be afraid. In fact, everything is very simple.
If you have suggestions and additions to the article - write in the comments.


